

There’s a great joke about an old man showing off an axe that has been in his family for more than 200 years.
The man’s guest is astounded at what good condition the axe is in considering its age, to which he responds, “Well it ought to be. I’ve replaced the head twice and the handle three times since I got it!”
If you want to keep the tools of your trade or hobby in good working order, you can either replace them regularly — which is expensive — or you can perform routine maintenance and extend their lives.
Unless you’re made of money, it should be pretty clear what the better choice is. And for knives, this means learning how to use a good sharpening steel.
In this article, we’ll talk about honing your knives between uses, with a brief look at why you should do it, what tools you’ll need for the job (Yay! More gear!) and how to do the job correctly.
Let’s get to it!
Jump to:
Video Guide: How to Hone Knives Using a Steel
Now that you’ve read the book, perhaps you’ll enjoy the movie? Sure, you’ll know what’s coming next, but it’s still a great story.
Watch as a hone is expertly demonstrated, and get an excellent explanation as to why it needs to be done.
How to Use a Sharpening Steel — Text Description
Well, that’s why we’re all here, isn’t it? Misusing a honing steel can actually damage your knives rather than repair them. To avoid that unfortunate outcome, let’s go through the process of honing step-by-step.
With Hone in Hand

- Grasp the hone in your non-dominant hand and hold it in the air angled slightly away from your body with the tip pointing up.
- Keep your fingers behind the guard.
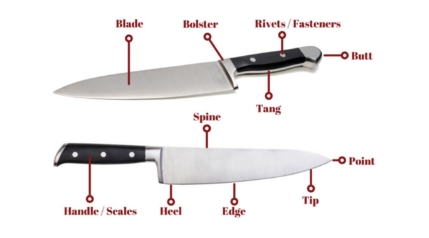
- Grasp the knife in your dominant hand around the bolster (where the handle meets the blade) with your fingers just in front of the
- Bring the heel of the knife (the part of the knife blade furthest from the tip) to the tip of the hone.
- Angle the knife so that the blade edge is meeting the hone at a sharp angle of about 20°, give or take a degree or two. (or 15° for Japanese knives.)
- Applying slight pressure, slide the knife-edge down the hone so that by the time you reach the finger guard, the tip of the blade is against the hone.
- Switch to the other side of the knife and repeat the process.
- Hone each side of the blade 6-10 times each. (Depends on the condition of your blade — you may only need a few passes if you do this after each use.)
- Rinse and dry your blade before using to remove any metal filings you may have created. (Unlikely to happen with steel, but could happen with a ceramic or diamond-coated hone. Worth doing regardless.)
With Hone Anchored to Workbench (Safer!)

- Grasp the hone in your non-dominant hand and hold the hone straight up and down with the tip against a cutting board or tea towel. (You don’t want to damage your counters.)
- Keep your fingers behind the guard. (Still very important!)
- Grasp the knife in your dominant hand around the bolster with your fingers just in front of the handle.
- Bring the heel of the knife (the part of the knife blade furthest from the tip) to the uppermost part of the hone just below the finger guard.
- Angle the knife so that the blade edge meets the hone at an angle of about 20°, (or 15° for Japanese knives) give or take a few degrees.
- Applying just a bit of pressure, slide the knife-edge down the hone so that by the time you reach the tip, the tip of the blade is against the hone.
- Switch to the other side of the knife and repeat the process.
- Hone each side of the blade 6-10 times each. (Again, this will really depend on how often you hone your knives.)
- Again, rinse and dry your blade before you use it to remove any metal filings that may be there. (Unlikely to happen with steel, but could happen with a ceramic or diamond-coated hone. Worth doing regardless.)
What is Honing?
Honing refers to the process of restoring a knife’s edge.
The knife edge can become bent or folded with repeated use, and when that happens, it won’t cut as effectively.
Rather than sharpening the blade, which removes small amounts of metal and shortens the life of the blade, you can use a hone to set the blade right again.
Now, I know this is a site dedicated to outdoor cooking, but the number of pitmasters who aren’t at least mildly obsessed with their knife collection you could probably count on one hand.
We are constantly butchering, trimming, carving and slicing, and for this you need suitable knives for BBQ. But the right kit is useless if it isn’t effective at its job. For our knives to remain so, we have to look after them and the first step toward this is to keep them regularly honed.
What is a Sharpening Steel?
The tool used for honing is often referred to as a “sharpening steel.” This is a bit misleading because you aren’t really sharpening the blade. “Honing steel” is more accurate, but less commonly used.
A typical steel is a long metal rod with a handle at one end. There are also ceramic models and diamond-coated rods. Knife sets sometimes come with one included.
Bring It On Hone
And that’s all there is to it! A honing or sharpening steel belongs in everyone’s kitchen tool and gadget collection, especially if you love to barbecue and have invested in good knives.
Don’t sharpen your knives unnecessarily when you can bring them back to tip-top condition with a few strokes across a honing steel. You’ll save time, effort, and increase the life of your knives!
If you have a friend or relative you’d like to hip to honing, by any and all means, please do share this article with them. Maybe they already have a hone, but they’ve been afraid to use it? (That was my situation.) They’ll be glad for the new knowledge, and you’ll be happy for the nicely carved meat!
There probably aren’t a lot of honing stories out there, but if you got one, we’d love to hear it in the comments below! We’re also happy to take your questions, comments, and criticisms. Let us know what’s on your mind!
If you’re ready to leave us now just click your heels together and say, “There’s no place like hone…” Or, click on another article. Your choice.
Happy grilling!


As a grilling neophyte, I am glad I found your website. I’ve learned a lot in the short time I have been reading.
Thanks.
Thanks, Danny. That’s nice to hear!