In this article, we provide step-by-step instructions on how to clean a gas grill.
Because a clean gas grill is a safe grill, a good-looking grill, and guess what? It produces better food than a dirty grill too!
You will hear many people say when you ask about their dirty grill: “Oh, that’s all flavor that is!”
It’s not, it is old grease and grime. And when it burns after turning on the grill, the smoke produced is acrid and bitter, and it does taint the taste of the food.
While cleaning might be the last thing on your mind after an indulgent meat feast, it’s a skill and practice that every grill master should conquer.
That desired charred finish on your food leaves carbon deposits on all of your grill’s surface areas, even the ones that you cannot see.
Grime, dirt, and bacteria will stick to these deposits and gradually accumulate.
Over time this will result in uneven heating and uneven grilling, which can ruin your grilling experience altogether. And if left for too long, it can ruin a grill completely!
So, whether you’ve left your grill to its own devices for too long and you simply can’t put it off any longer, or you’re a once in a while kinda person, here with our easy-to-follow step-by-step guide we’ll teach you exactly how to clean a gas grill properly.
Jump to:
- 1 Which Gas Grills Does This Guide Apply to?
- 2 How Often Should You Clean Your Gas Grill?
- 3 Before You Start, Consult Your Gas Grills User Manual
- 4 Equipment Needed for Cleaning Your Gas Grill
- 5 Turn Off the Gas Supply
- 6 Cover Your Work Area
- 7 Disassemble your Grill and Remove Any Large Lumps, Flakes, and Dirt
- 8 Cleaning the Interior of Your Gas Grill
- 9 Cleaning the Exterior of Your Grill
- 10 Maintaining Your Grill
- 11 Conclusion
Which Gas Grills Does This Guide Apply to?
Generally speaking, this guide can be applied to all and any gas grills.
Whether full-sized or portable gas grills, liquid propane or natural gas grills, they all have pretty much the same components and should be cleaned the same way.
There can be differences between manufacturers and models, and some may indeed have special components not seen elsewhere, but this guide will be right for over 90% of all gas grills out there.
How Often Should You Clean Your Gas Grill?
While this question might seem like it should have a precise, scientific answer, thankfully, knowing when to clean your grill is quite simple.
If you open the lid and your first thought is ‘ew,’ or if you’re wondering whether you might infect the family (and yes, the mother-in-law counts!), then it definitely needs cleaning.
Another frequent occurrence that is an easy way to know if it needs cleaning is the point at which you notice your grill isn’t heating up as well as it did in its prime. While there could be a more worrying defect with your grill, it’s more than likely that the burners are simply blocked, or the airflow is restricted by grease and grime.
So again, it’s time to get cleaning!
Before You Start, Consult Your Gas Grills User Manual
Taking something apart is easy, but putting it all back together, in the right place or order, is the tricky bit.
This is where your grill manual comes in handy, so you can be confident that everything goes back how it should.
While most grills work the same way, it’s still essential to consult your grill manual to ensure a thorough clean just in case any non-standard parts aren’t covered in this guide.
If you can’t get your hands on your manual, many companies have electronic copies downloadable online, so check the manufacturer’s website or try typing your grill model into a search engine.
If this fails, then take photos as you take your grill apart, so you can see what parts go where and how to put it back together!
Equipment Needed for Cleaning Your Gas Grill
In my experience, whether that be meat and ingredients for recipes, or grills and cleaning products for cleaning, it’s always easier to have a checklist to hand and ensure that everything you need is out and ready to use.
So, here’s everything you need to clean your gas grill:
- Tarpaulin or newspapers for covering work surfaces and floors.
- Bristle-free grill brush.
- A bucket of warm soapy water.
- Sponges and scouring pads.
- Toothpicks, or paper clips (for cleaning burner holes.)
- Metal spatula or grill scraper.
- Glass cleaner (for glass windows only.)
- Stainless steel cleaner (for stainless steel grills only) or a specialist grill cleaner.
Turn Off the Gas Supply
First things first, make sure you turn off the gas supply.
While this might seem like an obvious step, it’s often a forgotten one that’s very important.
So, locate the source of the gas, whether that’s the gas supply valve on a propane tank, or the connection point for natural gas supplied grills, and turn it off before you do anything.
And if in any doubt, as good ol’ Grandpa taught me, “righty tighty, lefty loosey”.
Cover Your Work Area
The next step is to make sure that the area in which you’re planning to clean your grill, or simply place removed grill components, are covered. And this includes the floor too.
Different chemicals react with different surfaces, and the last thing you want to do is get your grill gleaming to only realize that you’ve ruined your favorite garden table or stained the decking area with grease from the grates.
Newspapers or tarpaulin will do here (preferably tarp) as they aren’t easily penetrated by cleaning products.
And one more thing, be sure that any children or Fido are out of harm’s way too.
Disassemble your Grill and Remove Any Large Lumps, Flakes, and Dirt
Before we get any water near your grill components, it pays to remove the bulk of any dirt and debris with a scraper, and a dustpan and brush.
During grilling, grease and carbon build up on the inside lid and the sides, as well as the base of the grill.
As you scrape down the inside the lid and the sides, you might see what looks like flakes of paint coming loose. But don’t worry, this isn’t paint, it is the carbonized grease and smoke that has collected over time.
So, take out all grates, any Flavorizer bars, burner assemblies, drip trays — everything that can be removed — and place them aside for cleaning shortly.
Then with a scraper, go around the inside the lid and the sides, and scrape away at the bottom of the grill to remove as much debris and build up as you can while it’s still dry.
It’s easier to get any dry(ish) bulk out now before we get things wet with soapy water, and will reduce the amount of greasy water leaking out onto the surrounding floor.
Cleaning the Interior of Your Gas Grill
Now to get grubby and down to business…
Rub Down Inside the Lid and Sides
Scrub the inside lid and sides down gently with a scourer and warm soapy water.
Make sure that you start with the lid and work your way down the sides, with the bottom of the grill being the last bit to clean later, otherwise you’ll end up cleaning it twice.
Don’t aim for ‘factory new’ looking here, it is not going to happen. Just make sure any build up is largely removed, so it cannot flake onto your food during regular use.
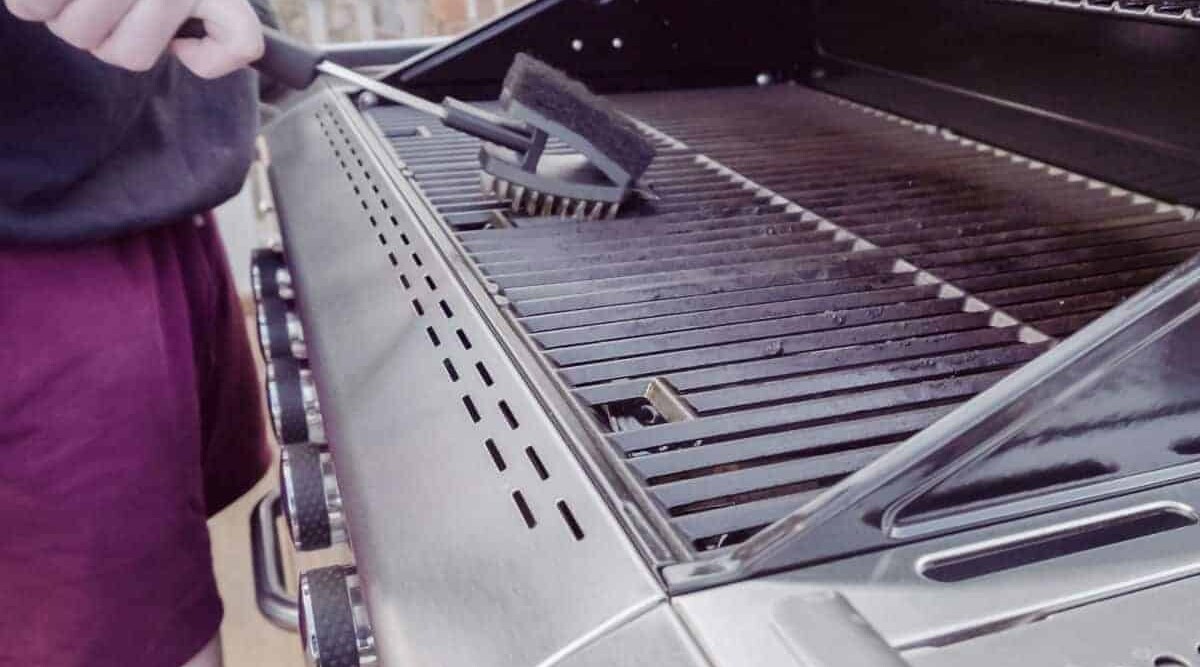
Clean the Grates
Even after just one or two uses, grill grates are going to accumulate food residue. After a season, the grates can be thick with it! So they do need an occasional deep clean.
Most grates will not fit inside your dishwasher, so this will need to be done by hand. But if they do, and they are dishwasher safe, chuck ‘em in and save yourself a bit of time.
If not, then simply scrub both sides with a bristle free grill brush and warm soapy water, and scrub away until they are grime-free and shiny.
Run the brush along the length of the grills rather than across, as this will give you a quicker clean, as well as preventing splattering all over your clothes.
A teaspoon of liquid dish soap for 4 cups of warm water is the ideal solution, and for an even easier clean, invest in a specific grill cleaning brush, which can be bought in most large supermarkets or online.
Clean the Flavorizer Bars
Most grills have some sort of cover over the gas burners, and these are often named Flavorizer Bars, or sometimes heat diffusers, or simply ‘metal plates.’

Before their invention, lava rocks were used instead, which were a nightmare to clean and prone to flare-ups.
Nowadays, the Flavorizer Bars spread the heat more evenly and direct drippings away from the burner tubes. This not only creates more even cooking, but it helps to prevent flare-ups and stops the burners from clogging, so it’s essential to keep these guys clean.
The Flavorizer Bars are the most chastised part of the grill, because not only do they take full whack of the heat, but they also collect all the marinade and drippings so do tend to get and look a bit grim over time.
Again, there’s no secret technique here, just make sure these guys are removed from the grill and then scrub both sides with a scourer and warm soapy water.
Wipe the Burners Clean
Now to the burner tubes.
These should have been adequately covered by the Flavorizer Bars or metal plates described above, so a gentle wipe with a sponge and warm soapy water should be enough.
While wiping them down, check to make sure none of the holes are clogged as this affects the flow of gas, causes uneven heating and inconsistent results from your grill.
So if you see any clogged holes, gently remove the dirt using a toothpick or an opened out paper clip to clear any blocked holes.
If more than just a few holes are blocked, if seriously dirty, caked, and clogged they will need a little extra TLC. Check out our guide to cleaning gas grill burner tubes for more info.
Clean any Drip Pan
Most grills have a grease management system that ends up with a removable grease tray at the bottom of the grill.
You should have taken this out at the start of the process. It is now time to clean it.
It will probably have a thick layer of grease, so use a metal scraper and scrape the thick grease out into a bin.
Once most is removed, give it a good scrub down too with a scourer and warm soapy water.
The water will probably be dirty and full of grease by this stage, so replace it with fresh, clean water and some more liquid dish soap.
Washing dirty, greasy components with dirty, greasy water doesn’t make for a clean grill!
Scrub the Bottom of the Grill
After removing and cleaning all removable parts, it should be easier to reach the bottom of the grill.
And just to repeat myself, you have already done the inside lid and sides, yes? Good.
Now remove any large quantities of grease and build up from the bottom of the grill with a scraper before scrubbing it out with a scourer and warm soapy water.
Reassemble Your Grill and Fire it up
Now that the cleaning is complete, it’s time to reassemble your grill in the reverse order you took it apart, and if you’re not too sure how or get stuck, resort back to your trusted manual or the photos you took.
Each part should slot in place easily, and most grills have ledges and groves that each part rests on. If it doesn’t feel right, it probably isn’t, so don’t force it. Look at that manual.
Once you’re happy all is together correctly, ignite all the burners and run it on its highest heat for 10 to 15 minutes.
This will burn away any residue and water.
Once completed, turn the burners off.
Oil Your Grill Grates
With the grates still warm from drying out the grill in the last step, soak a couple of paper towels in vegetable oil, take your tongs (no hands please!) and rub the towel over your hot grates.
I recommend wearing some good, heat-resistant BBQ gloves to be sure of no burns.
This will help to prevent corrosion and prolong the life of your grates, as well as stop food sticking to them as easily, so is an important step.
Cleaning the Exterior of Your Grill
Before you start to clean the outside, like before, you want to make sure the gas is off again.
Switched off? Let’s get your grill looking brand-new again.
Simply Wash and Rinse With Soapy Water
It’s a good idea to start with fresh warm soapy water again. Otherwise, you’ll get grease smears all over the outside of your grill, and that’s never a good look.
Using a sponge, gently scrub the exterior all over, particularly around the grooves and knobs where grime tends to stick.
If you have any stubborn bits of burnt food or grime, soak it with warm water and cleaning product a few times, 30 seconds or so apart to loosen it.
Do not use a scourer as this will scratch the paintwork or surface.
Once you’ve rubbed it down thoroughly, rinse it with clean water using your garden hose set to a low power setting, and that’s it!
Use Glass and Stainless Cleaner to Polish Such Surfaces
If your grill has any glass windows or stainless steel surfaces, spray with glass or stainless steel cleaner, wipe them with a sponge and wash away with the hose again.
Be sure not to use standard detergents as they can make your grill look dull, or even worse, cause damage.
You’ve gone through this whole process to make your grill look fantastic, so be sure to treat your grill with specific cleaners that are right for the job if they do have glass or stainless steel components.
Maintaining Your Grill
To prevent any severe grime build-ups or damage it’s important to look after your grill and maintain it regularly, particularly if you’re an avid griller!
Some simple maintenance also results in the benefit of not having to clean the grill so often! So…
Oil Your Grates Before and After Use
Be sure to oil the hot grates with vegetable oil before adding any food when grilling, as this prevents food from sticking. As before, use your tongs and oil-soaked paper towel.
After each use and while the grill grates are still hot, clean them with a good grill brush or scraper to remove any grease, drippings, or food. Then oil them again to prevent corrosion between uses.
Regularly Check Your Gas Lines
Be sure to periodically inspect the gas lines at least every season, or monthly if in heavy use.
To do this, simply apply a small amount of soapy water along the line and at the connections using a cloth, and look out for any bubbles that indicate a gas leak.
Perform Occasional High Heat Burn Offs
After every 3 or 4 uses, run the grill on its highest heat for 15 to 20 minutes, lid down without any food inside.
This will burn off any greasy drippings from the Flavorizer bars, the grates and more and help to prevent build-up.
Cover Your Gas Grill Between Use
Be sure to cover your grill in between uses with a cover as this will help to keep it clean and presentable, as well as prolonging its life.
A cover stops dust collecting, insects and even animals getting inside, and just generally protects it from the elements.
A good grill cover might seem like an unnecessary expense, but they more than pay for themselves by lengthening the time between grill replacements.
Conclusion
So now you know how to clean a gas grill.
While some may be slightly different from one another, they all have similar components and follow the same general principles, and as such, the cleaning and maintenance will also be roughly the same.
Some manufacturers have their own advice for their particular grills, which can be found in your manual or online (such as this guide for cleaning Weber gas grills), so be sure to check their guidelines out for model-specific advice.
Do you have any other useful tips or tricks for our readers? Do let us know in the comments below.


0 Comments