They say a good workman never blames his tools, but when it comes to your gas grill, you’ve noticed that your once newsworthy grill goodies are no longer front-page standard.
Your gas grill is just not performing as it once did when you first welcomed it into your home, and now you’re wondering how to clean your gas grill burners to get it back to tip-top condition.
A clean, free-flowing gas grill will deliver constant heat and equal heat flow along the burner, which helps to prevent hot and cold spots while cooking, stops flare-ups, and gives a better finish.
It will also prolong the life of your grill, so there really is no reason not to learn this quick skill.
In this compact guide, we will walk you through, step-by-step, how to clean a gas grill burner, including what equipment you need, and some of our tips and tricks for a better clean.
But just where do you start? With the basics, of course.
Jump to:
What Are Gas Burner Tubes?
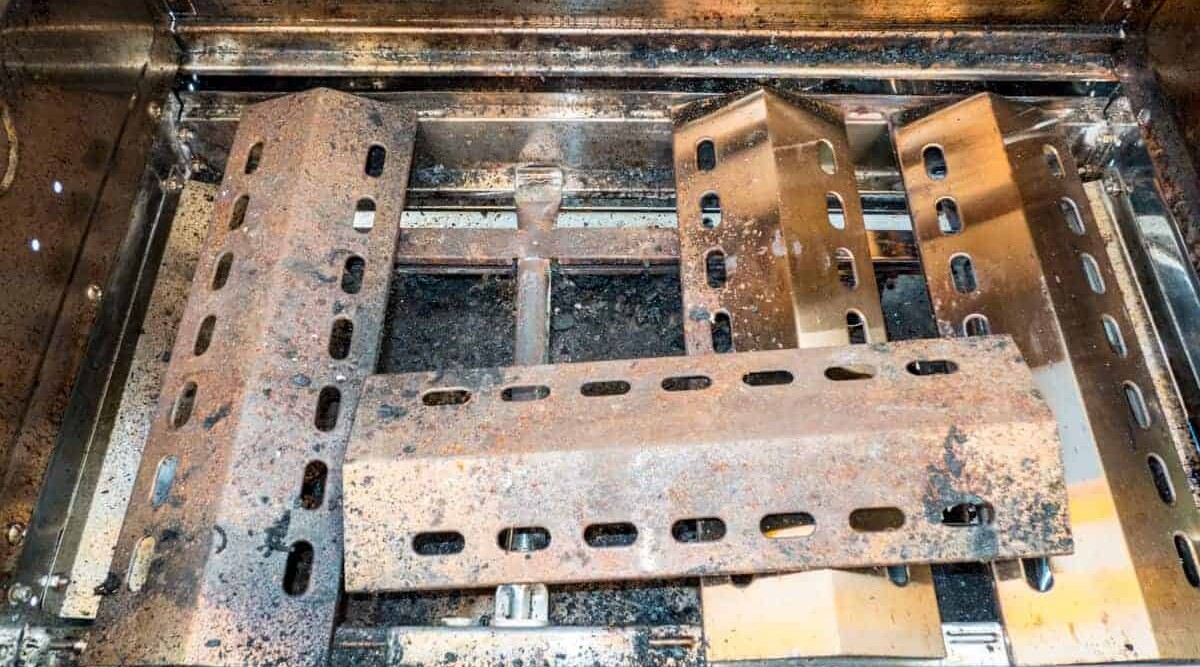
Simply put, a gas burner is a hollow tube with holes in it for the gas to travel along and exit. Whether you own a more common propane gas grill, or a mains connected natural gas grill, they will both have burner tubes.
When ignited, the gas travels along the burners to deliver equal-sized flames across the length of the grill, which allows for constant temperature and an even cook.
It’s this simplicity that makes them a joy to use, but it can also lead to easy blockages if not cleaned regularly.
The process of cleaning the burners will also allow you to check for damage like cracks and rust. Most burners can be replaced, which is more cost-effective than replacing the whole grill.
How to Clean Your Gas Grill Burners — Video Walkthrough
Before we get into our written walkthrough, here is a video showing the basic steps for cleaning gas grill burners:
OK, let’s get into it a bit deeper…
Equipment Needed To Clean Your Grill Burners
- A stiff-bristled nylon brush (wire can damage the burner).
- A small diameter bottle brush.
- A pointed implement such as a toothpick, soft metal pin, or a paper clip.
- A lemon, vinegar or degreaser of choice.
So, let’s get started.
Simple Seven-Step Process to Cleaning Gas Burners
Step 1: Safety First
Make sure to turn off the gas control valves and disconnect the tank. Not only does gas smell terrible, it can also cause you to feel dizzy and faint, and not to mention it only takes a spark to ignite it and cause big problems.
So, cleaning your gas burner outside in a well-ventilated area is always advisable.
Step 2: Read the Owner’s Manual.
Getting it right the first time is better than jumping in feet first, getting it wrong and damaging your burner tubes.
Step 3: Remove the Burner Tubes
There will be a knack to this, such as lifting and pulling or removing retaining clips etc. So make sure you know before you go yanking them out, exactly how to remove the burner tubes for your particular grill.
Step 4: Clean inside the Tube
Once you have removed the gas burners from the grill, you will be able to see inside the tube.
Push a small bottle brush into it and brush out any debris and dust that has found its way inside.
If you choose to blow the dust out instead, just be sure to wear safety glasses, as small pieces of metal and burnt food are no fun in your eyes (we would advise just sticking to the bottle brush method!)
Step 5: Clean the Outside
Take a nylon brush and give the burner a good scrub on the outside to remove any baked-on food or carbon deposits. It’s best to use a softer nylon brush, and not your grill brush, because the nylon brush is softer and less damaging.
You can be heavy-handed with the brush because the bristles are softer than a wire one.
If there is any grease on the outside, feel free to wipe it down with vinegar or lemon juice and a lint-free cloth, and that way, the ports will not become clogged with fluff or paper from hand towels.
Step 6: Unblock all Holes
Now that the bulk of any grease and carbon deposits are gone, we can put the toothpick or paper clip to good use.
Look at each gas port individually, whether they are circular, square, or rectangular, they should be a uniform shape. If they aren’t, they are likely blocked in some way.
Push the pointed end of the toothpick into the hole and clear it out. Whatever you use to clear the hole, make sure it is smaller than the hole itself and of a softer material than the metal. You don’t want to stretch the holes as this will create uneven gas flow and change the dynamic of the grill.
Step 7: Re-assemble Your Grill
Now that you’re happy that the burner is clean both inside and out, and the gas flow is back to maximum efficiency, it is time to put the grill back together again.
This is simply a reversal of the way you took it apart. If you get stuck for whatever reason, consult the manual again, it makes life a lot easier!
Conclusion
Job done. Simple is as simple does. You’re now ready to reconnect the gas tank and check that everything is as it should be.
A test run is a perfect excuse to try one of the many recipes we have on our site.
Let us know in the comments below if you found this helpful, or if you encountered any problems? Either way, we’re grateful for the feedback!
Happy grilling.


0 Comments