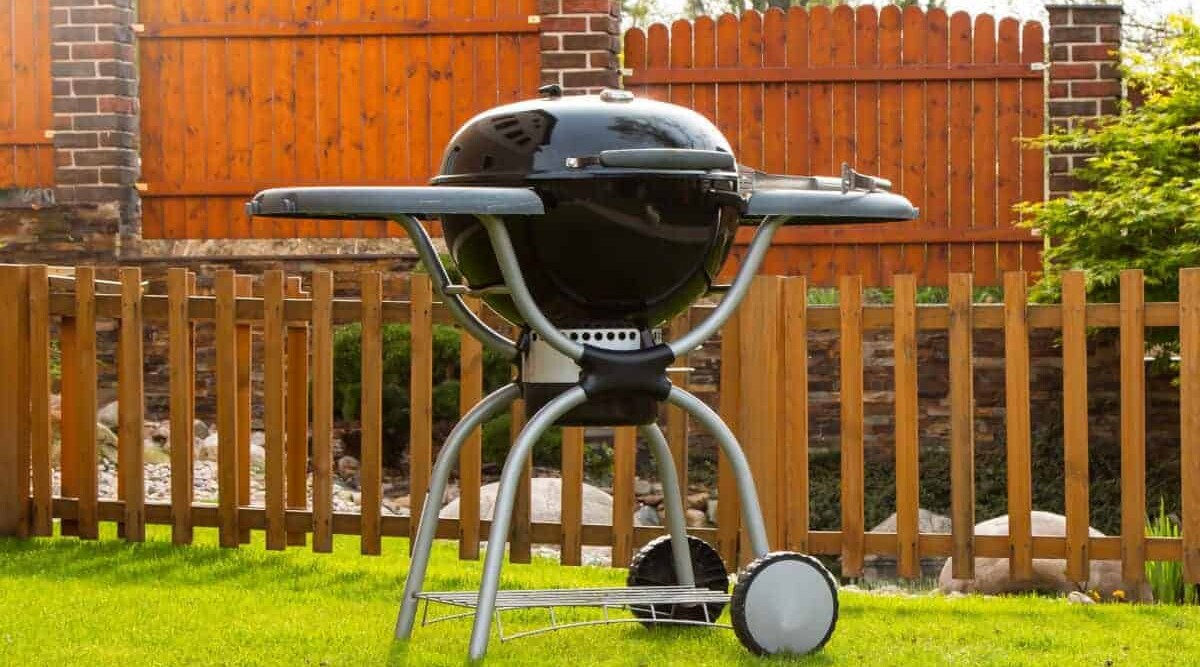
You can’t beat the trusty charcoal grill for that back to the wild taste of home cooking, hunter-gatherer style. Food plus fire plus friends equal a great time!
That is unless you forgot to clean it after last year’s festivities? Because let’s face it, if it’s covered in greasy deposits, burnt-on meat, and moldy veg leftovers, the family would rather use the kitchen or order a takeaway.
How to clean a charcoal grill is an area of expertise that anyone can master.
With no gas rings, fiddly knobs, or awkward nooks and crannies, it’s a job you could even delegate to the kids as part of their chores (now there’s an idea!)
Left uncared for too long, your grill will become laden down with carbon deposits and fat, which will eventually make everything taste of stale cooking fats and ash and will ultimately deteriorate much quicker than it should.
So, now that you’ve pulled it out from the shed and taken the cover off, where do you start? And how do you get it back to its deserved condition?
Well, it’s easy once you’re in the know, so start with this guide, and I’ll teach you everything you need including what tools are required, how to clean it section by section, and how to prevent future issues with preventative maintenance.
So, let’s get started!
Jump to:
- 1 How Often Should You Clean Your Charcoal Grill?
- 2 Equipment Needed for Cleaning Your Charcoal Grill
- 3 Clean it Where You Don’t Mind the Floor Getting Dirty
- 4 Brush Grill Grates — Then Remove and Wash Them
- 5 Empty Out The Ash
- 6 Scrub Lid and Sides
- 7 Clean the Bottom
- 8 You Can Ignore the Charcoal Grate
- 9 Reassemble the Grill
- 10 Oil the Grates to Prevent Corrosion
- 11 Conclusion
How Often Should You Clean Your Charcoal Grill?
If you can’t look at your grill without feeling nauseous or find your other half hurling into the rubbish bin, the obvious answer would be, more often than you have been!
Jokes aside, you’ll be surprised to hear you only need to thoroughly clean your charcoal grill once every grilling season, or maybe twice if it gets some serious, frequent barbecue action.
After every grill session, you should give it a quick clean post-cook while it’s still warm to remove any food residue and carbon deposits, so it’s ready to go for the next session.
And by quickly maintaining it every time it will make the deep cleanse a much simpler job at the end of the season.
Equipment Needed for Cleaning Your Charcoal Grill
As they say, ‘proper planning prevents poor performance,’ so before you have to go rummaging for the right tools with your hands covered in grease and ash deposits, gather these necessary supplies:
- Tarpaulin, newspapers, or old dust sheets for covering the floor.
- Bristle-free grill brush.
- A bucket of warm soapy water — and a barbecue cleaner if you fancy going all out.
- Sponges and scouring pads.
- Metal spatula or grill scraper.
- Tongs and Vegetable Oil — If your charcoal grill is particularly fiddly, then remember to find your manual, or take a photo of it so that you know how to put it back together again once you’ve taken it apart. Though honestly, not many are.
Clean it Where You Don’t Mind the Floor Getting Dirty
Before we get started, take a look at where your grill sits. It probably takes pride of place on that fabulous patio or deck you spent time and money on. That’s not where you want to clean your grill!
If you have some hard standing behind the garage or at the bottom of the garden, take the grill there, if not choose somewhere that won’t be visible if you get a grease stain leftover from the wash down.
When you start to clean the grease off the grill and hose it down, the ash, oil and cleaning products will mix and become a black greasy liquid and wash onto the floor.
So, despite whether you have covers down or not, there is still the possibility of stains from this solution running off or through the covers. So, choose wisely and avoid turning one job into two or three.
Brush Grill Grates — Then Remove and Wash Them
Get your grill going to warm it up, as this makes the cleaning process so much easier!
Next, grab your grill brush and give the grates a good going over while inside to ‘knock off’ the larger baked-on lumpy deposits. If you don’t have a grill brush, you can use a scrunched up ball of aluminum foil about the size of a large apple.
Run the brush lengthwise along the grates, not side to side, as it removes the residue quicker and saves your clothes from spatter.
Now the bigger lumps are gone, take the grates out and give them a proper scrub with the sponge and warm soapy water.
If this is the first clean in a long time, then you may need to use a scourer. And you can check out our further guides on how to clean stainless steel grates, or if you have them how to clean cast iron grates if you want to get them into the best condition possible.
Once they’re clean and shiny, make sure you rinse them thoroughly with fresh water to remove cleaning products. That way your next steak won’t be marinated in soap suds.
Empty Out The Ash
This is as simple as it sounds. All the leftover ash needs emptying into the bin.
If you have an efficient grill that leaves unburned fuel in it when shut down, you can remove this by hand and use it again later. (There are in fact, a few ways to re-use charcoal.)
Empty out the ash catcher if it has one. If not, all the small pieces and ash collected in the bottom of the grill will need to be swept out, with either a vacuum cleaner or a dustpan and brush for ease.
Remove as much of the ash as possible otherwise, the soapy water you’re about to add will just end up creating a disgusting gooey mess that sticks to everything in its path!
But don’t wash it just yet, we have a few more steps before we add water…
Scrub Lid and Sides
When you use your grill, the evaporated fats and oils become airborne and coat the inside the lid and the sides with grease and carbon. These too can be scraped away, but if the sides are painted or enameled, be sure to use a plastic or wooden scraper so as not to chip or scratch them.
You can then use a sponge or a soft scourer to rub the surfaces down gently with warm soapy water to get it looking shiny and new again.
Good practice is to wash it from the top down like you would your car, that way the dirty water washes down and off the bottom. If you do it the other way around that pesky gravity will dirty the bit you’ve just washed, and you’ll have to do it again.
Clean the Bottom
Now that the grate and everything else is spick and span, we can clean out the bottom of the grill.
Just like you cleaned the sides and lid, simply wash the bottom with a sponge and warm soapy water, along with a bit of elbow grease. Remember the baked-on bits and drippings that have fallen all the way to the bottom.
And don’t forget the ash catcher, this will also get greasy, so be sure to give it the same treatment.
You Can Ignore the Charcoal Grate
Down in the bottom of your grill will be a charcoal grate, the grate you set your coals onto.
There is absolutely no need to clean this part of charcoal grills. Even if your grill has sat unused for months, and the charcoal grate is rusty and has looked better, as soon as you light your first fire on it, it will burn any crud away and be fine after.
If you want to, you can scrape away any crud and perhaps rust that accumulated, but honestly, there is no need. I always just let it self-clean during a burn.
Reassemble the Grill
Now that you’ve taken your grill from junkyard fodder to king of the garden, you can put it back together again. This is simply a reversal of how you took it apart.
It should be quite simple to put it back together again. Do not force anything back into place, if it doesn’t go in as easy as it came out, just try wiggling it about a bit to see if it just needs reseating slightly.
But, the brute force method of construction typically ends in tears, so take your time and get it right first time.
Once you are content that everything is as it should be, set up the grill with charcoal and fire it up for 20 minutes or so to burn off any chemical residue.
Oil the Grates to Prevent Corrosion
Once up to temperature, take a paper towel and soak it in vegetable oil, pick it up with your tongs and rub them along the hot grates. Hopefully you’ve already invested in some high-quality heat-resistant BBQ gloves? You should wear these while doing so for safety.
Oiling your grates will not only stop food sticking, so it’s easier to flip, but also prevent corrosion on the grates and keep them in good shape for many more barbecues.
Conclusion
Nice and easy! This cleaning job should take no more than ten or fifteen minutes to complete and needs no overcomplicating.
So now you know how to clean your charcoal grill you can do so more often, which will please your family!
Be sure to brush the grates off while they are still warm, and your life becomes a lot easier.
If you aren’t a fan of chemicals, you can switch out the liquid soap mix for vinegar, lemon juice, baking powder, or a combination of them, and the natural acidity in them will help to break down grease and carbon deposits.
Remember, if you keep your grill outside, be sure to get a waterproof grill cover so that you can protect it against the elements in between uses.
If you know of any tips or tricks for removing stubborn stains and deposits on our grills, please do share them with our readers and us in the comments below.

0 Comments