
There are two schools of brining: dry and wet. In this article, we’re going to go in-depth with dry brining. What is dry brining? How does it work? What is it for? And how can it be enhanced? We’ll answer all these questions and more.
Salt is one of the necessities of life. And not like how we think our barbecues or giant flat screens are necessities. You actually need salt to continue living.
According to scientists (and Wikipedia), we need sodium for the generation of nerve impulses and to balance our electrolytes, among other things.
Yeah, most of us probably get enough salt in our diets to stay out of danger, but why take chances? Let’s learn how this essential mineral can enhance the flavor of our barbecue, and keep us alive and well!
One of the most primal ways to preserve and season meat is by brining it with salt.
Ready to get granular? Let’s go!
Jump to:
What Is Dry Brining?

So as not to get ahead of ourselves, we should explain what dry brining is, and how the process functions.
First off, you might think the term, “dry brining” is an oxymoron. Isn’t brining always wet?
The very word ‘brine’ conjures up thoughts of sea shanties, pirates, and perhaps the Ironborn people of House Greyjoy. (My very first Game of Thrones/Barbecue reference!)
Technically, dry brining is just a salt rub or dry rub variant. You can also call it pre-salting. Not as catchy, but more accurate.
Dry Brining Vs. Wet Brining
We’re about to cover dry brining, but you may also want to learn about wet brining. Surely you’re not surprised we’ve got a piece about that, too?
Click the link to add a splash of flavor to your meat. Literally: Our guide to wet brining.
Why Should I Dry Brine My Meat?
The purpose is mostly the same as with wet brining, to break down the proteins and tenderize the meat while enhancing the natural flavor by seasoning deeper.
By rubbing the meat with salt and letting it sit, the salt works its way into the tissues via osmosis.
Salt draws moisture out of meat. But, by letting it sit, the salt will mix into that moisture, which is then reabsorbed by the tissues. Once inside, it goes about its delicious-making business, and you get tenderizing effects, seasoning, and flavor deep inside the meat, not just on the surface.
As an added bonus, with dry brining there’s no chance of ending up with soggy meat, a potential risk of wet brining, especially with thinner cuts like steaks and pork chops. Plus, brined meat cooks faster. (So keep your eyes on your meat to avoid overcooking!)
Dry brining takes longer than wet brining, unsurprisingly, but it’s a more straightforward process in terms of preparation and equipment.
What Kind of Meat Can You Dry Brine?

Turkey is the prime candidate for brining, but it’s not the only one in the running.
Any meat can benefit from a brining, especially pork, poultry, and fish. But, by all means, try brining your beef and see what you think!
Don’t Use Pre-salted Meat
You can purchase meat that has been pre-salted or pre-seasoned. Adding more salt to salted meat will result in a truly awful meal. Choose only plain, raw meat for brining.
Also, do not brine kosher meat, because it’s already been salted during ritual preparation after slaughter.
What Do I Need To Dry Brine Meat?
While it’s good to seal up your brining meat in a bag or container, larger cuts don’t lend themselves to containment. Fortunately, it isn’t necessary like it is with wet brining, in which the meat has to be submerged.
Here’s everything you’ll need:
- Salt. Of the many types of salt, you should try to use either kosher, or sea (table salt is not preferred for this technique because of the very fine grain)
- Any other seasonings you like
- A mortar and pestle (optional, but useful)
- A container such as a resealable bag or plastic container, or a roasting pan, with or without lid
- Space in your fridge
- Up to a few days lead time
How Much Salt Do I Use For Dry Brining?
General wisdom is to use about ½ teaspoon of salt per-pound of meat.
Using a bit more salt is fine, but you wouldn’t want to use less. This amount should work for either kosher or sea salt.
Beyond Salt: Adding Different Flavors to A Brine

Salt is great for enhancing flavor and tenderizing, but there’s no reason you can’t ramp up the flavor profile a bit. You can easily mix in some of your favorite seasonings and spices to your dry brine mix. Examples include:
- Pepper
- Sage
- Rosemary
- Herbs de Provence
- Cayenne
- Cumin
- Cinnamon
- Brown sugar
Go traditional, or create an exotic blend for a taste of international cuisine. When it comes to seasonings, there’s no limit but your imagination.
How Much Flavoring Should I Use?
You don’t want to overwhelm the meat, nor interfere with the salt process. It doesn’t take a lot of seasoning to make a big difference in flavor.
For large poultry, you might use ¼ teaspoon of each extra ingredient per-pound. For smaller cuts, like chops and steaks, try half that amount.
Dry Brining Turkey Step-by-Step

Turkey is one of the most popular meats for brining. It’s far too easy to cook a dry and tasteless bird, and brining is the simplest way to avoid a Christmas or Thanksgiving disaster.
This is how it’s done:
Step 1: Thaw the Turkey
I’d bet good money you’re starting with a frozen turkey. Well, you should thaw it out before you brine it.
If you’re short of time (thawing a turkey can take days, unless you use cold water immersion) you can dry brine a partially frozen bird, but you’ll get better results if you thaw first.
Step 2: Mix Your Dry Ingredients
Combine your salt of choice and any other seasonings you’re using into a small bowl.
This is when you could opt to grind the mixture with a mortar and pestle to help it penetrate more easily. Otherwise, just set the blend aside for now.
Step 3: Unpack the Turkey
Remove all the packaging and any “bonus” parts found in the cavity (giblets & neck).
Be sure not to leave behind any netting, cages, or pop-up readiness indicators.
Step 4: Prep the Turkey
Pat the turkey dry with paper towels. Next, give the skin a massage, as it were, to loosen it. You want to separate the skin from the breast and the thick, meaty parts of the legs.
Don’t remove the skin; just be sure it’s free from the meat.
Step 5: Season Inside
Take a couple of teaspoons of your brine mix and distribute it around the cavity of the turkey. No need to be too thorough here; just toss it about as best you can.
Step 6: Season Outside
Here’s the essential part! You need to season both the meat and the skin, with the focus being on the meat. This requires getting under the turkey’s skin and rubbing the mix into the flesh.
Concentrate on the meatiest parts, these being the breasts and the thick parts of the legs, to make sure the salt penetrates thoroughly. This is where the bulk of the brine is going to be applied.
The remaining brine (which shouldn’t be that much) can be rubbed into the skin.
Step 7: Refrigerate
If you have a bag large enough to hold the turkey, great, go ahead and use it. It’s ok, however, to just let the turkey rest in a roasting pan in the fridge.
Your minimum brining time should be 1 hour per-pound, but, if you can, leave it there for two or three days for best results.
Every 12 hours or so it’s a good idea to give the turkey a little rub down to help the osmosis process along. If the turkey is bagged, just rub it through the plastic!
Remember to wash your hands after every time you touch the raw turkey.
Step 8: Ready to roast
After the requisite time has passed, you’re ready to cook your turkey! There’s no need for any further seasoning, and you don’t need to pat it dry again.
A Note on Stuffing
If you usually cook your stuffing inside the turkey, don’t do it with a brined bird. You’ll end up with salty, unpleasant stuffing.
How to Dry Brine Steak, Chops, Chickens, and More

Of course, you can dry brine more than just birds!
Anything you’d consider applying a dry rub to will benefit from a dry brine. It’s especially great for “budget” cuts that might otherwise be too tough.
Chicken
For a whole chicken, follow the steps for turkey, but adjust your times and measurements to suit the weight of the bird. Expect to rest the bird and let it brine for 24-36 hours.
For individual chicken cuts, like breasts, you can achieve good results with just a few hours of brining. Good news for those of us who tend to fly by the seat of our pants!
As with the turkey, if you can bag it or cover it, that’s fine. If not, that’s ok, too.
Seafood
It may seem a bit redundant to brine seafood since most varieties spend their entire lives in salt water. Still, a little brining can really make the flavor pop.
Shrimp will come alive (not literally) with a quick 15-60 minute brining in the fridge. Use one teaspoon of salt per-pound of shrimp.
For any kind of fish, just sprinkle a thin coating of salt over the entire piece. You can repeat this with sugar if you like. Let it sit for as little as 15-30 minutes before rinsing it thoroughly in cold water. The flesh of fish is so easily penetrated, this is all the time it takes to draw moisture to the surface and concentrate the flavor.
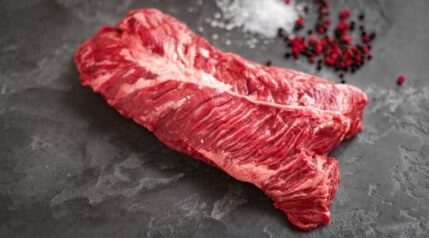
Steaks and Chops
To brine smaller beef and pork cuts, like a steak or chop, stay with the ½ teaspoon per-pound ratio. Let it sit for 12-24 hours. If you don’t have time for that, you should still notice a difference if you allow 1 hour per inch of thickness.
Bagging or covering is a matter of personal preference.
The good people at Char-Broil recommend rinsing your cuts and patting them dry after the brining process is over to remove any residual salt deposits on the surface.
I’m not entirely sure if this is always necessary, so I’ll leave that up to you to play by ear.
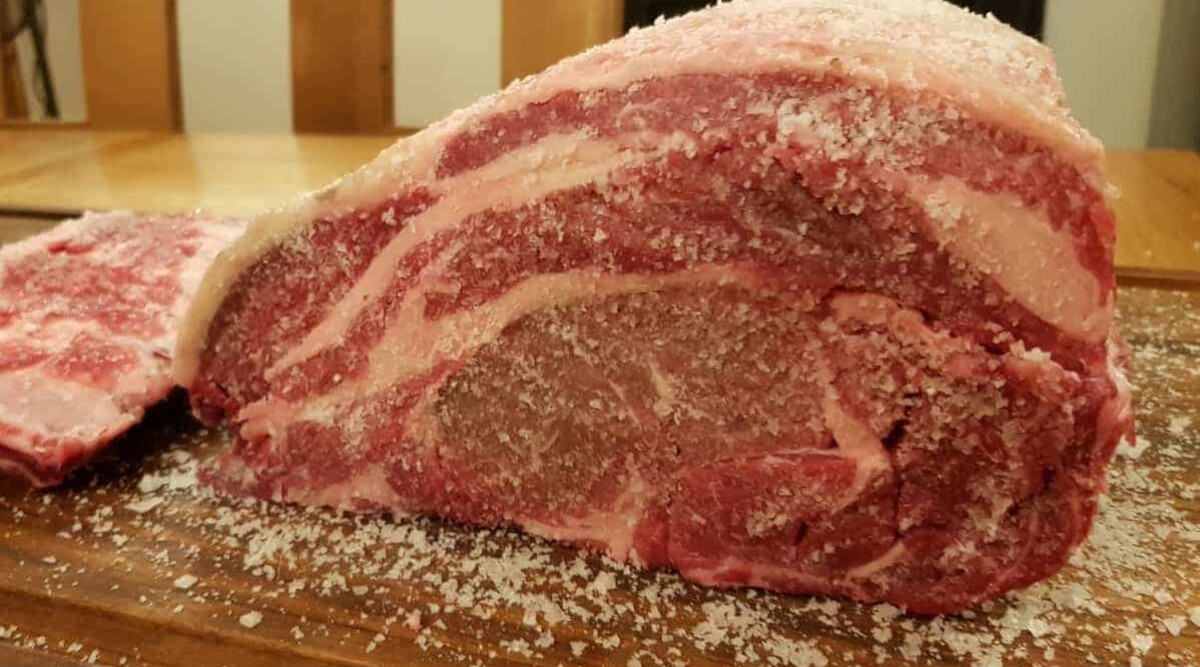
Prime rib, Brisket, and Ribs
If you’re cooking a substantial piece of meat, you’ll want to allow a similar brining time as you would a turkey. Set aside 48-72 hours for big cuts exceeding 8 pounds.
Another One Salted Away
And with that, we are done. If you’ve never brined your meat before, you won’t look at your saltshaker the same way again. Who knew there was so much potential in those humble grains? It really is an astonishingly simple but delicious way to add a special touch to your barbecue. (And it’s essential to living, as we’ve already explained. Just in case you still needed to justify yourself.)
Let us know how you’re brining experiments turn out, be they dry or wet. We love to hear about (and see!) your barbecuing adventures.
And, while you’ve got the computer open or your phone out, why not take a moment to let us know what you think about the site? We’re always happy to hear your comments, answer your questions, and address your concerns.
We genuinely appreciate you for spending part of your day with us, and we can’t wait to see you again. Until then, shake it ‘til you make it!
Happy grilling!


I have just discovered this site — while looking up details on dry-rubbing a roast — discovered what I am doing is actually dry brining … what a great website! I look forward to exploring it more in coming days. By the way, I am dry brining a lovely bone-in pork roast — and while I have been cooking such things for many years, I am thrilled to be learning some new tricks.
Thanks, Leah, it’s always nice to hear people are enjoying the site and making use of the info here 🙂
You’ve said “Choose only plain, raw meat for brining.” Can I dry brine an “Organic”, “Non-GMO”, “Free Range” turkey that “may contain up to 5% retained water due to processing”? No mention anywhere about salt or other seasonings.
Hi Andrew,
Sounds like your turkey should be OK to me — although I cannot be 100% sure without investigating your particular turkey of course, what it says on the label, or who prepared it etc. But generally speaking, if it’s been pre-salted or contains salt it will say so on the packaging.
As discussed above, all I am warning against is people brining an already salted bird, resulting in an over-salted and horrible tasting meal.
Great advice, many thanks — going to try both wet and dry brine on sections of venison rump I have acquired. Will let you know how it works in South Africa!
Sounds good….and would love to hear your feedback on it!
I usually only cook 4 small pork chops and 4 small chicken breasts at a time. I want to dry brine so how much kosher salt pepper and say dry rosemary is a good mixture
Hi Larry,
1/2 teaspoon of salt per-pound of meat, and approx 1/8th to 1/4 each of the other ingredients per-pound of meat is a good starting point. See how you like the results, then tweak up or down for the next cook as everyone tastes are different.
Very well expained. It covers everything a person would need to know, and in simple terms. If I had to give a grading, it would be 10 out of 10
Thanks, May.
After reading this I’m going to try it with a Capon that I got from the Amish market this morning. I will let it sit until Thanksgiving afternoon. What do you think?
Sorry for the late reply. It depends on the time scale — Don’t let it sit too long (from the time of comment it reads like that would be 48 hours?) — but yes it should be good!
Best detail I have seen. Thank you