
When it comes to grilling, it’s all about the seasoning. Rubs and marinades. Herbs and spices. Paraffin wax and metal shavings.
Wait, what?
Hold up a moment. We know you’re eager to get cooking, but if you don’t take time to prepare and season a new grill correctly, you could have some pretty nasty stuff from the manufacturing process mixing into your food.
Seasoning a grill is a simple process of oiling and heating your grill before you cook on it for the first time. There are many benefits to this, including zapping those toxic factory contaminants.
In this post, we’ll explain why seasoning your grill is so important, the advantages of grill seasoning, and how to do it.
Jump to:
How Do I Season My New Grill?

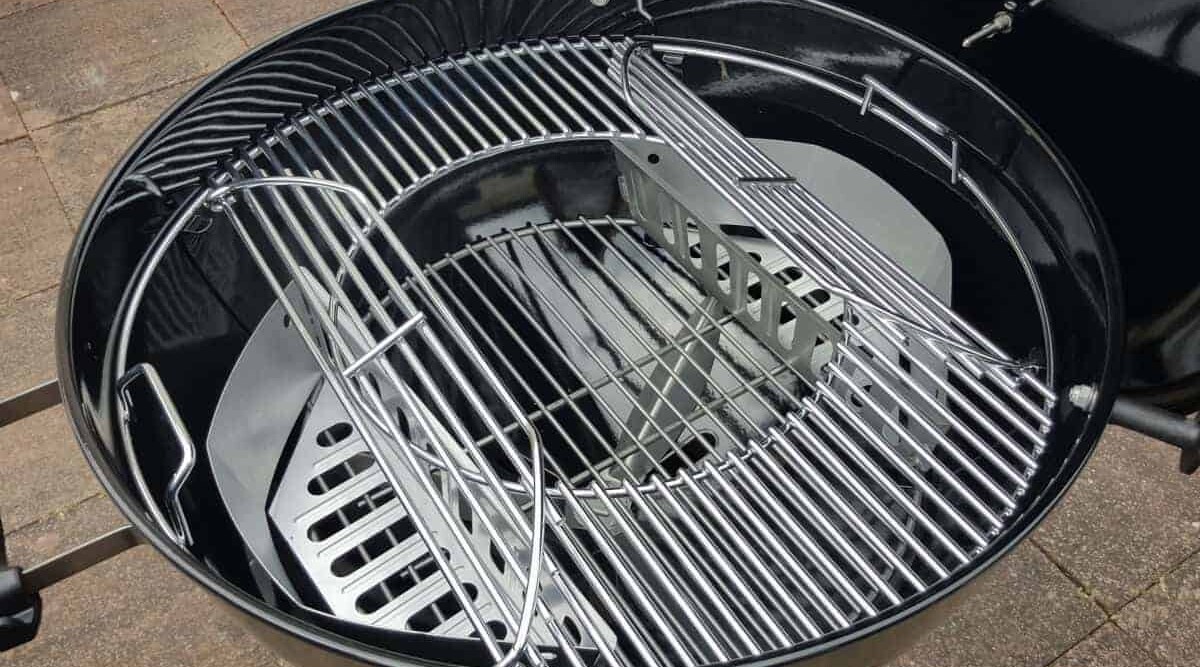
All new grills, whether a charcoal or gas grill, stainless steel or cast iron, will benefit from seasoning. Just follow these simple steps.
- Rinse and thoroughly air dry the grill grates. No need to use dish soap. If you do, be sure to rinse and dry them thoroughly.
- Using a basting brush or even a clean (new!) paintbrush, or paper towel, wipe the grates all over with a high heat-resistant oil such as a vegetable oil, peanut oil or canola oil. A spray bottle of oil or even a can of Pam also works fine. You can read more here about the importance of choosing the right oils (those with a high “smoke point”) for grilling.
- Lightly brush or wipe the oil also on the inside the lid, the insides of the pit and on the emitters if your grill has them. The idea here is to bake and seal the grill and grates. With cast iron, the oil will actually seep into the pores of the iron, bake in, harden and create a smooth non-stick coating that will darken and improve with every cook.
- Turn up the heat! Light your charcoal or crank up your gas. You want your grill screaming hot.
- Let it burn and smoke and work its high heat magic for a good 30-40 minutes.
The grates will change in appearance. Don’t worry! Shiny stainless steel will discolor and darken, and cast iron will take on a slick black sheen. These are the signs of a non-stick surface developing. This is good!
- Turn it off and let it cool. Your grill is seasoned. All set!

Don’t slather on your oil. Too much can pool and form streaks on your grill at best, or start a grease fire when the grill hits high temps at worst. Aim for a light, very thin coating, by wiping off excess oil with a paper towel. It should almost feel dry to the touch!
— Mark Jenner
Why Should I Season My new Grill?

You’ve just brought home a shiny new, best on the market gas grill, or perhaps a fine looking charcoal grill. You’re itching to get cooking and see what food that baby can produce, right?
Hold your horses! You should season your grill before your first cook for the following reasons:
Safety First!
Like all products right out of the factory, your new grill will have residual paint, manufacturing oils, and dust and metal shavings from shipping.
You don’t want any of these on your burger!
Seasoning will burn off impurities and sterilize your grill. This is a health and safety check, don’t skip the seasoning!
Easier Cooking & Cleaning
Seasoning will ensure easier non-stick cooking and enable your grill to function at its best.
This is because cooking oils and fats adhere to the grates and over time develop a smooth non-stick surface. This is especially true of cast iron grates which are porous and will absorb those oils and fats. And of course, non-stick surfaces make clean-up a snap.
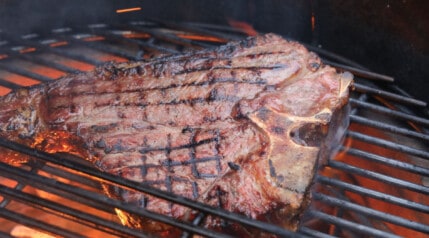
Better Flavor
When you grill, the juices and fats from the food get vaporized by the high heat and coat the entire inside surface of your grill: The grates, lid, pit, and all, to give that signature grill taste.
The flavor just gets better and better every time you fire it up.
Lasts Longer
Finally, seasoning will extend the life of your grill and prevent rusting.
In fact, if you take the time to season your grill regularly, you’ll get years of great grilling and flavor out of your grill. A little TLC goes a long way.
Click here for more on the importance of grill seasoning.
Maintaining your Grill
Just like a car, bike or a lawnmower, your grill is going to perform better with a little TLC.
Some say to oil the grates after every cook, but we recommend seasoning every few months or so. This will be enough to prevent rust forming and maintain that beautiful non-stick seasoned coating you got when you first seasoned your new grill.
You’ll know when your grill needs re-seasoning when food sticks, or you see rust forming.
To maintain your grill in prime condition, simply keep that high heat going for 10 minutes after cooking. Then scrub down the grates with a good grill brush.
Don’t forget to spray or brush a light coating of oil onto the warm, clean grates. This way, next time you fire up, your grill will season all over again.
Can I Season an Older Grill?

Winter’s done — it’s BBQ season! You throw off the grill cover — yikes!
Peeling paint and crud-hardened dirty grates. You’re thinking: new grill. But don’t give up on that busted-up old grill yet.
First up, it’s not peeling paint! It’s the build-up of layers of carbon from smoke after many good grill feasts. So break out a scrubbing brush, roll up your sleeves and get in there with a decent grill cleaning product or some soapy water and scrub it all off.
Next, turn on — or light coals in — your empty grill and let it burn on high heat for 20 minutes. This will loosen and burn off even the toughest of last summer’s cookouts.
Let the grill cool a little, then grab your grill brush and scrub all that crud off.
OK, your grill is looking a lot better. Last thing is to season it, so go ahead and follow the steps up above, and presto, you saved a trusty workhorse from the grill graveyard.
Beyond Canola Oil
You may be surprised to learn that seasoning the grill is (mostly) not about adding flavor. The main goal is to seal and optimize the performance of the grates using oil and heat.
But hey, we’re all about flavor. And canola oil doesn’t cut it. So here are some tasty suggestions you can try for adding some good smoky flavor as well as lubrication to your grates from one cook to the next.
While the grill is heating, grab your tongs and try rubbing those grates with:
- Half an onion dipped in oil
- A couple pieces of bacon
- A chunk of fat you cut off the meat
- A smoky mesquite wood chip dipped in oil
Conclusion & Confession
When I bought my first grill, I had no idea about seasoning. OK fine, with my second grill I was still clueless. And I can tell you, in those days, I was no stranger to stuck, ripped, and wrecked meat on the grill. So painful!
One time, I even considered chucking out all my grill fare because I could smell those noxious factory fumes while cooking on my new grill for the first time. Ugh.
But now I am wiser and, after reading this post, so are you! Just follow these simple steps to seasoning your new grill — or maintaining and re-seasoning an older grill — and you will enjoy years of top-notch, non-stick, easy-care grilling. No sticking meat. No nasty odors. No rusty grills.
Let us know how it goes in the comment section below!


Hi Mark,
Thank you for your insight and guidance on seasoning a new BBQ grill. I’m 63 years old and have never done that before. As you can imagine, my food never tastes like I think it should, and I can’t tell you how many grills I’ve gone through due to them rusting.
I have once again bought a new grill. I actually spent over $200.00 on this grill. I’ve never paid over $150.00 on a grill before. . Since I have so much money invested, I felt it was time to do things right and read up on taking care of it. This is the perfect article for me! I didn’t know that you should season the entire inner grill as well. I suppose that does make perfect sense. This may be the last grill I need ever buy. I want to thank you for sharing this great information for those slow learners like me out there.
Hi Pete,
Hopefully with a little more care this new grill last you many years. Have you got a cover for it also? Or the ability to move it inside, out of the elements? That will surely help a lot also.
Do you close the BBQ lid during the pre-seasoning process?
Hi Ace. You do, yes.
Thank you. Never knew that you should season the WHOLE grill when brand-new.
Followed the steps with peanut oil and came out great! Appreciate the advice. Steps were easy to follow
Wouldn’t you want to heat the grill before oiling it? Wouldn’t oiling it before you heat it seal all those factory chemicals into the grill ?
I can see what you’re saying, and it’s logical, but I’ve never read to do so, been advised to do so, or actually done so.
Yes you would. Pretty much any cooking device using heat recommends you heat it up before use to burn off residual manufacturing oils. The additional advantage is oiling the surfaces while they are still warm will thin the oil making it easier to spread the very thin layer you want. Ideally you want to repeat the seasoning process a few times before use. When properly seasoned the oil is polymerized, fairly durable and has no impact on flavour. You can, and should, oil the grill when cooking just like you oil a skillet. Using flavoured oils at this point will flavour your food. Putting a thin layer of oil on the grates after cleaning can help prevent rust getting a hold in any imperfections in the seasoning.
Hi,
I just followed your tips on my new gas BBQ but the inside the lid has turned filthy black, is that ok?
Hi Ronny,
Yes, that is the seasoning, much like you do with a cats iron pan. As you cook on your grill more and more, it will get darker and darker too, it’s totally expected.
Hi Mark,
What if my grill is a combo charcoal and gas do I preseason these at the same time? Do I have to put charcoal to season that side?
Yes, do both sides. And charcoal may or not be necessary, it depends on the configuration. You just need heat. So if the gas heats the whole thing through, including the charcoal chamber, then no. But if the charcoal chamber is separate, then you will need a charcoal fire, yes.
IF A LITTLE IS GOOD ,..
I really over did it. I left way to much grapeseed oil on my grates before seasoning them. The coating is thick and gummy. What can I do now?
A high heat burn off will work. Grill at highest temp you possibly can to burn it all off, or in your kitchen ovens ‘self clean’ setting. Then a wire brush to get it all off, and then start again.
Love this post!! Thanks for info
Thank you!! I found you very helpful
Thanks
Thanks for the help. Got a new gas grill for Christmas. Gonna season it. Thanks again.
So like a big dummy. I did this below
Can it be fixed?
Don’t slather on your oil. Too much can pool and form streaks on your grill at best
Is this somewhere on the grill body? If so, it’s only cosmetic / aesthetic and will not matter! Or is this on the grill grates? If so, then simply burn it off with hgih heat, wash, dry, and start again.