
So you’ve got yourself a top charcoal grill? Before any magic happens on it, you first need to get it lit.
In this article, I’m going to cover five different methods for how to light charcoal without lighter fluid, with step-by-step instructions on each method so anybody can follow along and successfully get to cooking.
And although we strongly recommend against its use at all, we will also cover how to light charcoal with lighter fluid in such a way that it doesn’t ruin the taste of your food!
Any time you’re handling fire, the potential for injury is there, both for you and anyone around the grill area. So before we start, I want to briefly go over a few safety tips prior to getting into the most effective lighting techniques.
Jump to:
Fire Safety — We Can’t Ignore It
I want to remind you that fire can quickly get out of control when you disregard common sense. Here’s just one example from a recent NBCNews report.
A Denver man in his mid-30s had been using a charcoal grill. But. It wasn’t getting hot enough, so he decided to pour lighter fluid on the coals to get them going. Unfortunately, the coals were already lit, the fluid exploded, and the man received head-to-toe third-degree burns over 90 percent of his body. He did not survive.
I don’t want to be morbid, but it happens all too frequently. Take a moment to review these top three, very wise, grilling safety tips from the National Fire Protection Association. They have more excellent safety tips you can use on their site.
- Use extreme caution with lighter fluid and other volatile fuels.
- Do not add fuel to an already lit fire; the flame can flash up into the container and explode.
- Do not lean over a grill when lighting using flammable fluids.
YouTube is full of “grill fails” videos where flammables and stupidity collide.
People get excited about grilling out. Like a kid in a candy store, they’ve brought that huge steak home and can’t wait to grill it. They just tend to forget the risk of dealing with lighting a charcoal grill properly. So be very cautious.
6 Methods to Light Your Charcoal Grill the Right Way

We have 6 methods here of lighting charcoal. Some of them require special equipment, others none at all. And we have ordered them from top to bottom in order of our preferred way of lighting…and we have tried them all many, many times.
This first method is one of the simplest ways you can get many coals red-hot and ready to cook on in just a few minutes.
The Charcoal Chimney Method

Using a charcoal chimney starter is the preferred method by most because it works well, is clean and cheap, and is relatively quick compared to lighting the coal from inside your grill.
It’s not best for kamado style grills though because of the narrow sides of the grill.
A charcoal “chimney” is nothing but a metal tube that holds your charcoal or briquettes in place while you ignite them from the bottom. The heat rises through the chimney, which sucks more air in from the bottom. So as the coals light, they are effectively ‘self-fanning,’ as if being blown on all the time, and become lit and hot in a very short time.
You can make your own charcoal chimney starter using a piece of aluminum 6-inch diameter stove-pipe or a #10 can and can see how to do so in this video here.
For most of us who don’t have the tools or desire, you can buy a well-constructed chimney in any store that sells grills. They’re inexpensive and well worth whatever you pay for one.
Step 1 — Place two sheets of wadded up newspaper in the bottom of the chimney.
Step 2 — Pour in the charcoal or briquettes in the top. Fill the chimney to the top for maximum heat in your grill, or only halfway if using the minion method for low and slow cooking.
Step 3 — Place the chimney in the bottom of the grill and light the newspaper
Step 4 — Once the top layer of coals in the chimney have started to ash over, this is when the coals are ready. So now carefully dump the chimney into the grill and spread them evenly.
Pros
- Inexpensive
- No chemicals or electricity
- Works every time
Cons
- The side handle makes it hard to use in deep or narrow grills like the Kamado or Big Green Egg.
The chimney method is the least expensive, and adds no chemicals to your fire unlike some other methods.
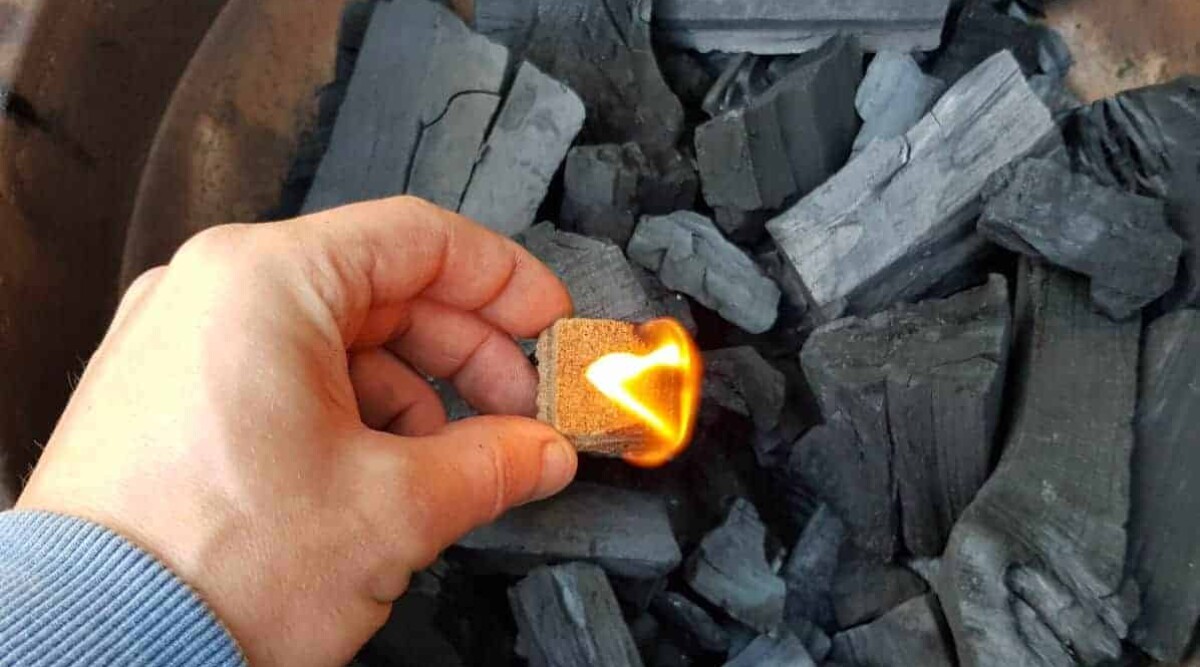
Fire Lighter or Fire Starter Method

I think this is the best and most cost-effective method for kamado style grills.
Firelighters or starters use paraffin wax, compressed cardboard or wax coated wood shavings to ignite the charcoal. They also work well to start your chimney and don’t leave ash as a newspaper will. Also, paraffin wax is non-toxic and doesn’t leave any odor or residue.
You will find a variety of brands, in cubes, strips or loosely packed in a box or bag.
You can also make fire starters yourself. Here is a video demonstrating the technique using paper egg cartons and shortening instead of wax. They have a phenomenal 8-minute burn time.
Personally though, I would just buy some in, as that’s too much faffing around for me.
Step 1 — Place the fire starter under the chimney or directly on the pile of charcoal
Step 2 — Light it.
That’s all there is to using these to light the coals.
Pros
- They work well and burn 8 minutes or more if you have wet or stubborn briquettes
- Inexpensive
- Weatherproof
Cons
- If the flammable agent is chemical, it can affect the taste of your food, so make sure if they are labelled ‘natural.’
These starters will work in any grill or campfire. Avoid fire starters that use other chemicals besides paraffin wax or vegetable oil. These can taint your cooking with chemical taste if not completely burned.
The Looftlighter Method

The Looftlighter is a combination heater and blower that directs super-heated air toward the charcoal, igniting it in seconds.
Not only will it light a charcoal grill in less than a couple of minutes, but the built-in stand is also a bottle opener. Let’s face it, fire starting and bottle opening with one device is pure genius!
If you’re unfamiliar with a Looftlighter, you can learn more in our Looftlighter review, and see it in action in this video by the inventor himself.
Step 1 — Plug in the Looftlighter
Step 2 — Touch the tip of the lighter to the base of the charcoal pile and push the button
Step 3 — Once you see glowing coals or sparks, hold it back about an inch, still pointing at the same spot.
Step 4 — After 60 seconds, the coals should have enough heat to keep burning. Turn it off and open a cold beer with the built-in opener.
Pros
- The fastest way to light your charcoal or briquettes
- Has a built-in bottle opener
- No chemicals
Cons
- The most expensive method
- Requires electricity
The Looflighter costs around $80 (as of 11th Nov 2017) or about 13 bottles of lighter fluid.
The two best benefits from this are it is the fastest lighting method and uses no chemicals. The bottle opener is a nice touch too, so long as you don’t sear your hand getting the bottle open.
If money is no object, then the Looftlighter is the way to go. It’s my preferred method and perfect for any grill, especially Kamado style/ Big Green Egg grills.
Paper, Kindling, Charcoal Method

With this method, you build a fire to light your charcoal.
It’s more labor-intensive and not always reliable. But, if you can do it with one match you might get a merit badge from the Boy Scouts for fire building.
Step 1 — Make a base for your fire by putting down a layer of charcoal or briquettes.
Step 2 — Wad up 2 to 4 sheets of newspaper and place them in the center.
Step 3 — Add thin, dry sticks in a crisscross pattern over the paper. Press down to make a level surface.
Step 4 — Add some charcoal on top and light the paper.
Step 5 — Once some of the charcoal lights and starts to ash over, add more to build up your fire.
Pros
- No Chemicals
Cons
- You need fire building skills, dry kindling wood and patience
- You’re making a fire to start a fire
- Slow
- Hard to do in wet conditions
This method takes the longest. But you’ll get the satisfaction knowing you can build a fire and that you didn’t use any lighter fluid or starters.
The Electric Charcoal Starter

This method is also a good way to start your grill without chemicals.
The electric starter is just like an electric stove burner element but bent in a “U” shape with a handle.
It’s not as fast or sexy as the Looftlighter, but it will get your fire going. You can see a quick video of the set-up here.
Step 1 — Place the burner element in the base of the grill with the handle sticking out.
Step 2 — Pile the charcoal on top
Step 3 — Plug it in.
Step 4 — Once the coals start to glow, unplug the burner and remove it.
This method lights a smaller area of charcoal than the chimney method, so it may take longer to get a big fire going if you’re grilling over a large area. But if you only need a small fire or just smoking low and slow, this works well.
Pros
- No chemicals
- Never fails
- Fast
Cons
- Requires electricity
Electric fire starters work with any type of grill.
Lighter Fluid Method

We’ve all used lighter fluid in a pinch. You’re in a hurry, or it’s raining, and the charcoal is soggy. Lighter fluid is a sure thing.
The trade-off is that it’s dangerous and often leaves a petroleum/chemical aftertaste in your food. I recommend you avoid this method for these reasons.
Step 1 — Create a pyramid of briquettes in the bottom of your grill.
Step 2 — Squirt a liberal amount of lighter fluid onto the pile of briquettes, and leave to soak in for a good 30s to a minute. Close the bottle and take it at least 10 feet away from the grill before lighting.
Step 3 — Light the fire using a long matchless lighter or rolled up piece of newspaper. Keep your hands out of the grill in case there is a vapor flash fire.
Never Substitute Gasoline (Petrol) for Charcoal Lighter Fluid.
Yes, the fireball may be spectacular, but the risks outweigh the rewards. Charcoal lighter fluid burns slower and does not have the flammable fumes of gasoline.
Pros
- It will get any fire going
- It’s fast
Cons
- Dangerous
- Can leave a chemical residue on your food
- Hazardous to store when not using
You can start a fire in any grill with lighter fluid, in almost any conditions. The danger comes when you don’t use enough, and it does not light the briquettes. Adding more can make your food taste like petroleum, and it can also cause an explosion. Avoid using lighter fluid for your grill.
Final Thoughts
So that’s how to light a charcoal grill. 6 Techniques, some without a chimney or lighter fluid.
Now of course, lighting your grill is just the first step, and there’s a lot more to learn when it comes to mastering charcoal grilling. Luckily for you, I have a detailed guide on learning how to grill with charcoal. And for the end of your cooking session a guide to putting out a charcoal grill quickly, effectively, and while saving unburned fuel for later use.
Just remember when starting it up, it’s always best for food quality to stay away from chemical fire starters or lighter fluids. Electric starters work well, are clean and efficient — so long as you are close to a power source. If you’re tailgating or out in the woods, you can use one of these other methods.
One thing I forgot to mention is the one common denominator you’ll need to light all these fires, matches or a lighter.
Unless you’re a survivalist, who can make fires using a bow drill, or flint and steel, make sure you always have some matches or a working lighter handy. Remember the Boy Scout motto, “Be Prepared!”
Happy grilling!


I’ve been using the Weber on my deck for decades. I just put scrunched-up newspaper underneath. Put charcoal on the charcoal grate. Light the paper. Wait about 10 minutes. Never fails.
That sometimes burns out too quickly before the charcoal can catch for me. But…I’ve added a bit of vegetable oil to the paper before, and it stays lit A LOT longer, which works well.