
Welcome to my comprehensive guide on how to use a charcoal grill.
Charcoal grilling requires more effort than gas grilling, where you simply adjust a dial to set the temperature. By choosing a charcoal grill, you’re embracing the art of fire starting, fire management, and using vents to control temperature.
Charcoal grilling brings you back to the basics. It’s not about push-button ease or set-and-forget cooking. It’s about developing an intuition for the heat, the process, and the timing, reconnecting with the hands-on approach that modern cooking appliances often lack.
It isn’t difficult, though. Anyone can learn it with the right information, guidance, and a bit of dedication.
Over decades now, I’ve had the pleasure of using a wide variety of charcoal grills and different charcoals, which has given me a deep understanding of how different setups can affect your cooking.
I’ll share what I’ve learned through experience, to take you through every step of the process from set up and prep to fire management, fuel selection, and coal configuration, to and teach you how to cook with confidence no matter what’s on the menu. In fact, I don’t think there’s much about charcoal grilling that I haven’t covered in this post!
Here’s what you’re going to learn in this guide:
Key Takeaways
- Always starting with a clean grill to avoid bitter-tasting smoke and food sticking to the grates.
- Having the correct tools ready before you start grilling to avoid frustration and ensure a smooth cooking process.
- Planning your cook and setting up your grill accordingly, taking into account the type of food you’re cooking and the fuel and equipment you’ll need.
- Understanding the different cooking methods (direct heat, indirect heat, and two-zone cooking) and choose the one that best suits your food.
- Choosing between lumpwood charcoal and briquettes, considering factors such as flavor, burn time, and cost.
- Configuring your coals based on the cooking method you’ve chosen, such as direct-heat grilling, two-zone cooking, or the charcoal snake method for smoking.
- Using a chimney starter to light your charcoal for fast and efficient ignition.
- Using the vents on your grill properly, to control the temperature, adjusting the intake damper and exhaust damper as needed.
- Using a thermometer to monitor the temperature of your grill and ensure accurate cooking.
- Cooking food to the desired internal temperature using an instant-read thermometer, rather than relying solely on cooking time.
- Being prepared for flare-ups and knowing how to safely extinguish them.
- Closing down your grill properly after cooking, cleaning the grates while they’re still warm and closing the vents to prevent debris and pests from entering.
Jump to:
- 1 Key Takeaways
- 2 Always, Always Start with a Clean Grill
- 3 Have the Correct Tools Ready
- 4 Plan Your Cook, and Ready Your Grill Before You Start
- 5 Should You Cook With Direct or Indirect Heat?
- 6 What Type of Charcoal Should You Use, Lumpwood or Briquettes?
- 7 Choose Your Cooking Method & How to Configure Your Coals
- 8 How Much Charcoal Should You Use in Your Grill?
- 9 How Do You Light a Charcoal Grill?
- 10 How do You Arrange Your Lit Coals and Preheat Your Grill?
- 11 Do You Grill With Lid Open or Closed?
- 12 When Is It Time to Start Grilling?
- 13 How do You Monitor Your Grills Temperature?
- 14 How do You Use a Charcoal Grills Vents to Control Temperature?
- 15 How do You Hit a Desired Grilling Temperature and Keep it There?
- 16 Finally, Add Your Food!
- 17 What to do During the Cook?
- 18 When is Food Finished? Cook to Temperature, not Time
- 19 When to Remove Food, Resting and Carryover Cooking
- 20 How do You Top Up Charcoal During a Long Cook?
- 21 How Can You Avoid or Control Flare-Ups?
- 22 Closing Down the Grill When Cooking is Done
- 23 That was a Lot to Digest!
All fired up? Then let’s get started!
Always, Always Start with a Clean Grill

Contrary to popular belief, a dirty grill doesn’t contribute to the flavor. It creates acrid smoke that taints your freshly cooked food. Also, residual ashes gathered in your grill may hinder airflow and prevent accurate temperature control, making the grilling process harder. Therefore, I advise you to always begin with a clean grill.
When it comes to cleaning your charcoal grill, here are the three simple steps to follow:
Step 1:
Clean all grates and cooking surfaces while the grill is still warm from the previous cooking session, as removing residue before it hardens is easier. Use a high-quality bristle-free grill brush or a specially designed grill cleaning scraper.
Cleaning after cooking is the best choice. However, if this isn’t possible (perhaps you forgot due to having too much fun?), preheat the grill briefly before your next cooking session to soften the grim, making it easier to scrape the grates before cooking.
If you neglect this task, old burnt food will contaminate your fresh meat, and worse, what you’re currently cooking may stick to the grill, causing it to tear and disintegrate. This is not a desirable outcome.

Step 2:
If your grill has a grease tray (AKA starter kit for an inferno!), remove and clean it out. Nothing says flare-up like a good old pan of grease meeting new flames.
Step 3:
Ensure to dispose of all old ash, only after confirming it’s entirely cold. This is crucial as hot ash might contain live embers, potentially causing a fire.
You may consider adding new charcoal on top of old ash to grill, but this isn’t advisable. Excessive ash can obstruct the vents, hamper airflow, and make it difficult to maintain stable cooking temperatures. As a result, you may need to work harder, for only mediocre results.
Have the Correct Tools Ready
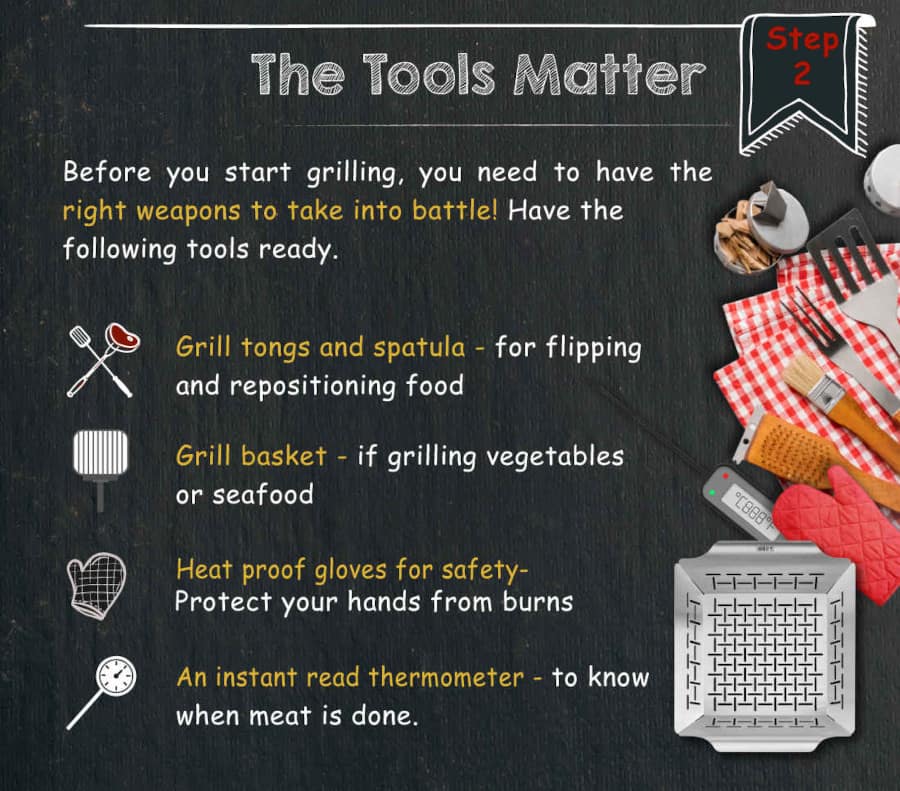
Ensure you have your grilling tools ready! Tongs and spatula as a minimum. If you’re planning to grill tiny items like prawns or mushrooms, have your grill basket prepared too. Don’t forget skewers for making kabobs.
Finding your grill tongs in the dark while your perfectly seared steaks are ready to be removed from the grill can be frustrating. So it’s crucial to prepare all your tools before you even light the grill.
Above anything else, remember your heat-proof grilling gloves for protection. Avoiding burnt fingers is simple if you have a reliable pair ready.
Another worthwhile tool to keep around is an instant-read food thermometer. The most accurate way to achieve perfect cooking results is by measuring the internal temperature of the food. No other method is as effective.
Plan Your Cook, and Ready Your Grill Before You Start
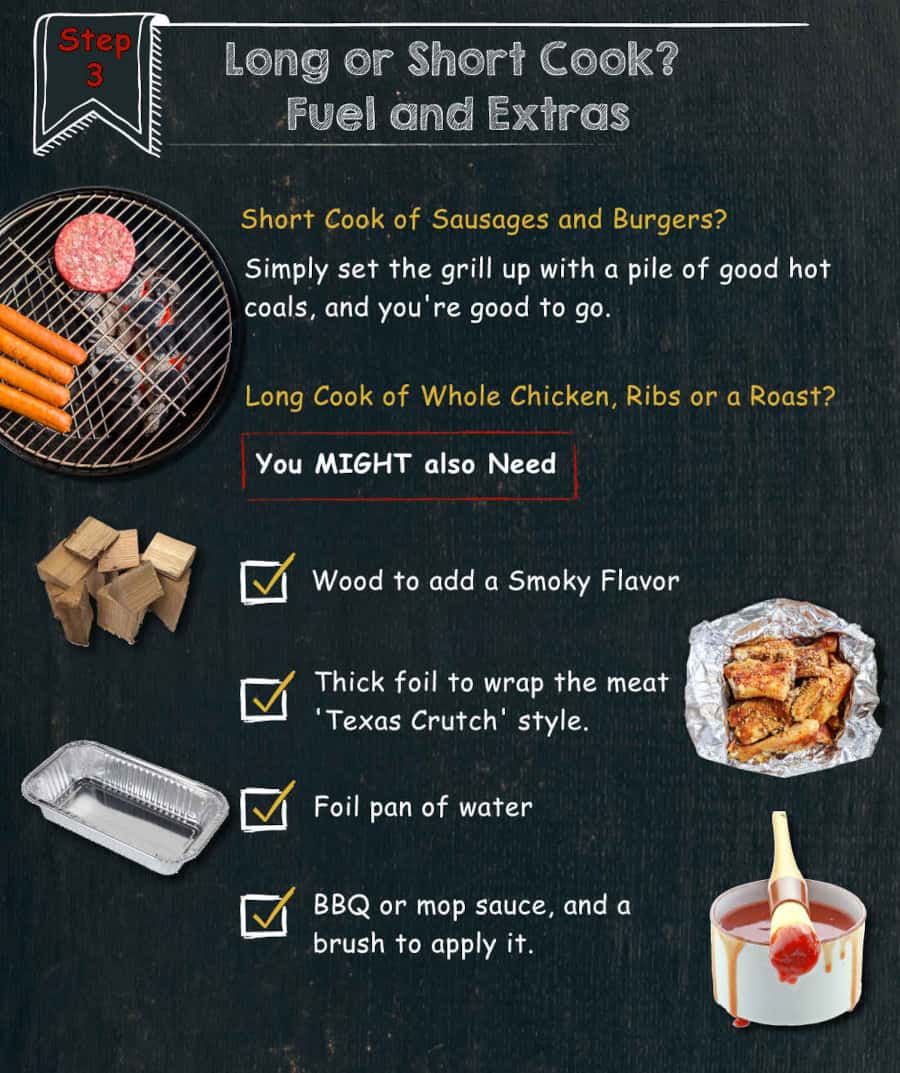
What you plan to throw on the grill will dictate how much fuel you need and how to prepare and set up your grill. So, What’s cooking tonight?
To quickly cook burgers or sausages, just set up the grill with a pile of hot coals; this fuel will suffice.
For an extended cook for, say, ribs, a large roast, or a whole chicken, you will need a different set up and potentially an additional fill of fuel.
And that back-up fill of charcoal needs to be right by the grill so that adding more when the time comes is quick and seamless. So always keep a good stock of charcoal, sop you never need to perform a last-minute dash to the convenience store mid-cook.
Other items you may need for a longer cook are:
- Wood chips or pellets to add or enhance the smoky flavor goodness.
- Heavy-duty foil to do a wrap partway through cooking, ‘Texas crutch’ style, if doing brisket or some ribs.
- Sauce and brush or mop for basting and layering on flavor.
- A small foil water pan to add moisture to the cooking chamber, which can help maintain stable temperatures, as well as help keep food moist.
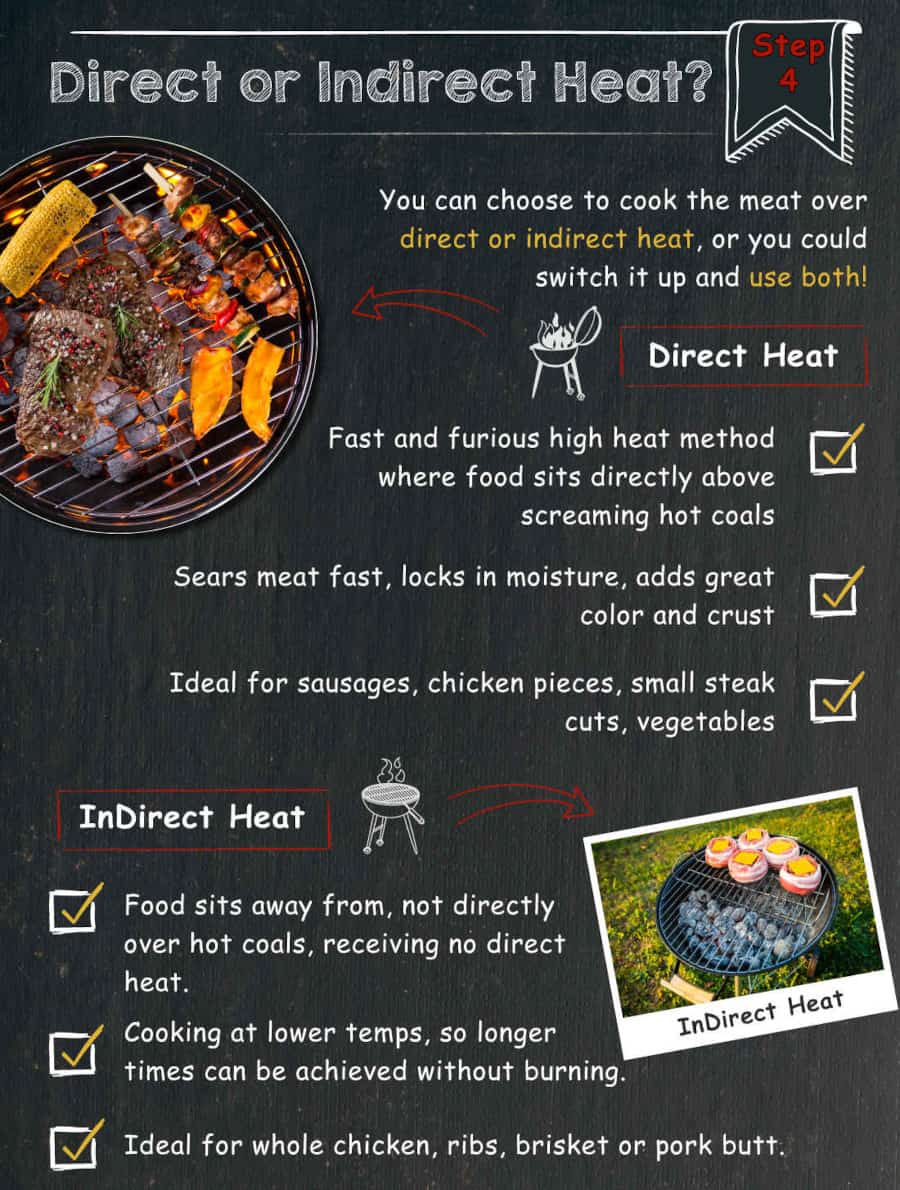
Should You Cook With Direct or Indirect Heat?
With all the essential items now at hand, you need to decide whether you are going to grill using direct heat, indirect heat, or a combination of both, depending on what you’re cooking.
Let’s take a close look at these key grilling terms, how you do them, and how to decide which grilling method you need.
What is Direct Heat Grilling?
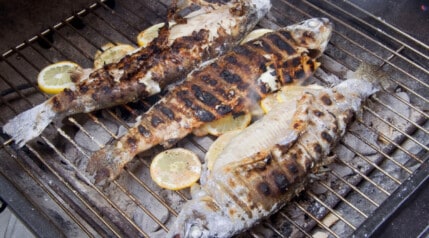
The direct heat grilling method involves cooking food directly above extremely hot coals. Use this method for quickly grilling small items like steaks, chicken pieces, sausages, fish, pork chops, or vegetables.
Direct heat sears meat quickly, producing a flavorful Maillard crust and appealing color.
What is Indirect Heat Grilling?
The indirect heat grilling method is a low and slow method ideal for cooking larger, tougher meats like pork shoulders or whole chickens. It may not be suitable for small charcoal grills, but works well on standard-sized models.
You place the meat near to but not directly over the heat source, with the lid closed and fewer coals for lower heat.
Indirect cooking is the same as slow-roasting in an oven. The gentle, prolonged heat breaks down tough fibers, making collagen in certain cuts tender, and cooks larger meats like chicken and beef roasts all the way through without burning the exterior.
This method requires patience and attentiveness, as you’ll need to regularly monitor and adjust the grill.
What is Two-Zone Cooking?
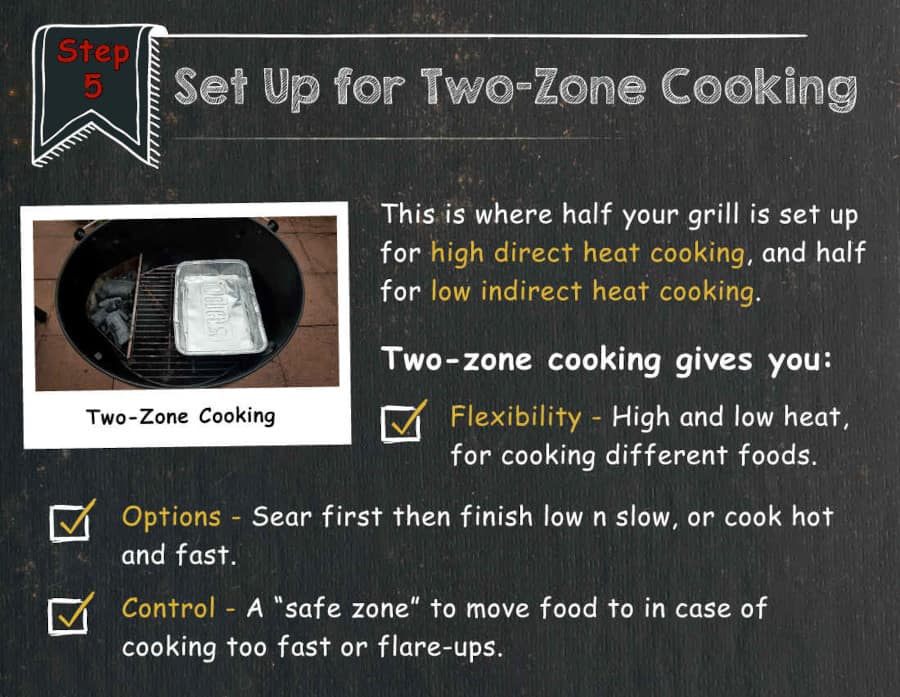
I mentioned two cooking methods, direct and indirect, but actually, you can use both at the same time on one grill, with two-zone cooking!
Set up one half of your grill for high, direct heat, and the other half for lower, indirect heat. Move food from the high heat over coals to the lower heat away from coals to prevent burning.
For large cuts like a big joint or thick steak, try a reverse sear. First cook on the low heat side until nearly done, then move it to the high heat side for a few minutes to get a seared crust.
This two-zone method offers flexibility, options, and a “safe zone” to move food to avoid overcooking or flare-ups.
What Type of Charcoal Should You Use, Lumpwood or Briquettes?
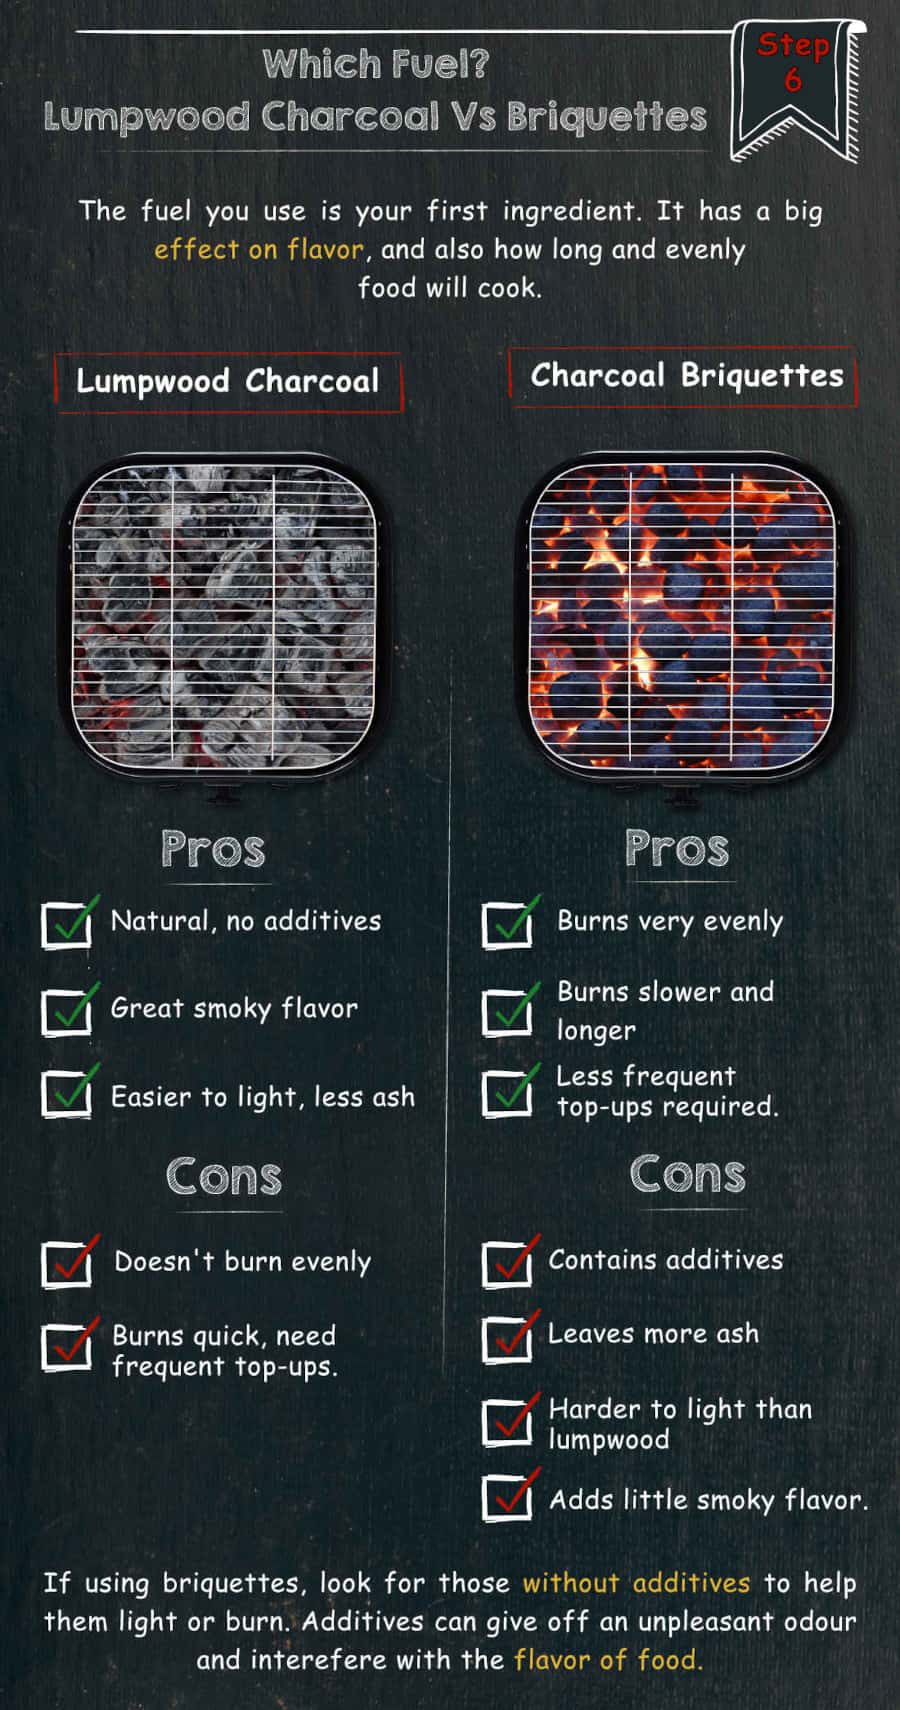
When I’m grilling, I always think of charcoal as my first ingredient. And we all know what they say about your final product being only as good as your ingredients.
So yes, what you choose to put in your grill can have a significant effect not only on the flavor of your food but also on how long and how evenly it will cook.
The two options you have for fuel are lumpwood charcoal or briquettes. Let’s briefly look at each in turn:
Lumpwood Charcoal

OK, I’ve got to tell you, this is numero uno with me and many grillers. The best lumpwood charcoal is 100% natural, cleaner, burns hotter and imparts a killer smoky flavor to food. It’s also easier to light than briquettes and leaves less ash to clean up afterward.
However, its irregular shape can lead to uneven burning, requiring more attention. Also, it burns faster, so you’ll need to replace coals often, which can be costlier.
An interesting aspect of lump charcoal is the availability of “single species charcoal,” offering unique flavors to your food, potentially eliminating the need for flavored wood chips.
This is something to consider when you’re smoking rather than just a quick grilling session where the subtleties of the flavor wouldn’t have time to develop.
Charcoal Briquettes

Briquettes are your grilling workhorse, a little slow to get going, sometimes a bit tricky to light, but burn slow, steady and evenly once lit. However, they don’t provide the deep smoky flavor as effectively as lump charcoal.
Choose high-quality charcoal briquettes free from accelerants and additives, which can produce an unpleasant chemical smell and affect food flavors.
I’m splitting hairs here, of course. Both lump and briquettes will give you a great fire to cook with. I just think it’s worth understanding the differences so that, like all ingredients, you know what’s going into your food.
Choose Your Cooking Method & How to Configure Your Coals
Back in the dark days when I didn’t grill much, I’d simply pour a bag of briquettes onto the grate, light it, close the lid, and hope it worked out.
The food was probably fine, but taking time to learn different coal arrangements significantly improved my results.
There are four popular charcoal grill setups, each offering a unique cooking method. I’m going to teach you each of them now.
Method 1: Direct-Heat Grilling
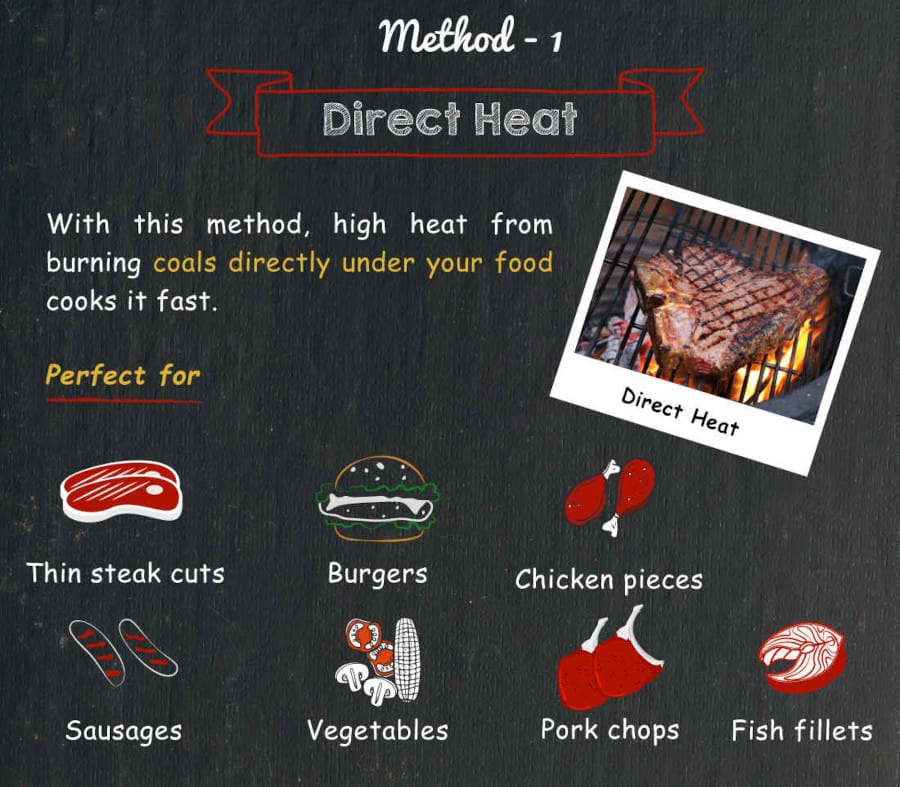
With direct eat grilling, high heat directly under your food cooks it fast.
What this Method is Good for — Small or thin cuts such as individual steaks, burgers, sausages, chicken pieces, fish fillets, pork chops, and vegetables.
Basically, whenever you’re looking to get a good quick sear with a still moist and tender interior, direct-heat is your man.
How to Set up Your Grill — Spread a layer of lit coals across the charcoal grate, leaving just a small area empty we call the “void zone” which gives you an out in the event of flare-ups or food cooking too fast.
Method 2: Two-Zone Cooking
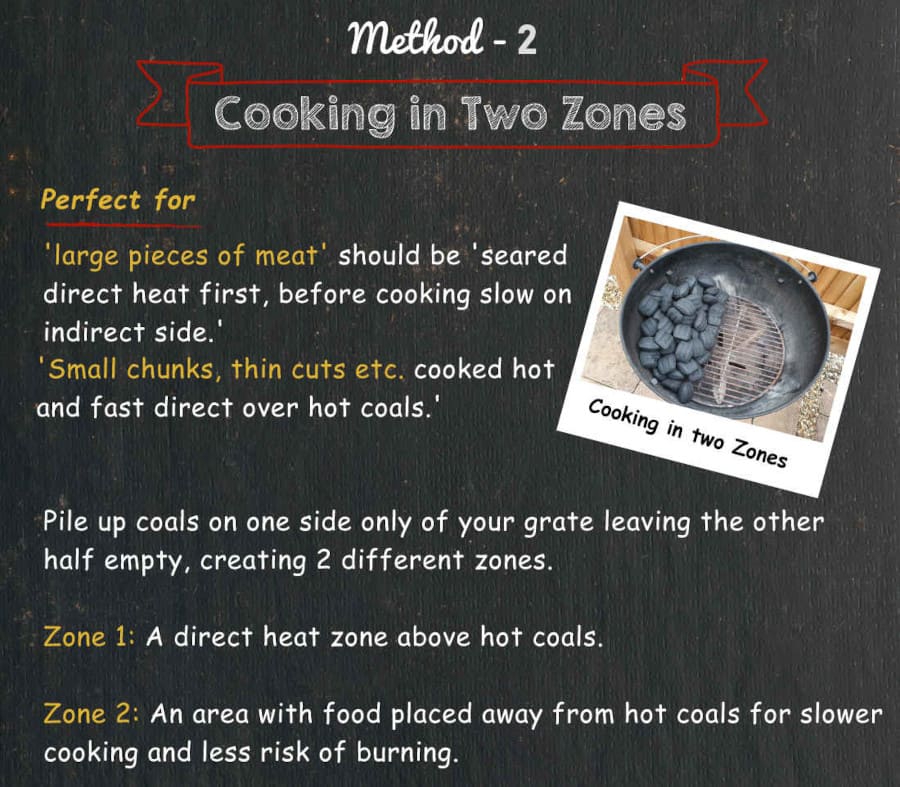
Two zone cooking’s combination of high heat and low heat is all about controlling temperature. And when you’re working with a natural element like fire, there will always be certain uncontrollable factors that can affect cooking, even for the top grill-masters out there, such as wind or irregular coals.
With a two-zone setup, you always have the option to lower or raise heat instantly by transferring food from one side to the other so that you, not Mother Nature, are totally in control of the heat.
What this Method is Good for — Well, pretty much everything, because even the humble hot dog if it cooks fast, needs to be removed to a low heat zone, so it won’t burn.
And larger pieces cooked in a two-zone setup will love a good blast of high heat to sear the exterior followed by low heat to finish the cook. Or flip that and cook low and slow, tender and juicy, then sear on the high heat side of the grill to get that wow factor at the table.
Whole birds, racks of ribs, pork butts, even the hallowed prime rib will all grill up just beautifully on a two-zone grill.
How to Set up Your Grill — Pile up coals on one side only of your grate leaving the other half empty. Food will still cook in this empty zone but at a much lower “indirect” temperature.
Method 3: Parallel Configuration
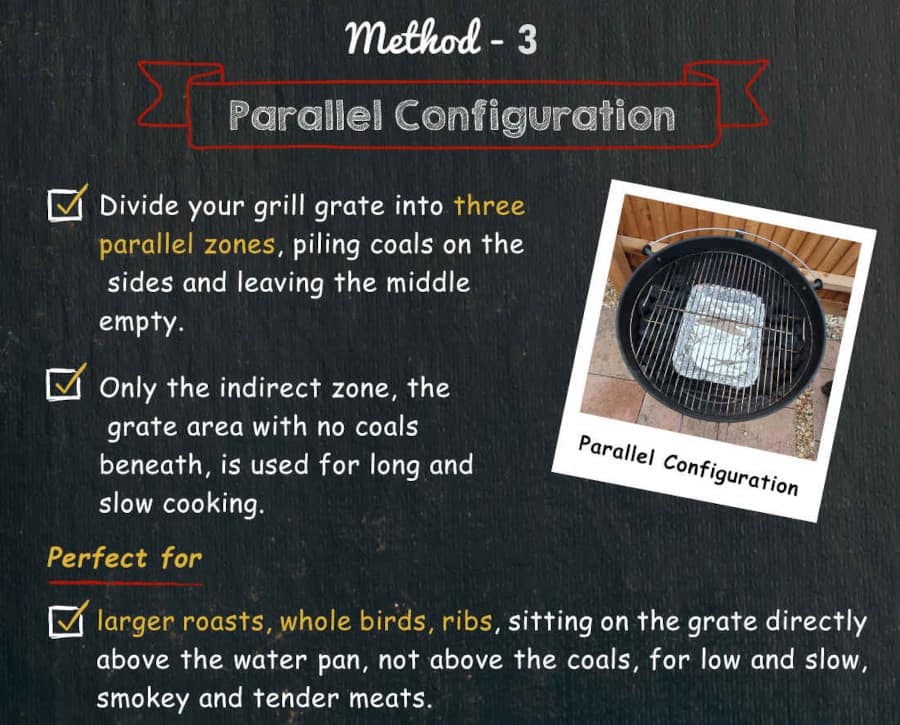
A type of two-zone grilling where only the indirect zone is used for cooking. The parallel configuration is one of the preferred ways for slow roasting.
With this method, there is heat coming from both sides, so food cooks more evenly compared to a two-zone setup. It’s also a favorite way for cooking whole chickens, because with lit coals both sides, but none underneath, the chicken is cooking indirectly in lower heat avoiding burning, but getting radiant heat from both sides for crispy chicken skin .
You will typically be roasting in this configuration with the lid closed.
What this Method is Good for — Larger roasts, brisket, whole birds, ribs, anything that will achieve a new level of nirvana with a good long, lower heat smoke and roast.
How to Set up Your Grill — Divide your grill grate into 3 parallel zones, piling coals on the sides and leaving the middle empty. Not essential, but a good idea is to set a foil pan with water in this central zone to keep the air humid under the lid, which will help ensure tender, juicy meat.
The meat sits on the cooking grate directly above the water pan, not above the coals.
Method 4: The Charcoal Snake
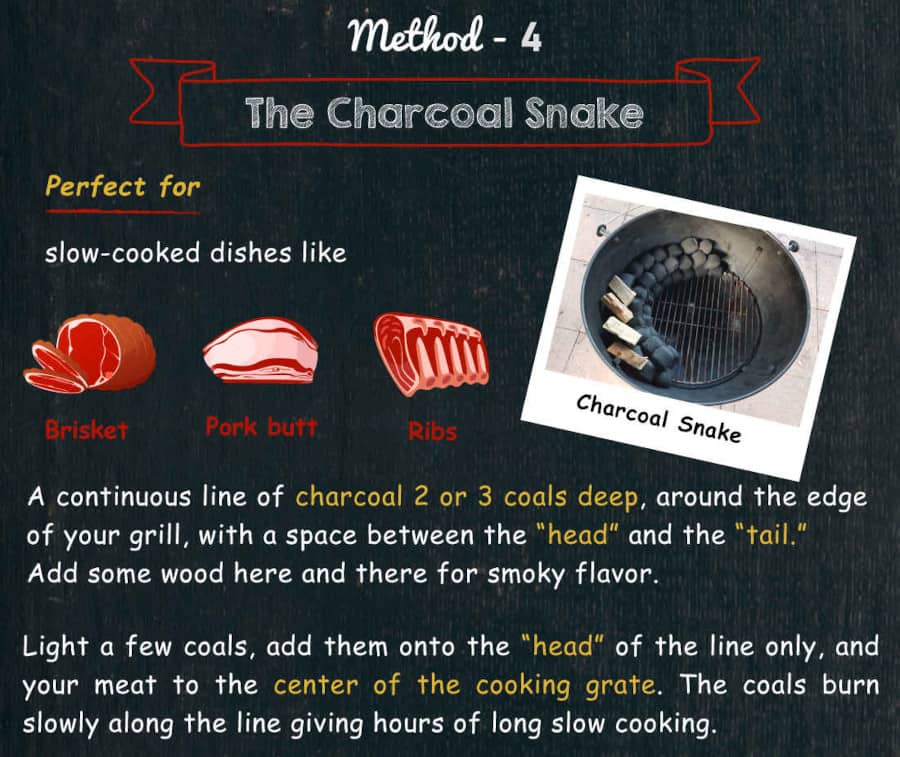
Ever wondered how to use a charcoal grill as a smoker? The charcoal snake method is an excellent method for low and slow barbecue, and one that is used for turning a standard charcoal grill into an effective smoker.
What this Method is Good for — Large pieces and inexpensive, tough cuts such as brisket, pork butt, and ribs will become melt-in-the-mouth tender with a long smoke using the charcoal snake method.
How to Set up Your Grill — Create a continuous line of charcoal, 2 or 3 coals deep, around the edge of your charcoal grate. Make sure it’s not a full circle, leave a good space between the “head” and the “tail.”
Add some smoke wood chunks here and there to crank up that smoky flavor, placing them toward the start or the ‘head’ of the snake, so smoke is generated toward the beginning of the cook.

Next, use a charcoal chimney starter to light 6 or 7 coals until glowing hot and ashed over, then using some tongs carefully place them onto the “head” of the line and close the lid, with the vents partially open, for the grill to warm up.
Then add your meat to the center of the cooking grate.
The lit coals will slowly burn along the line giving you hours of prolonged, slow, low-temperature smoking. And of course, you can keep topping up more coals to the “tail” to extend the snake and the cooking time.
How Much Charcoal Should You Use in Your Grill?
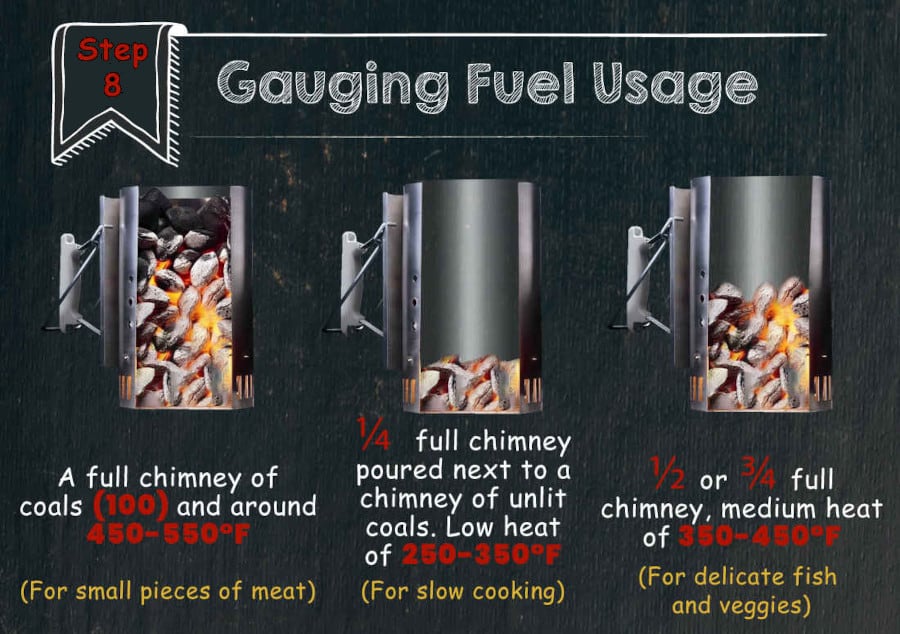
How much charcoal you need depends on the food you’re cooking and your desired grill temperature. Here’s how to decide.
For small items like steaks, chicken legs, and sausages needing high direct heat, use a full chimney of about 100 lit coals to reach 450–550 °F.
For delicate items like fish fillets, vegetables, or chicken breasts, aim for a medium heat of 350–450 °F, using ½ to ¾ of a chimney (50 to 75 coals).
For low temperatures around 250–350 °F, a 1/4 full chimney of lit coals is sufficient. You can add more coals later for longer cooks.
Remember, a thinner charcoal layer burns faster and provides less heat, suitable for quick cooks like hot dogs. A thicker, multi-layered coal setup offers more intense and longer-lasting heat.
How Do You Light a Charcoal Grill?
When it comes to lighting a charcoal grill, You’ve got a few options and some are better than others. I’ll describe the main ways first and then point you in the direction we recommend.
Option 1 — Use a Chimney Starter.
This simple metal cylinder with venting at the bottom is available from most hardware stores and a surefire way to get, well, a sure fire.
Concentrating all the coals in a small space, combined with the chimney effect (heat rising, pulling air up through the bottom to naturally fan the flames), allows intense heat to build fast.
Simply screw up 2 or 3 sheets of newspaper and place underneath the chimney — or a firelighter if you prefer — then light it and wait. The coals will be fully lit and ready to pour into your grill and to cook over in 15 minutes or so.
This is a fast, simple, and efficient way to light a charcoal fire. We absolutely love them!
Option 2 — Use a Looftlighter
A second excellent option to get your coals burning is to use a Looftlighter or other electric starter.
A Looftlighter is a clever handheld, quick-touch device that uses a powerful blast of hot air to ignite coals in about 30 seconds. Kind of like a super-hot hairdryer. You can learn more in our Looftlighter review.
Also, If the coals need a boost, rather than chuck lighter fuel at them, just give them another quick hit with the electric starter.
Just know that you will need an electrical socket nearby to plug it in.
Option 3 — Pyramid of Coals and Firelighters
Create a small pyramid of coals on your charcoal grate, with a couple of fire starters in there toward the bottom. Then light the firs starters and wait for the coals to catch.
Kind of old-school, but it still works.
This method will take a little longer because you have to wait for the fire starters to light the coals and get them going on an open grate.
A charcoal chimney starter or Looftlighter has you ready to cook in at less than half the time!
What do I Recommend?

I highly recommend methods 1 or 2. They are foolproof and fast. And when you’ve got a big cook ahead of you and a hungry hoard to feed, you need quick and easy.
A charcoal chimney will last you for years, making it an easy investment when compared to time saved starting up your grill.
And also, when you grill as much as I do, a Looftlighter pays for itself in saved costs compared to firelighters in 12 to 15 months. Plus it’s a cool looking toy to have and use 🙂
A Word on Lighting Fluids
Don’t. Just don’t. Avoid petroleum, methanol, ethanol. You don’t want these chemicals flavoring your burger.
Some briquettes come pre-infused with lighter fluid for easy lighting, or you can apply lighter fluid to standard briquettes. If you, just make sure every charcoal piece is fully ignited, glowing red, and covered in ash, so any and all accelerants and odors have been burned off, ensuring they won’t affect the taste of your food.
However, it’s best to avoid lighting fluids or accelerated briquettes. This way, you can safely cook on partially lit coals, add unlit coals mid-cook, or use the snake method without any worries.
I never use lighting fluids or briquettes with accelerants, and I advise you to do the same.
How do You Arrange Your Lit Coals and Preheat Your Grill?
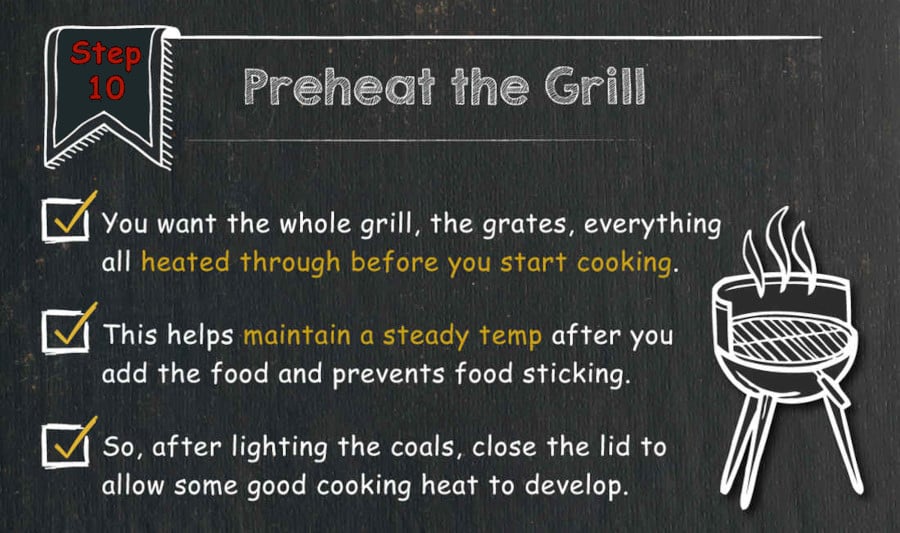
Using one of the three methods, once you have hot coals ready, put on heatproof gloves and use tongs to arrange the coals as previously discussed. Then it’s just a case of closing the lid to allow the grill to fully heat up, ensuring a steady temperature and hot grates to prevent sticking.
Skipping preheating can lead to inadequate, inconsistent heat and the common grilling issue of food sticking to the grates and tearing during flipping. So be sure to preheat properly!
Do You Grill With Lid Open or Closed?
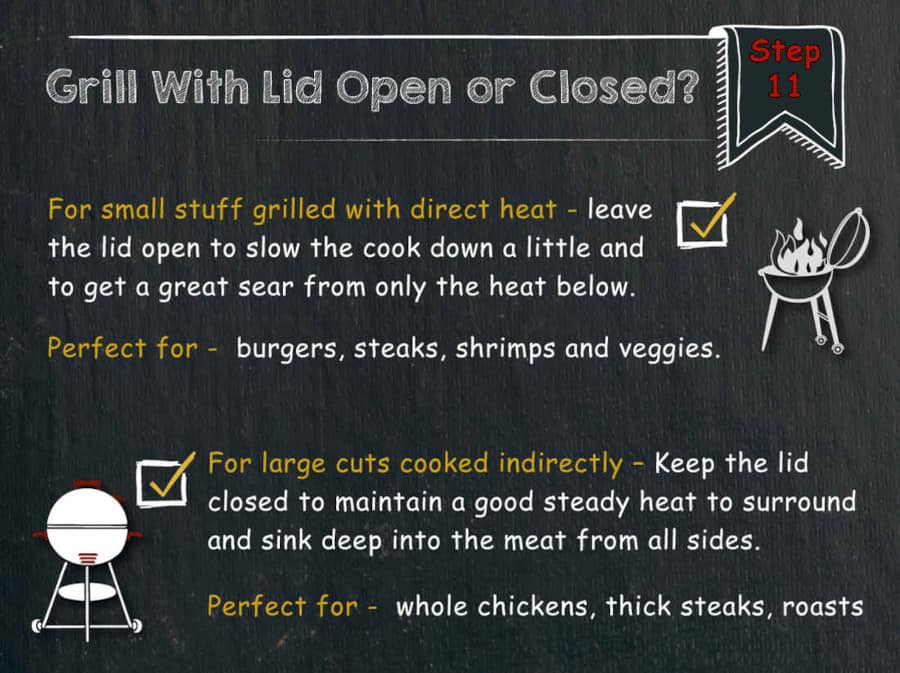
Sometimes it’s best to grill with the lid open, sometimes with it closed. Admittedly, it took me some time to realize that keeping the lid closed isn’t always best. It’s generally true to retain heat, but consider this:
You aim for a nice sear from below when cooking smaller items like shrimps, burgers, or kabobs with high direct heat. However, a closed lid can create extremely hot conditions, risking overcooking these small pieces.
With the lid open, most of the heat is from below, allowing food to cook more slowly. This gives you more control to achieve a seared crust without overcooking the inside.
With the lid closed, heat surrounds the food, cooking it faster. You might have to choose between a perfect outside sear without thoroughly cooking the inside or well-cooked insides with an overdone exterior.
So…
Lid Open
If grilling quick-cook small items that you want a great sear on, leave that grill lid open when cooking to slow the cook down a little and allow you more time to brown all sides before the food is cooked through.
Lid Closed
Conversely, for large cuts like whole chickens, thick steaks, roasts, you’ll want the lid down all the time to maintain a good steady medium heat that will surround and sink deep into the thicker meat from all sides.
In this case, you also want to minimize as much as possible opening the grill lid because the temperature inside the grill will drop significantly every time you do so, resulting in longer cooking time.
This spawned the oft spoken phrase in pitmaster circles: “If ya lookin’, you ain’t cookin’!”
Tip for when cooking with a closed lid:
If your grill lid has a built-in thermometer like the Weber kettle and many others, try to position the lid thermometer directly above the food, and not over the coals. Otherwise, you’ll be measuring the wrong temperature.
This is especially important when you’re cooking using a two-zone setup where different parts of the grill will have radically different temperatures. At the end of the day, the main goal is to monitor the area of the grill where the food is!
However, if you have a weber kettle — and I have two — then this is impossible sadly.

In a two-zone setup, position the vent above the food, placing it on the side opposite to the coals. This encourages the heat to circulate around the food rather than escaping directly upwards and out if the vent is above the coals.
As illustrated in the photo above, the thermometer on the lid of a Weber kettle is located on the side opposite to the vent. Consequently, the thermometer ends up directly above the coals when the vent is correctly positioned.
However, this implies that the lid thermometer is measuring the temperature above the coals, which is far hotter than the temperature at which your food is cooking on the indirect side. Unfortunately, this can’t be helped. Therefore, I recommend using a third-party digital thermometer, which I discuss later.
When Is It Time to Start Grilling?
There are some easy rules of thumb to follow to decide when start grilling, and you want to get it right.
For high heat grilling with lump charcoal, look for all pieces being lit and for the flames to die down.
For high heat grilling with briquettes, you’ll want to see the coals covered with a light gray ash before you add food.
For low n slow smoking or indirect heat roasting, you do not need to wait for all the coals to be lit and can add the food as soon as your grill has come up to cooking temperature and has pre-heated through.
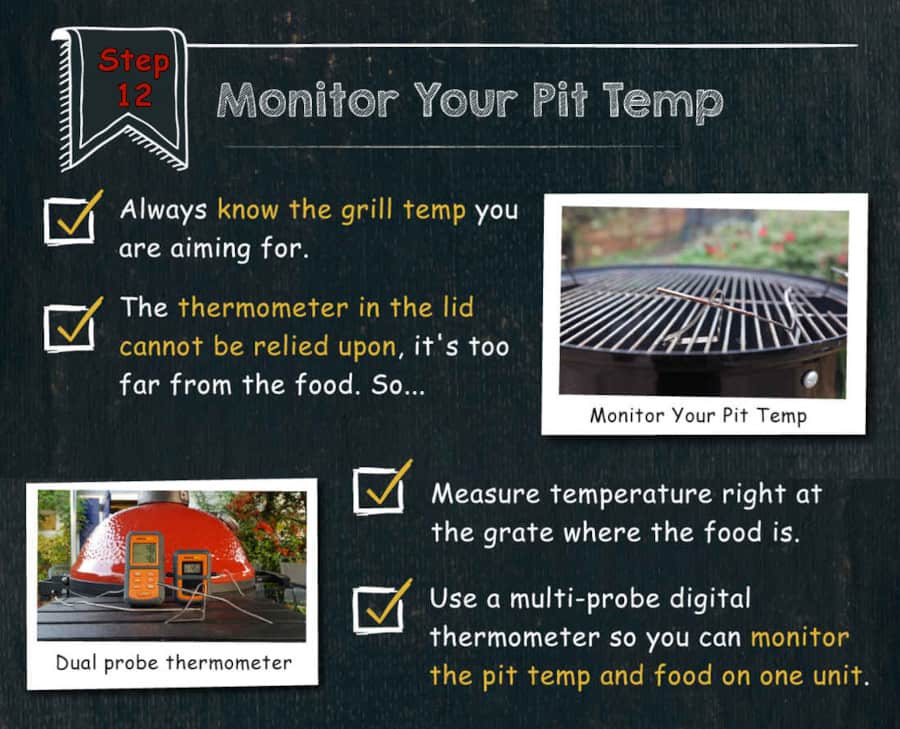
How do You Monitor Your Grills Temperature?
Monitoring your grills temperature is the holy grail of accurate barbecue and consistent results! All successful cooking relies on accurate temperatures.
Just like when following a recipe for your kitchen oven where it says ‘roast for 90 minutes at 375 °F’, so will BBQ recipes require a set temperature for a certain time.
A grill with the lid on can reach temperatures of anything between 160–700 °F+. That’s quite some difference, and too low or too high temps can completely ruin your cook.
So, start by always having your target temperature in mind.
A plain digital BBQ thermometer — no gadgets or trickery necessary — will be your friend here, ensuring no over or under-cooking and helping you maintain a stable temperature throughout the cook, which is very important.
So go the distance and invest in a good, easy-to-read thermometer even if your grill has a built-in one.

Built-ins aren’t especially reliable, plus they are often on the opposite side of the lid from the vents (as discussed just above) causing highly inaccurate temperature reading.
On the other hand, a digital thermometer that you add to your setup can be placed precisely where you need it, at grate level, next to the food you are cooking, to give accurate temps right where they are most important.

For food safety as well as ensuring perfect doneness, we also strongly recommend using a multi-probe food thermometer. Find one with a neat magnet on the back to stick right on to the grill lid and with probes that will tuck under the lid and directly into that fat juicy steak.
No thermometer? In a pinch — and this is not scientific but will work if it’s all you’ve got — use your hand.
Here’s how to very roughly gauge the temperature of your grill using your hand:
Carefully hold your hand about 4” above the heated cooking grate. If you can keep it there for:
- 2 seconds or less, heat is high (about 500 °F)
- 3 seconds, heat is medium-hot (about 400 °F)
- 4 seconds, heat is medium (about 350 °F)
- 5 seconds, heat is low (about 300 °F)
How do You Use a Charcoal Grills Vents to Control Temperature?
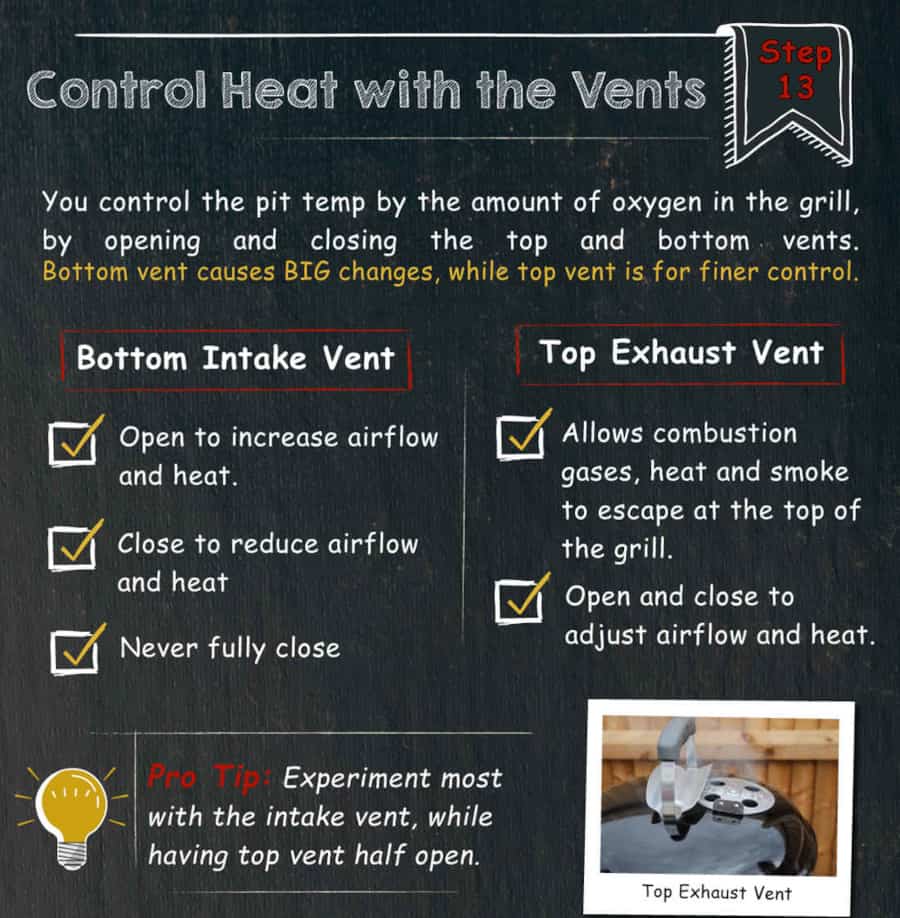
Managing oxygen is essential for taming the flame and controlling temperatures on your charcoal grill. Together, oxygen and fire are the two fuels needed for charcoal grills, and managing them effectively is crucial for successful grilling.
The more oxygen that reaches your lit coals, the hotter the fire will burn. Conversely, reducing the amount of oxygen will lower the fire’s temperature. This principle lies at the heart of controlling your grill’s temperature.
To regulate the oxygen feeding your flames, it’s necessary to adjust the vents.
Remember, your fire is constantly changing, and without attentive monitoring, the temperature and cooking conditions can change rapidly. Hence, while enjoying a beer, always remember to monitor things.
Charcoal grills usually have at least two vents that function to control the grill’s temperature. Here’s how to use them:
Lower Vent, or Intake Damper

Open this all the way for maximum airflow and the highest heat, and close to reduce the temperature and slow down cooking.
Never fully close this, or no oxygen will be able to keep the fire going. This means a bag of chips for dinner!
Upper Vent or Exhaust Damper

The top vent allows combustion gases, heat and smoke to escape at the top of the grill. The hot air rising and escaping out the top vent also sucks in air — the draft — from the intake damper, creating a current of air from bottom to top, passing over the coals.
And that, in a nutshell, is how the fire is fueled with oxygen in a charcoal grill.
How do You Hit a Desired Grilling Temperature and Keep it There?
To keep and hit a desired grilling temperature needs practice. Part of the beauty of grilling is that every grill has its own personality, and so my best advice is to experiment with these two vents, mainly the intake damper, and learn your own specific grill. They are all slightly different, but the process is the same.
Using a thermometer, get to understand how your grill reacts to small adjustments to the vents, how this affects temperature and cooking conditions. Because managing vents is one of the key things to successful grilling.
My Process for Hitting the Right Temperature on Charcoal Grills
This is my process for hitting and maintaining low to medium temps of 225 – 375 °F
- Top vent half-open.
- Bottom vent half-open.
- Place 1/2 to 1 full chimney (50 to 100) of unlit coals onto your charcoal grate.
- Fully light 1/4 chimney (25) of coals, and when glowing red-hot place onto the unlit coals on the charcoal grate.
- Close the lid, and allow the grill to come up to temp.
- Use a digital BBQ thermometer to measure the internal temp of the grill.
- If the grill begins to settle at a temperature that is below your target temp, open the bottom vent further.
- If it begins to creep past your target temp, close the bottom vent a little.
- Adjust in small increments until your target temp is hit.
- Always adjust by small amounts and wait for a good 10 to 15 minutes to see the actual effects after any vent change.
- During the cook, monitor things, and make adjustments as necessary.
- If it gets too hot, close the bottom vent 1/8th
- If it gets too low, open the bottom vent 1/8th
For hitting med to high temps of 375 °F and above:
- Top vent FULLY open.
- Bottom vent half open
- Place 1/2 to 1 full chimney (50 to 100) of unlit coals onto your charcoal grate
- Fully light 1/2 to 3/4 chimney (50 to 75) of coals, and when glowing red-hot place onto the unlit coals on the charcoal grate.
- Follow from step 5 above for hitting lower temps.
As general rules of thumb, depending on your particular grill and how many coals are currently lit:
- Opening or closing the bottom vent 1/8th will affect a 30 °F or so temperature swing.
- Opening or closing the top vent 1/8th will affect a 10 to 15 °F temperature swing.
I highly recommend to set the top vent to halfway open for lower heat cooks, or fully open for higher heats, then only adjust the lower vent to control temperatures. At least until you gain some experience and get used to your grill!
Playing with one vent (the bottom) is manageable for most people, playing with two can be a nightmare juggling act unless you’re sure of the process.
Be Somewhat Relaxed With Grill Temps
Although cooking somewhat demands precision, don’t go too nuts over the accuracy of your grills cooking temperature.
If a recipe calls for a low 250 °F heat, anything from 225 to 275 °F will suffice.
If a recipe calls for a medium-high 400 °F heat, then anything from 375 to 425 °F will suffice.
You WILL get pretty much the same results, only the cooking time will be shorter or longer.
Don’t go nuts over pin-point accuracy, the ballpark is good enough. Otherwise, you will be continually tweaking your vents chasing perfection and, in the process, take away some of the fun.
Finally, Add Your Food!
The big moment has arrived! You got all your tools ready, you set up your grill, you’ve lit it, and you’ve hit and maintained a stable cooking temperature.
It’s time for some food to hit that grill!
But steady on! You might have one more task before you get cooking.
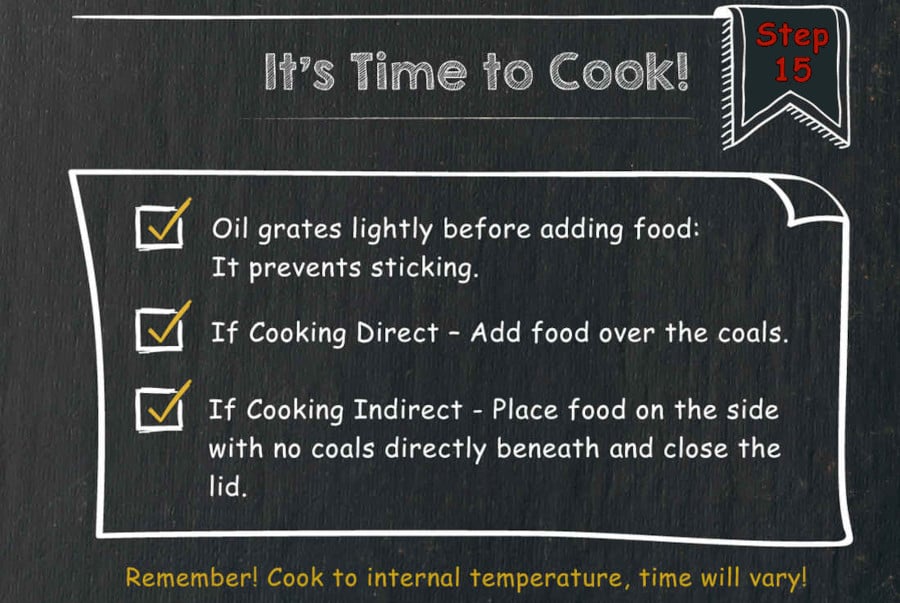
Oil the Grates Before Adding Food — If Low to Medium Heat
There’s nothing more heart-breaking than turning a carefully marinated expensive piece of fish only to have it stick with half left behind on the poorly prepared grate.
If you are cooking at a low to medium heat, grab a small wad of paper towel with tongs, dip it in a little vegetable oil and lightly brush your grill grate up and down to give it a thin non-stick coat.

You can use an old but very clean paintbrush for this too, but then you’ll have to clean it. I prefer a use-it-and-toss-it paper towel. And don’t forget your heat-proof gloves!
Do Not Oil the Grates if Cooking at High Heat!
If you are grilling at high heat, do not oil your grates! The oil will polymerize, become sticky, and have the opposite effect to what we want.
Oil your food instead and not the grates. The oil on the food will help it stop sticking.
What to do During the Cook?
If you’re cooking hot n fast using direct heat, don’t stray too far from the grill. That food’s going to need frequent turning every minute or so to get a good sear and to prevent overcooking on one side.
If cooking with indirect heat, place food on the side with no coals directly beneath and close the lid.
Try not to peak too often as you will lose valuable heat and upset the stable temperature every time you open the lid.
Instead, get your thermometers in place so that you can monitor the temperature without having to look inside.
When is Food Finished? Cook to Temperature, not Time
You can find all kinds of guides for “how long it takes to cook (fill in the blank)”. But, as we’ve noted earlier, no two grills are the same. And external factors like air temperature and humidity will always affect cooking time as well.
So while time can be a rough guide, always rely on a good quality instant-read meat thermometer to know exactly when to remove food from the grill. This is especially important when it comes to large joints and whole birds where the outer appearance of the food is absolutely no indicator of the internal doneness.
With burgers, sausages, fish, shrimp, and veggies, you can generally eyeball it. If it looks done, it probably is.
But for larger cuts, or If you’re in any doubt, just stick in that thermometer. This is not only your guarantee of delicious, still moist and tender meat but also your insurance against food poisoning.
I like to keep a print-out of the AmazingRibs.com food temperature guide stuck to the side of my fridge in the kitchen.
It’s a handy quick reference and removes the guesswork from grilling, is magnetic so stays put easily, and saves me having to reach for Google (and I stopped asking Alexa…because answers vary!)
When to Remove Food, Resting and Carryover Cooking
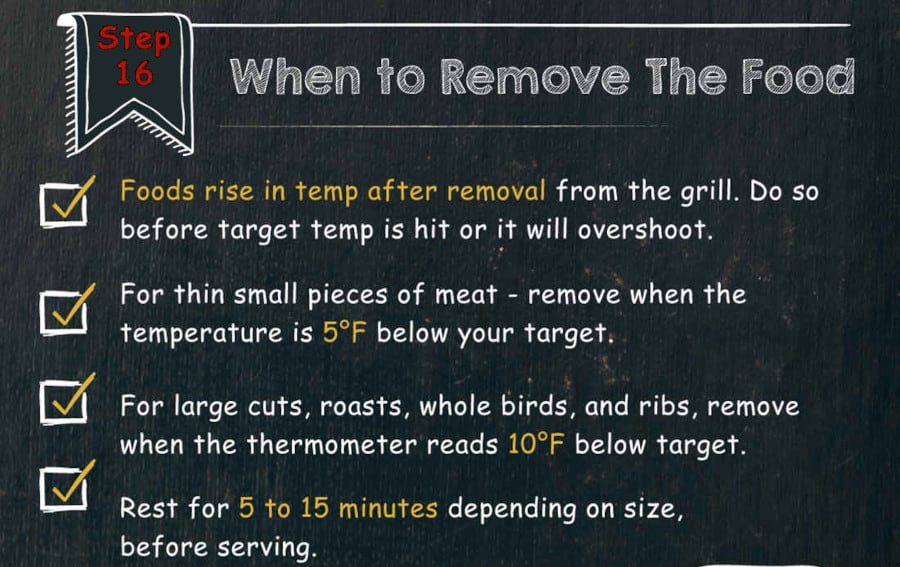
Whether baked in an oven or grilled, all foods will continue to increase in temperature by a few degrees after being removed from the heat source. To avoid overcooking, it’s important to remove food before it reaches your target internal temperature.
For thin or small pieces of meat (including steaks):
Watch that thermometer and remove the meat from the grill when the temperature is 5 °F below your target.
For large cuts, roasts, whole birds, and ribs:
Remove when thermometer reads 10 °F below target.
Then cover food lightly with foil and let it rest for 5–15 minutes for small cuts, and anything from 30 minutes to 2 hours+ for very large cuts.

During this resting period which sounds so relaxing, a lot is going on!
First, the food is still cooking and rising in temperature. This is called “carryover cooking,” and if you don’t realize it’s going to happen, you will overcook your food time and time again.
What happens is, even though you may have read an internal temperature of 125 °F for your steak, that is ONLY at the center. The surface of the steak has been in contact with a heat source over 500 degrees Fahrenheit if you seared it.
So the center is 125 °F, the surface could be 400 °F+
When you rest the meat, the temperature across the food equalizes. The surface cools, but some of that heat makes its way inside, further cooking the insides and raising its temperature.
So if you want a medium-rare 130 °F steak, take it off the grill at 125 °F, and it rises to 130 °F while it’s resting, due to carryover cooking.
Obvious when you think about it, but surprising when I first learned it. So remember this fact and never serve overdone steaks again 🙂
How do You Top Up Charcoal During a Long Cook?
Unlike gas, a charcoal fire has the potential to fizzle out if not topped up regularly. I don’t want to scare you, but after following all the advice we’ve given here and setting up a beautiful grill, the last thing you want to do is let the fire go out!
It’s not just that it will delay chow time. Worse, it will mess with the quality of your food, which, partially cooked, will cool down and then be cooked again. Don’t let it happen!
The single most reliable sign your charcoal needs topping up: The grill temperature is dropping, and opening vents to increase the heat doesn’t work. Then it’s almost a surety you’ve run out of fuel.

For many grills, simply lifting the lid allows you to check the fuel. However, to visually inspect the charcoal in grills where the fuel is concealed under deflector plates, like kamado grills, you must remove the food, grates, and deflectors.
In these cases, assessing if the temperature rises when the vents are open is the most efficient way to check the grill’s status.
You always need to stay ahead of the fire. If the cook’s been going a while, just start a new chimney of coals, so you’re ready to top up the grill before the heat drops off.
No chimney? Add small amounts of new fuel and tuck them in with the old.
Dumping a load on top of an existing fire will only temporarily reduce the heat until the new coals light and establish. Your goal is always to maintain a stable heat with as few ups and downs of temperature as possible.
How Can You Avoid or Control Flare-Ups?
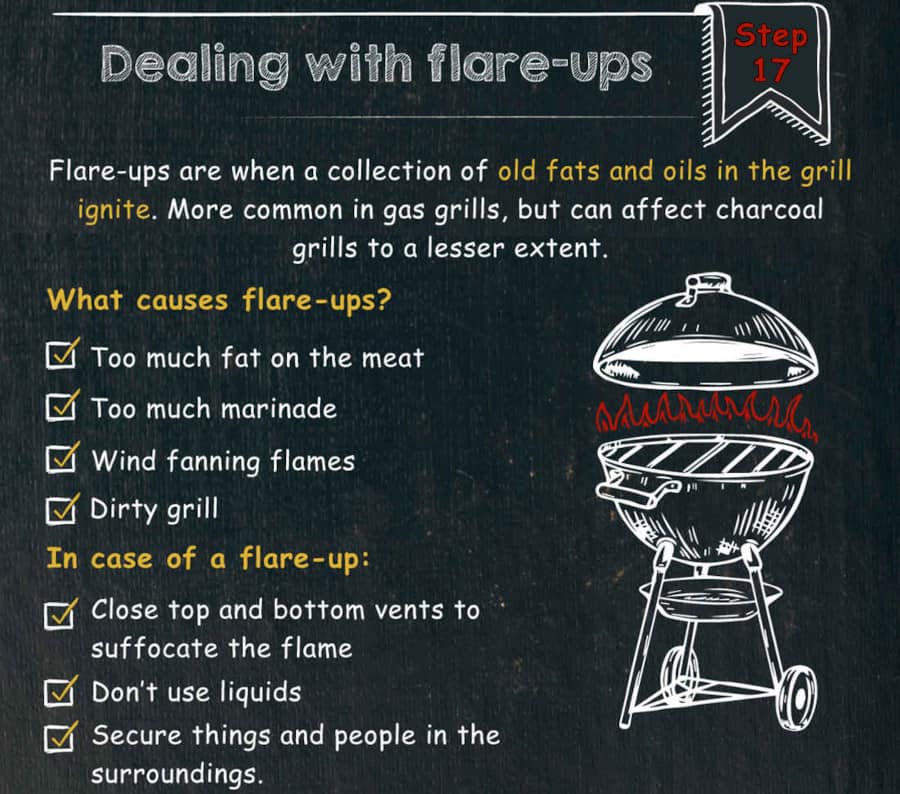
A flare up is a sudden surge of large, intensely hot, often out of control and definitely unwanted flames on your grill. We’re not talking small, localized flames licking up from the coals due to the odd bit of fat dripping fat here. We’re talking: “Whoah! Get out of there! The grill is actually on fire!” style flare-ups!
Most seasoned grillers have been there, and it’s not a pretty thing. It can be downright scary too as you frantically try to dampen the flames while trying to recall if your home insurance is up to date.
Here are the top 4 reasons for flare-ups:
- Too much fat on the meat. When heated, fat will melt and drip down on to the flames. Yup, there’s your inferno. Keeping the lid open to dampen the heat will help and trim that fat before grilling…better for your waistline too!
- Too much marinade. Sweet and/or oily marinades, in particular, can burn and flare-up. It’s best to pat dry the meat with paper towels before adding it to the grill. If you’re sad to lose all that great flavor, set some aside earlier that you can boil up to kill bacteria, then brush onto the meat just before serving or use as a sauce at the table.
- High wind. Pretty obvious, this one. Wind will fan the flames and create more fire than you’d bargained for. If it’s windy out, try to steer your grill into a sheltered spot before you light it.
- A dirty grill. The first thing I said right at the start of this guide was: “Always start with a clean grill.” I cannot emphasize enough how important it is to clean your grill well after every cook. Old stuck-on food will only lead to bad things…burnt smell, sticky grill and flare-ups.
What Should you do if You Have a Flare-up?
Close the lid and the top and bottom dampers. Starving the fire of oxygen is a quick way to put out the flames.
Do NOT use water. Oil and fire don’t mix. We learned it in school, and it’s still true today. Suffocating the fire is your best bet.
And, of course, remove all people and objects from the immediate vicinity until you have the situation back in control.
Then go re-read this article because clearly, if you had a flare-up, you didn’t follow all our advice!!
Closing Down the Grill When Cooking is Done
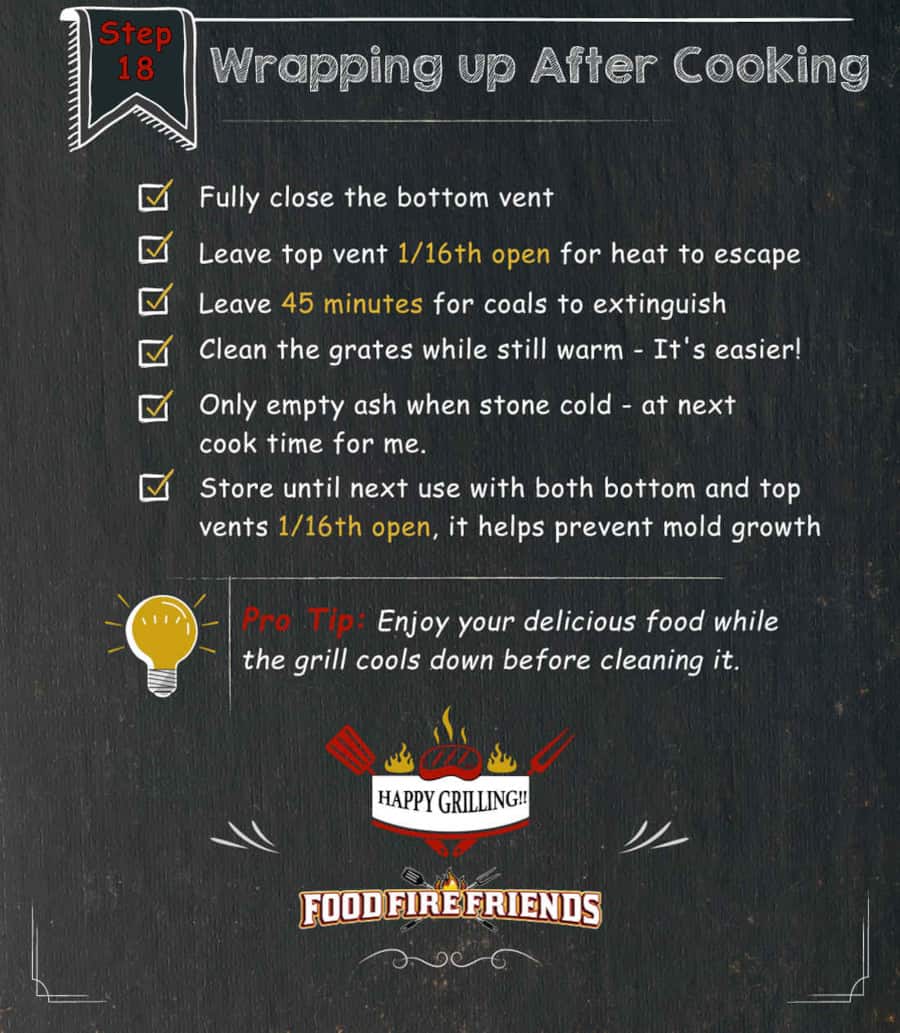
We have an article dedicated to putting out your charcoal grill once a cook is finished, but the basic details are as follows:
Once you’re done cooking and ready to sink your teeth into whatever deliciousness you’ve just grilled up, take a moment to fully close the bottom intake vent to shut down the fire.
This way, you will not continue to burn good coals and may be able to use some whole pieces again for your next cook.
Leave the top vent just slightly open to allow smoke and heat to escape and go enjoy your food.
Clean the grates while still warm!
I know it’s difficult to tear yourself away from the party, but it’s highly recommended to clean the grill while it’s still warm, and any residual food is still soft and scrubbable.
So give the grill time to cool but not go cold and then get in there with a good grill brush and scrub all those grates down.

You can empty the ash pan only if it’s stone-cold. You don’t want to risk even the smallest ember still being live. Remember that home insurance. I usually leave emptying the ash until the next day, or even the next cook.
Finally, once the grill is cooled and the grates are cleaned, close the top vent too to prevent rain, natural debris, and curious bugs getting in.
If you don’t plan on using your grill for a while (whaaaat?), leave both vents just a tiny bit open to allow some airflow that will help prevent fungal growth.
If you’re putting it into storage, use a good quality weatherproof cover but only after the grill is totally cold.
That was a Lot to Digest!
I’ve tapped into my decades of grilling experience and wisdom here to share with you everything from soup to nuts, and coals to steaks when it comes to how to grill with charcoal. This is basically your charcoal grilling 101 reference manual right here!
Remember, your grill is your best tutor. Keep practicing. Experiment with various fuels, starters, coal arrangements, and vent settings.
At the end of the day, no one size fits all.
You will need to absorb this information and adapt it to fit your own preferences and equipment.
I hope my guide on how to use a charcoal grill has been helpful, and I wish you many successful grilling sessions in your future!
Thanks for stopping by!


Really useful article — loads of stuff I sort of thought I half knew and now realize that whilst I was on the right track, there is still so much to learn! And you learn by doing, so I’m off to get started. I have recommended this read to a number of my BBQ friends — very informative.
Thanks, Damian! Always nice to have positive feedback. And sounds like you’re about to grill more, which is always a winner in my book! 🙂
I’m grilling for the first time. Your site was ever so helpful. Thank you, so much for the great advice!
Thank you, and good luck 🙂
Thank you very much for your generosity. I’m new to grilling with charcoal, and I learned a lot from reading your article.
Have a nice day.
Thanks, Michel. It’s easy to learn with a bit of dedication, but mostly by doing, making some mistakes and learning from them. Welcome to the world of grilling! 🙂
This was a great guide. We successfully grilled on the weber smokey Joe today and this guide made it go so smoothly! Thank you!
Thanks, Terri. It’s always nice to hear someone found it useful!
Hi Mark,
Your article was excellent, very interesting to read, and it taught me so much about my grill which I never knew.
Thank you very much.
Love to stay in touch, so I can learn more.
Thanks, Merven. I’m glad it’s helped!
This article is a goldmine. Wish it was available as a PDF or some kind of print-friendly format. Would love to have a physical copy to use for reference, next to my grill =)
Hi, Tiger. Thank you, it’s always nice to hear people get something out of our content. To print it, I would think a simple copy and paste into a Word doc, or Google Docs will result in a nicely printable version of it?
Hello Mark, I’m hosting a BBQ next weekend and it’s the second time I’m using my Weber Charcoal Grill. I’m so happy I came across your link. You’ve covered everything there is to know about a charcoal grill. I appreciate the hard work you put into putting this A-Z How To on using a charcoal grill. I definitely learned quite a few things that the manuals don’t go into. Thank you once again. Happy Grilling!!! Anna
Thank you very much, Anna. It’s always nice to get positive feedback 🙂
Mark,
Finally, a direct and complete instruction to cook with a charcoal fire. I have used an offset smoker for years, a Weber Kettle both 18.5- and 22-inch, picnic grills on a pedestal, and just fires. You bring it together along with suggestions and pitfalls. You are my hero.
I was disappointed with the gigantic and beautiful Weber BBQ book. It had lots of beautiful pictures and cute write-ups, but was lacking in instructions. I had OfficeDepot rebind it into a spiral binding. Steven Raichlen’s Barbecue! Bible was a travelogue and picture book, but not too informative. The spiral binding let me use it a bit.
You beat them all. Thanks for the effort. Good eatin’.
Thanks, Cliff! It’s always nice to hear the content is useful.
Really well written, and thought out how to for beginning, medium, and even advanced charcoal grillers guide. I wish this could be downloaded, and saved to my computer, or smart phone in pdf format. I can print it out, but for me it is much easier to access in digital format. Food for thought!😉👍💯
Hi Barry. I’ll ty to make PDF downloads a thing in future. Added it to my to do list (which is sadly quite long already!)