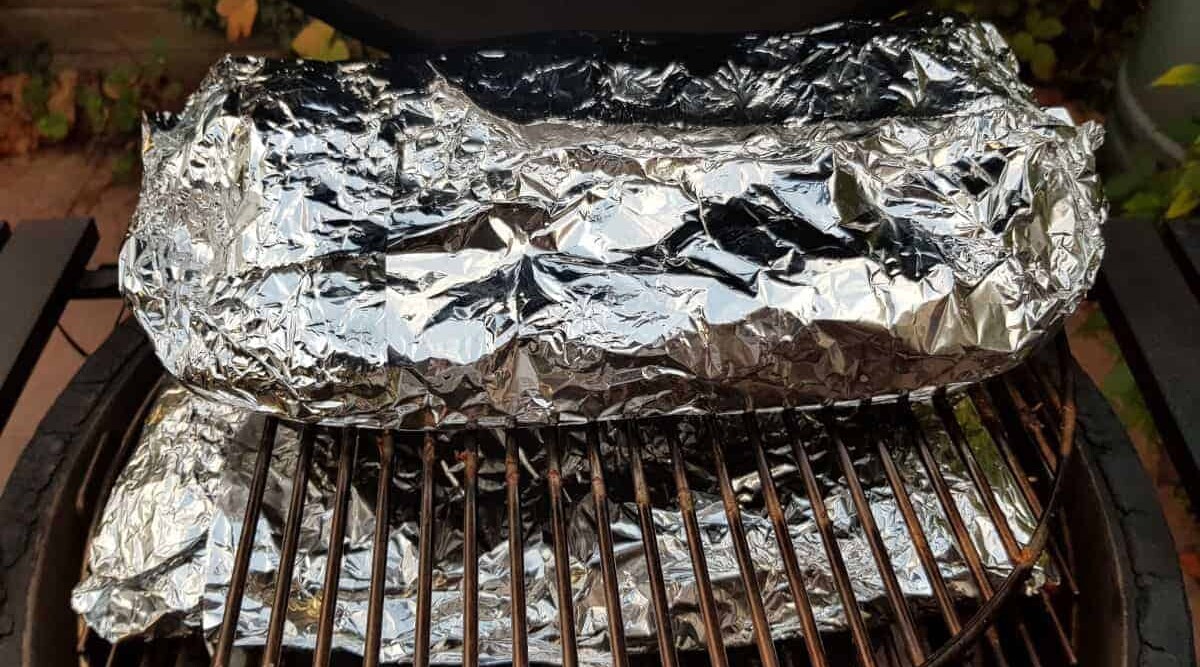
The Texas crutch method gives you a moister melt-in-the-mouth result, not always easy when you’re grilling meat for many hours and risking drying it out.
In this post, we’ll explain the many benefits of this simple method, also discuss a couple of pitfalls, so you can avoid them, and give you an easy step-by-step guide on how to use the Texas crutch next time you grill.
In Spain, folks typically eat dinner around 10 or 11 pm. This didn’t go down so well at my house.
On that fateful night, the beautiful beef brisket I’d imagined wowing my friends and family with? It took a lousy three extra hours to cook.
Back then, I didn’t know about ‘The Texas Crutch.’
When you’re smoking or slow roasting a big hunk of meat over low heat, this simple technique can help speed up the cooking process and get dinner on the table at the right time.
And let me tell you, this is important! There are only so many hours you can fill in with chips and beer.
Let’s get to it.
Jump to:
What is the Texas Crutch, and Why Use it?
Texas crutch is a simple step in the process of slow-cooking or smoking large pieces of meat like pork butt or beef brisket.
During the cook, once the meat has enough time to take on a great smoke flavor and has developed a beautiful, tasty bark, the meat is taken off the grill, wrapped tightly in heavy-duty aluminum foil, and put back on the grill to finish cooking.
It’s a bit like braising in a Dutch oven.
Here’s the thing. When grilling over low heat, the temperature of the meat rises slowly for the first few hours of cooking, but will then hit a plateau. Pit-masters call this the “stall,” an ugly twilight zone on the grill where all cooking can suddenly stop for several hours with no increase in the internal temperature of your meat, despite your beautiful fire and impressive BBQ skills.
The stall happens because, as the meat’s temperature rises, it releases moisture which then evaporates from the surface and cools the meat even as it’s cooking. Kinda sounds like a contradiction, heating and cooling at the same time? But at low temperatures, this is exactly what happens, and the result is a deadlock on the grill. It’s the same evaporative cooling that happens on our skin when we sweat.
Texas crutch is a neat, easy way to power through this “stall” and keep the cooking going.
How Does it Work?
When you wrap the meat tightly in foil, you are preventing evaporation (cooling). All the heat is trapped, and the meat’s temperature will continue to rise towards your target finishing temperature.
This simple step can save hours of cooking time.
In the Texas crutch world, especially when it comes to brisket, nobody knows their stuff better than pit-master Aaron Franklin of Franklin Barbecue in Austin, Texas.
Watch the master at work in this video to learn how you too can create the perfect slow-smoked melt-in-the-mouth brisket as he does every day for hundreds of devoted fans.
Yup folks, that’s 1,800lbs of brisket per day!
What are the Pros and Cons of the Texas Crutch?
Like using water pans and 2-zone grilling, the Texas crutch is another tool to help you control the grilling process. Used smartly, it will help you tweak cook times, color, texture and taste.
Competition pit-masters will often make use of this method, but the key is to get the balance right.
Here’s a quick look at what can work for you and what may work against you when using the Texas crutch:
Pros
Cut down cook time. I’d be the first to say you can’t rush good barbecue, but sometimes you just don’t have 16 hours to wait for the perfect cook. With the Texas crutch, you can push through some of those slow hours and get dinner on the table faster, still with excellent results.
Keep it moist and tender. Low slow cooking and smoking is awesome, but meat is continually losing moisture and drying out as it cooks. Using the Texas crutch traps the moisture in and keeps the meat super juicy and moist.
Control the color and smokiness. When I see the color I’m looking for in a piece of smoked meat, but know it’s got some cooking still to do, that’s my sign to wrap it in foil. With the Texas crutch, wrapping will lock in that great dark color, level out the smokiness, so it doesn’t get overpowering, and still continue to cook the piece through.
Give you “holding time.” If, instead of keeping folks waiting for their dinner as I did, you’re done early, wrapping the meat will allow you to maintain the temperature and readiness of the meat until you’re ready to eat, without risking drying out and getting cold.
Cons
Too wet and mushy: Moisture is the enemy of the good crusty BBQ bark that we all love. So when you wrap up that hard-earned beautiful mahogany crust in foil, it’s going to become soft and moist…“pot-roast-y” is the term some have given this result.
Still packed with flavor, but lacking the crispy crackling dark exterior that dreams are made of.
Don’t despair! There’s an easy way around this. Just follow our steps below to achieving perfect bark even while using the Texas crutch.
Messy, wasteful and extra work. Well, I only mention this because a few folks feel this way. Sure, the Texas crutch is another step, but it only takes a moment to wrap up the joint and toss it back on the fire.
For the pig (or beef) heaven that you’re going to end up with, a few more minutes work isn’t much to ask. The best things in life take a little more work, right?
What Kind of Meat Can I use Texas Crutch With?
Larger joints and especially tough joints of meat that take many hours to cook will benefit most from this method because long slow cooking will make all those tough fibers tender, but can potentially dry them out — and a Texas Crutch shortens the cook while keeping the meat moist.
The most often cooked cuts where a Texas Crutch is used are:
- Brisket
- Beef ribs
- Pork butt / Pork shoulder for pulled pork
- Pork ribs
Quick note: Pit-masters have their own special technique for crutching ribs…the 3-2-1 method… where ribs are slow-cooked for 3 hours, wrapped in a crutch for 2, then unwrapped, basted in sauce and cooked for 1 hour more. Read more here on crutching ribs using the 3-2-1 method.
5 Simple Steps to the Perfect Texas Crutch
- Start by slow cooking or smoking your meat for roughly 2/3 of the total cooking time. The number of hours will depend on what you’re grilling.
- You’re looking for two signs that it’s time to crutch: When the internal temp of the meat stalls and doesn’t climb further, typically when it hits somewhere between 150-160 °F — and — when the “bark”, the crust and color, is to your satisfaction.
- Remove the meat from the grill and tightly wrap it in 2 layers of heavy-duty foil. You can add a couple tablespoons of liquid, be that apple juice, beer or wine to the foil packet to increase tenderness and flavor. Don’t forget to crimp tightly around your meat thermometer probe too. IMPORTANT! It must be a tight seal!
- Return the foil-wrapped meat to the grill and continue cooking until the internal temperature hits your target temp (for example: 203 degrees F for brisket.)
- Now you have a choice: You can remove the meat from the smoker, keep it wrapped and warm and rest it if it’s not yet time to eat. Or you can unwrap it (be careful of the hot steam) and grill on low for another 30 minutes to crisp and dry up the bark which will be moist from the foil steaming. This is how you avoid that “pot-roast-y” texture mentioned earlier.
What about Butcher Paper?
The Texas crutch technique uses foil, but many pit-masters prefer to follow the same method using food-grade pink butcher paper (no wax, no silicone).
Being porous, butcher paper allows the meat to breathe, reducing the softness that can result from foil-wrapping, but helps it burst through the stall and cuts cooking time.
Check out Aaron Franklin’s at-a-glance chart comparing foil-wrapping, butcher-paper-wrapping and no wrapping:
| Foil | Butcher | Nothing | |
|---|---|---|---|
| Cook time (hours) | 11 | 11.5 | 13 |
| Bark | Softer | A little crunch | Crunchy |
| Taste | Beefy | Happy medium | Smokey |
Some Quick Tips from the Pros:
- Only wrap when the bark is looking good, about 2/3 through cooking. The bark won’t develop any further after crutching, but bark you created before crutching can always dry and crisp up again afterward.
- Don’t peek too much! Every time you raise that grill hood, you’re letting that good heat out and slowing the cooking. Remember “If you’re lookin’, you ain’t cookin’!”
- Always let the meat stand after cooking. Aaron Franklin says standing is as important as cooking, allowing juices to be reabsorbed evenly through the meat.
- Use a water pan during the first 2/3 of grilling to help keep meat moist.
It’s a Wrap!
The concept of wrapping meat to speed cooking and lock in moisture is not new.
Early man roasted animals in their hides (where hides back then were today’s foil!), and around the world today, banana leaves and corn husks among other things are used to protect grilling meat from high heat.
So join the club! Next time you’re slow-smoking a large hunk of meat, try the Texas Crutch. You will love the extra measure of control you get over cook time, texture and taste. It’s all about mastering the fire.
And remember, grilling is an art not a science. Every grill is different. Every cook has their personal preferences. Keep experimenting.
And let us know how you get on. Did crutching work for you? Foil or paper? We’d love to hear about your experiences in the comments below.
Happy grilling!


HI Mark, I am your way via WhitneyBond. Com. I moved to Colorado at 8k feet elevation and am still struggling toward the perfect brisket. I noticed you did not inject your brisket. What is your feeling on injection or any injection recipe ideas?
Hi Curt,
I’ve tried a few injection recipes over the years, and I liked most of them. I’ve been known to experiment this way on occasion, and in my opinion the cheaper USDA choice or leaner style briskets you can get internationally really do benefit, both moisture and taste wise.
However, I tend to buy prime briskets, and for me pork butts are moist enough, and you can add enough flavor with rub, bark creation and at the end saucing, making injecting unnecessary, so I tend not to inject hardly ever at all.
Lots of competition pitmasters will inject, as you only get that one mouthful chance to blow away the judges, so any edge you can get, any chance to add flavor is one you should jump on. But as a home pitmaster, I don’t feel it’s necessary.
Anyway, you should give it a try perhaps, so you have the chance to make your own mind up? That’s a big part of the fun, the experimenting. Meat injectors are reasonably cheap, and there are hundreds of recipes for injections around the web. There’s a few on this site if you use the search function in the sidebar on the right, enter ‘inject’ and check out the articles that come up.
Best of luck…let me know if you do try any injection recipes, and what you think of the end results.
Loved this very informative article, Mark! I only started smoking last year, but thanks to my learning about the Texas Crutch early on, my briskets have been surprisingly remarkable (despite my inexperience). I needed a refresher before smoking my first brisket of the season this weekend. I usually stick to what I know: briskets and steak, but look forward to learning more this summer. I’ll be back!
Excellent, thanks Pierce! If you love and stick to briskets and steak, try beef ribs next, they’re possibly my favorite. A bit briskety, very rich and beefy, take far less time and are pretty to get right (a bit more forgiving.)
Hi mark, I use the crutch on a pork butt. I decided to wrap at 167F and unwrap at 194F, thinking I would baste it in sauce, But the temp went from 194F to 155F and only went back to 177F after an extra 2-hour cook time. What is going on?
Hi Jean,
When you cook large pieces of meat low n slow and do not wrap them part way through the cook, they hit something called ‘the stall.’ This is a period where the moisture inside the meat makes its way to the surface, and then evaporates cooling the meat, in exactly the same way that sweating cools a human body. This prevents the meats temperature rising any further, hence we say the cooking has ‘stalled.’
When you wrap meat, you are keeping all that moisture inside. It is sealed tight and has nowhere to go. So the stall does not happen, and the temperature of the meat continues to rise.
When you then unwrap the meat, the moisture on the surface evaporates, and this has a cooling effect (exactly like a human sweating.) And when the surface moisture has evaporated, some internal moisture makes its way to the surface, evaporates, and has a cooling effect. This can last for quite some time.
This is a large part of what might have happened. Though dropping from 194F to 155F? This I have not seen and seems way too big a drop. Could it have been you had thermometer probe tip near a bone? In a fat pocket? And this caused a slight misreading? Or did you use an instant read and probe different places?
I ‘competition’ trimmed up a pork shoulder for pulled pork. Because it was just the money muscle and tubes (although still attached), I tied it up into a nice oblong 3.4-pound roast.
I injected it and rubbed it at 6 AM. (I would have done this the night before, but I’m using pineapple juice in the injection mix, and didn’t want to turn the meat into mush)
After two hours, at 9 AM, I tossed it in my 250° propane smoker. Fast forward to 3:30 PM, and it’s reached 160°.
Double wrapped in foil, bumped the temp up to 300°, and she’s climbing. Looks like the ‘Texas Crutch’ saved the day as I powered through the stall!
BTW? I made a North Carolina vinegar-based BBQ sauce and substituted my homemade ‘raisin vinegar’ for the apple cider vinegar. I can’t tell you how good this sauce is! I highly recommend trying other kinds of vinegar in your sauces. I also made a ‘cranberry vinegar’ that would work great here.
Thanks for the page, my friend! Very informative.
Hi Russell. Sounds great to me, and I will try to give alternative vinegars a go. We have a few, mostly balsamic types, including one with ‘dates’ in that we really like to use in dips and salad dressings. I might give that a go.