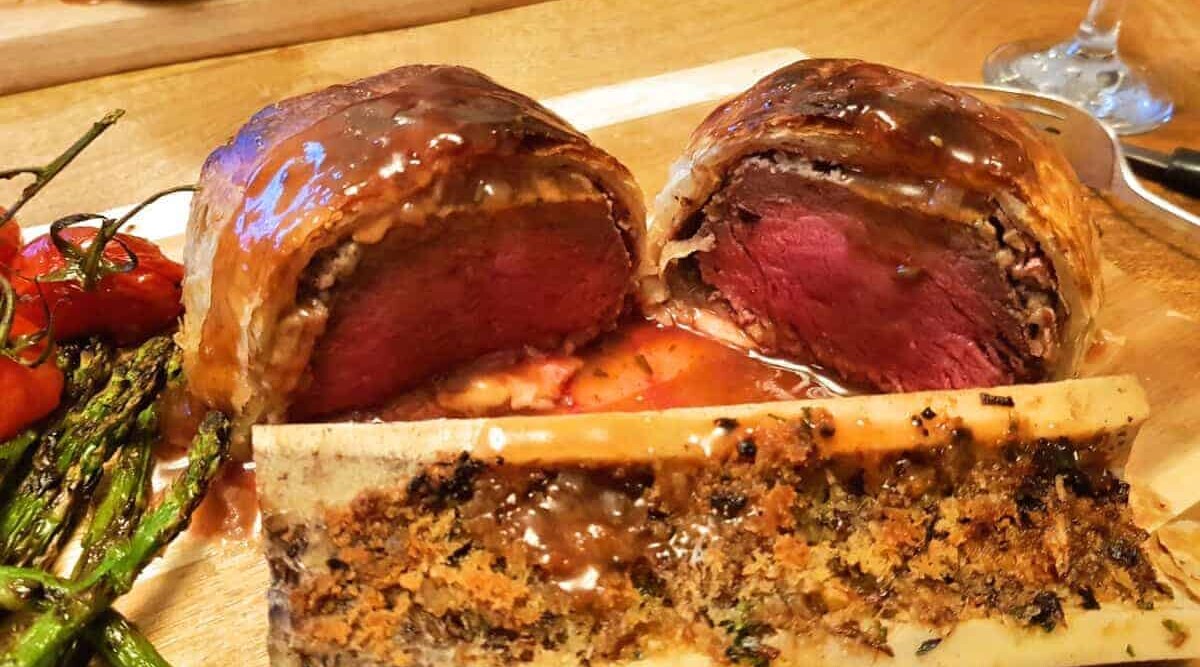
Basque Beef Wellington — Charcoal Seared then Wood Fire Oven Baked
Basque beef is retired dairy cows, left to graze wild for years in the Basque Country, developing incredible marbling and flavor. Quite unlike anything I’d eaten before. We charcoal grill Basque filet in this recipe before making it into a wellington, baked in a wood-fired oven.
This Basque beef Wellington cook, charcoal grilled then wood fired, is a cook I did back in early 2018 before I bought a decent camera, so a few process photos are missing, or have been left out due to being low quality.
I wasn’t going to post this at all, but just stumbled across the photos I did take while searching for something else, and because I loved this meal so much, have decided to add it to my site regardless.
The reason I loved this cook so much is that it involved Basque beef filet. A very rare treat for me.
This is beef imported from Spain, coming from ex-dairy cows who are left to roam Basque Country pastures after retirement from milk production, to forage and graze until between 8 and 12-years old before slaughter.
The meat is then dry-aged for a minimum of 30 days.
For me, filet is far down my list of best-tasting beef cuts. Yes, it’s tender, but it lacks flavor compared to so many cuts. Not so with basque filet, and particularly if cooked the way I do here!
The source of the meat and the dry-aging process results in an incredibly intensely flavored, extraordinary beef that is quite unlike anything I’ve tasted before or since. Basque (and the similar Galician) beef are two of my very favorite foods of all-time. If you get the chance, give a try!
Just look at that marbling — in a filet!
So yes, this meat was a bit special, so I wanted to knock up something that did it justice. I settled on a charcoal grilled, then wood-fired oven baked beef wellington, with a bone marrow canoe and sides.
Missing from this shot is the chicken liver pate, butter, salt and pepper. I wasn’t expecting to write this up 😉
First, make sure you use quality ingredients because you want to do this expensive cut of beef justice! I used all organic ingredients and made the pancakes myself. However, I used shop-bought puff pastry…but more on that later.
Making the Pancakes
You can make the pancakes using the rising heat of your grill as it comes up to temp.
When I say ‘pancake’ though, I mean more like a crêpe. The very thin style you get across Europe, and particularly France. Its only purpose is to help soak up juices during cooking to prevent a soggy pastry bottom, not to add flavor or texture to the dish. So we only need a small square to put on the bottom of each Wellington.
The Duxelles
A duxelles is a combination of mushroom and onions — or usually shallots — mixed with herbs, sautéed in butter to remove as much moisture as possible, and cooked down to a thick paste. The herbs used are usually thyme, sometimes parsley.
Duxelles is used as a stuffing in many dishes and can be added to soups and sauces. It’s a powerful tasting, umami filled, intensely mushroom flavored condiment that pairs well with, and adds a real flavor boost to beef. Hence, it’s inclusion in a beef Wellington.
My top tip for the Duxelles used in a beef Wellington, is to sauté it for at least 15 minutes. Most recipes say 10 minutes or less, but by cooking for longer, the maximum amount of moisture is removed, you have less chance of soggy pastry, and the extra cooking doesn’t change anything with the taste in my opinion.
Mushroom, shallot and thyme pulsed to a paste before sautéing
Sear Your Beef Filet Before Wrapping
Filet is notoriously one of the least flavorful cuts of beef. Yes, it’s super tender, but in the flavor stakes, it’s lacking. Therefore, sear it before use in a Wellington.
And bonus points for using a charcoal grill, that adds even more flavor to the dish.
Coat the Filet in Mustard Before Wrapping
Flavor! As far as the eye can see…
An excellent tip I use is to smother the beef filet in mustard before wrapping. Beef and mustard is a classic pairing, and for me works really well in a wellington.
However, do not use too much!
The biggest ingredient in most mustards is water, followed by mustard seed flour and a few other ingredients. So we spend ages making sure our duxelles has as much water removed as possible, then add some water with the mustard. A bit contradictory, you might think?
So yes, use it sparingly, and use a good English or Dijon mustard, because they pack the most flavor for the least amount used compared to others. See how much I use in the photo below as a guide.
Some Time in the Fridge Helps Keep the Shape
A good trick to help keep everything together and keep its shape is to wrap up all the ingredients and keep them in the fridge for 30 minutes, before wrapping them in pastry.
So lay out some plastic wrap, place your ham onto the wrap making sure if they overlap, spread out your duxelles across the ham, add your beef, and then roll it all up using the plastic wrap.
When done, you can twist up the ends and make a tight little sausage, before placing it in the fridge for 30 minutes.
This somewhat ‘sets’ the whole thing, so when you are ready to wrap it in pastry, you remove the plastic wrap and everything remains together and keeps a decent shape.
Use a Wood Fired Oven if You Can, a Grill if You Cannot
Using a wood fired oven adds yet another layer of flavor to the dish. I LOVE using my WFO, they aren’t just for pizza.
Seriously, as long as you can get a handle on temperature control, anything you can cook in your indoor oven, you can cook in your wood fired oven, and you get that crazy good wood fired flavor. Anything from roast meats and vegetables, to artisan breads, they all taste better — in my opinion — if cooked in the WFO.
If you do not have WFO, then use a charcoal grill. Charcoal imparts a lovely flavor to food and will elevate this dish above the norm if compared to a kitchen oven cook.
Whenever I roast or bake in my WFO, I always make sure to raise what’s cooking off the oven floor. Very often, the walls and floor of the oven are far hotter than the ambient air temperature, resulting in a burned bottom.
So place your Wellingtons on a wire rack if going the WFO route, otherwise you will burn the bottom!
Use a Wireless Thermometer for Ambient Oven Temp
Long gone are my days of guessing what the temperature is inside my wood-fired oven. I do have an infrared thermometer for reading surface temperatures, but for ambient air temperatures, you cannot beat a good wireless thermometer.
Can you see in the image below the short metal probe between the Wellingtons and the fire? This is measuring the oven’s ambient air temperature.
After a lot of practice, I’m able to hit target temps quite reliably these days.
But what I also do for insurance, is to keep a little fire going in my fire pit next to the oven, so I can remove burning logs to lower the temp or take one from the fire and place into the WFO if I need to raise it, without having to wait for a fresh log to catch fire.
This does mean burning through more fuel in the fire pit, but it works for me, and I get to enjoy standing near a lovely open fire while cooking in the WFO too.
Roast Bone Marrow Alongside the Wellingtons
Wellingtons, or more to the point puff pastry, tend to cook best at about 390 F, or 200 C. Bone marrow tends to roast best at about 430 F, or 220 C. So ideally, they would roast at different temps, which often means more than one oven.
However, if you place the bone marrows into the oven much closer to the fire than the wellingtons are, they will receive more radiant heat and cook quicker. So, that’s what you should do!
If you are going to cook this in a grill on indirect heat, then cook everything at the lower 390 F / 200 C temperature, and add 10 minutes to the bone marrow cooking time. All will work out well.
Bake until Filet hits 125 F internal
The usual advice for a Wellington is to bake it until the puff pastry is a beautiful golden color. However, depending on the thickness of the filet, and even the animal it came from, the cooking time can vary. If you cook to time, or to how the pastry looks, you may have an under— or -overcooked filet in the middle.
So the best method is to cook it to internal temperature.
Using an instant-read thermometer, I advise cooking the Wellington until the internal temperature of the filet reaches 125 F in the center.
Then, when you take it out of the oven to rest for 5 to 10 minutes, the internal temperature will rise close to 130 F and be a perfect medium-rare.
Grill some Veg While the Wellington Rests
Finally, since you had the grill lit anyway, you may as well use it to grill some veg, right?
For this cook, I grilled off some cherry tomatoes and some asparagus. However, I did warn very early on in this article that I was missing some process pictures, so a snap of asparagus is all I have. I’ll throw up a quick recipe for them next spring.
Charcoal seared, then wood fired Basque filet beef Wellington, with wood fire roasted bone marrow canoes.
Ingredients
Scale
For the pancake / crêpe:
50g plain flour
1 large egg
150ml milk
Pinch of salt
1 tablespoon of butter
For the duxelles:
350g chestnut mushrooms, roughly chopped
2x shallots
2x garlic cloves
1 tbsp fresh thyme
2 tbsp unsalted butter
50g pork or chicken liver pate
For the final assembly of the Wellington:
The pancakes and duxelles from above
2 × 200g Basque beef filet
8 x slices Parma ham
2 tbsp English or Dijon mustard
300g puff pastry, 2 sheets 150g each — shop bought, I never make it myself 😉
For the bone marrow canoes:
2 x canoe cut bone marrow shafts (split lengthways.)
1 x shallot
1 tablespoon of fresh chopped parsley
2 heaped tablespoons of breadcrumbs
Salt and pepper
Instructions
Heavily season your beef with salt 2 hours before you plan to use it, and leave it in the fridge.
Next, light the grill you will use for searing as it will take some time to come up to heat. And at the same time, light and preheat your wood-fired oven (or another grill for indirect cooking) to 425 F / 220 C.
Then, we begin by making the pancakes on the rising heat of the grill before using it to sear the beef.
Make the Pancake/Crêpe:
Add the flour to a large mixing bowl and make a well in the center.
Crack a single large egg into the middle and whisk well into the flour.
Add a pinch of salt, then mix well again.
Slowly add the milk while whisking all the way and doing so until all is combined and lump-free.
Leave to stand for a good 15 minutes or so. It helps any lumps of flour to truly dissolve.
In a medium-sized frying pan preheated to medium heat on your grill, melt half the butter, then swirl the pan to coat it.
Take half the pancake mixture and drop it into the center of the pan. Swirl pan to evenly coat the bottom.
Fry for 90 seconds, then flip and cook the other side for a further 90s.
Turn out onto a plate and allow it to cool before using it in the Wellington.
Repeat steps 6 to 9 to make a second pancake.
Sear the Beef:
Searing adds flavor to meat by the Maillard reaction. A little like caramelization, but a reaction between proteins and heat instead of sugar. An important step to maximize flavor!
Once your grill has hit super high heat for searing, lightly oil the grates to help prevent sticking.
Take your well-seasoned beef and place directly on the grates, directly over the charcoal.
Sear well on all sides until you see good color and crust (time can be variable, do it by sight!)
Once seared all over, remove from the grill and allow it to cool while you make the Duxelle.
Make the Duxelle:
Chop the mushrooms, shallots, garlic, and thyme very finely.
Blitz in a food processor.
Add a tbsp of butter to a frying pan on medium heat. Swirl to coat the bottom and heat until butter is bubbly. Then add the olive oil and heat for another 30 seconds.
Add the mushroom and shallot mix to the pan and sauté for 15 minutes, stirring occasionally.
After 15 minutes, remove from pan and spread thinly on a plate to allow to cool for 10 minutes.
Put into a bowl with the liver pate, and mix until thoroughly combined.
Assemble the Wellington
This recipe is for 2 individual Wellingtons, not one large one. To make one:
Lay out cling film approx 2 feet in length
Place four overlapping pieces of Parma ham down on the cling film
Take half of the duxelles and spread evenly across the ham.
Rub the cooled beef filet with a THIN layer of English mustard.
Place the beef onto the duxelles, then carefully roll it all up with the cling film, tucking in the sides of the ham as you go.
When rolled, twist up the ends of the cling film tight, so you have a perfectly formed sausage.
Place into a fridge for half an hour to chill the outside, which will help it keep its shape later.
After half an hour, roll out a square of puff pastry approx. 5 mm thickness.
Unwrap your ‘wellington sausage’ and place it onto the pastry
Cut a piece of pancake to the exact size that will cover only the top of the beef filet, then place it on top.
Fold the pastry around the filling, so the ends meet on top, then pinch it all together to seal it tight.
Finally, turn it over so the pancake is on the bottom, and the perfect looking side of the pastry is on top (for presentation reasons)
It’s now ready for cooking…
Prepare the Bone Marrow Canoes
If you wish, you can soak the bone marrow in water for a few minutes to remove any blood that may be present. I tend not to bother, though.
Finely chop 1 shallot and 1 tbsp of fresh parsley.
Add to 2 tbsp of breadcrumbs, and season with salt and pepper.
Take 2 bone marrow shafts that have been halved vertically, and spread half of the breadcrumb, shallot, and parsley mixture evenly over each of the bones, on the flat marrow side.
Cook it
Preheat your wood-fired oven or grill to approx 395 F / 200 C
Place the wellington on a small rack and into your wood fired oven, OR, if using a grill place it onto the grate to cook with indirect heat.
Allow the Wellington to cook for 10 minutes, before then placing the bone marrow canoes into the same WFO or grill.
Now cook for approximately another 20 minutes, until the wellington is a nice golden brown, and the internal temperature of the beef reaches 125f as measured with an instant-read thermometer.
Remove the Wellington, and allow the bone marrow to cook for a further 5 minutes or so while it rests. You want the breadcrumb mix to have a dark, golden crust, and the marrow itself to have bubbled and mostly rendered.
Now…eat!
I would keep it simple and serve with some potato and a veg two, you can pick your own poison here.
Notes
For the duxelles: Most recipes say to sauté it for 8 to 10 minutes. I find this is still too moist and always makes the pastry bottom too soggy. So I way overdo it instead and dry it out as far as possible, otherwise you get a soggy bottom. And nobody likes a soggy bottom 😉 So sauté it for 15 minutes at least. The taste is not impaired.
For the pancakes / crêpes: You can make either one large thin pancake or two smaller ones. I prefer two smaller ones. The reason I cut two squares only the size of the wellington being made and place it on the bottom, is to soak up some juices and stop the bottom getting soggy. Many recipes say to wrap the whole filet in a pancake, but it’s not necessary if you dry out the duxelles for longer than usual, and I prefer not to have all that pancake in it personally.
Searing the beef: Sear the filet on all sides in a blazingly hot grill, as hot as you can get it. You want a decent Maillard crust all over without cooking the inside the meat much, so the hotter and quicker, the better. And if you can use a charcoal grill, you get some added flavor!
The bone marrow canoes: If you’ve cooked these before, you will know not many people put breadcrumbs on top, but only herbs, salt, and pepper. I like to put the breadcrumbs on as once they’re baked, they give it texture, and it also soaks up lots of the delicious fats from the bone marrow that all too often melt away and end up discarded.
I'm a BBQ fanatic and have been barbecuing and grilling since 2005. I founded FoodFireFriends in 2017 and have extensively written for the site since.
I love cooking outdoors over live fire and smoke whatever the weather, and I currently own over 30 grills and smokers of all varieties that I frequently cook on to produce epic food.
My goal with this site is to help as many people as possible enjoy and be good at doing the same.
Great sounding recipe. I am buying some Galician fillet for beef Wellington on Xmas day using your recipe (don’t have a wood burner tho) really looking forward to it
Coincidence! Instead of turkey or a standard roast beef, we’ve decided this year to do a wellington and partridge for our Xmas dinner. So you and I will be slaving away on the same recipe!
Beef ribs are one of my all-time favorite meats to BBQ! Similar taste to brisket, easier to cook and ready in half the time, while also being cheaper to buy. What’s not to like? So here’s how I turn these ‘brisket on a stick’ behemoths into a wonderful beefy treat.
ABTs are jalapeño peppers stuffed with cheese and sausage, then wrapped in bacon before dusted with a BBQ rub, slow-smoked, and then slathered in sauce. Wow! Need I say more? Learn how to make this delicious side dish that also does well as a snack.
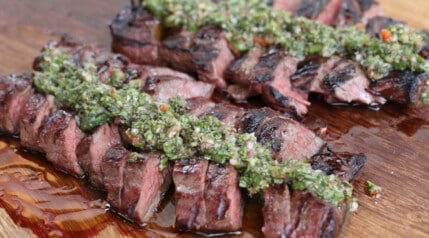
Quickly seared hanger steak, basted with flaming bone marrow dripped from a red-hot flambadou, served with chimichurri. This recipe is simple, has a bit of theater, an incredibly satisfying, flame-grilled beefy taste, and is everything simple BBQ should be. Give it a go, you won’t be disappointed.


Great sounding recipe. I am buying some Galician fillet for beef Wellington on Xmas day using your recipe (don’t have a wood burner tho) really looking forward to it
Coincidence! Instead of turkey or a standard roast beef, we’ve decided this year to do a wellington and partridge for our Xmas dinner. So you and I will be slaving away on the same recipe!
Awesome recipe! Definitely adding this to the permanent collection.