
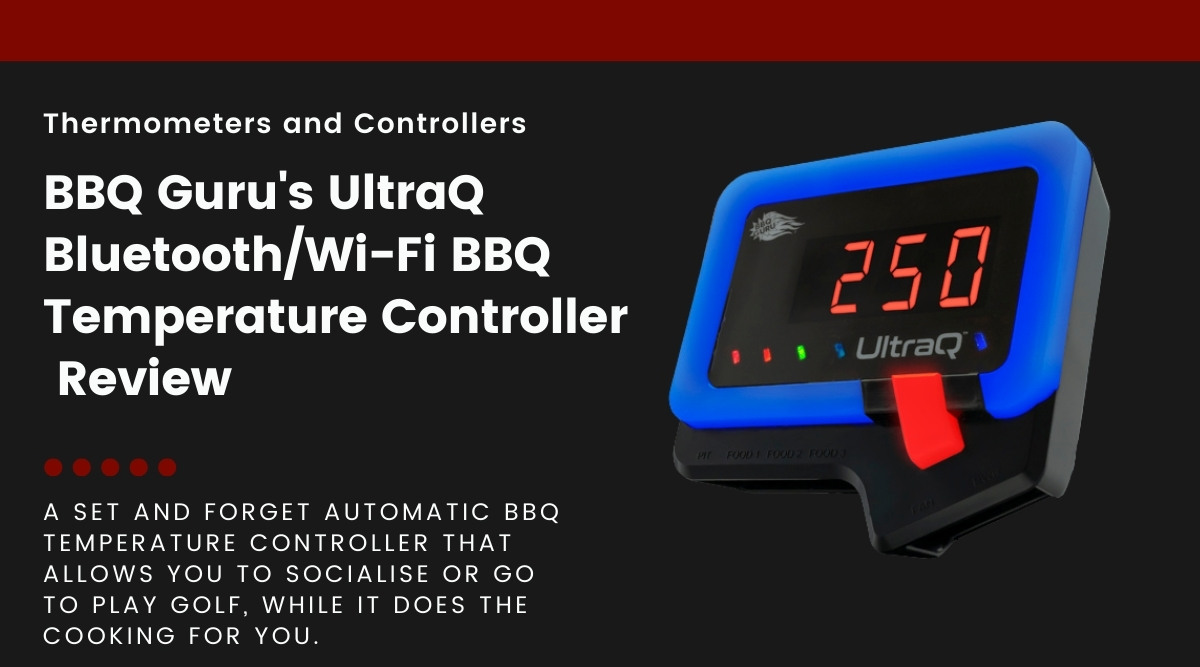
In this review, I’ll examine the BBQ Guru UltraQ Bluetooth/Wi-Fi temperature controller. I put it through its paces and share my honest opinions on build quality, functionality, and value.
What is a guru?
A simple definition might be a master in their field who can impart great wisdom to those who seek it.
Maybe the most famous guru of modern times was the Maharishi Mahesh Yogi, whom we can thank (or blame, depending on your point of view) for some of The Beatles’ most experimental music.
Some people saw Steve Jobs as a technology guru. And most dads see themselves as gurus on everything from lawn care to home repairs — and barbecuing, of course.
Perhaps, though, the real barbecue guru is this device from — wait for it… BBQ Guru! Bow down before the UltraQ BBQ Temperature Controller and prepare to absorb its wisdom.
The good folks at BBQ Guru were kind enough to send me the UltraQ free of charge in exchange for my opinions. Despite that, I can promise you an honest review so that you can make up your own mind — I got mine for free, but you won’t, and I don’t want you to spend your money on anything I wouldn’t bother with.
I’ll hook mine up to my kamado grills and my Weber Smokey Mountain to see how it performs in various conditions. I’ll guide you through setup and operation and let you know how easy it was to use, who it’s best suited to and whether it’s worth paying full pop. In effect, I will be your BBQ Guru guru.
Let the journey of learning begin.
Jump to:
General Overview

This automatic temperature control and monitoring solution for long, low n slow cooks makes for more consistently good food, with fewer headaches and mistakes. It’s a quality product, that works well.
The BBQ Guru UltraQ is a four-channel digital barbecue probe thermometer and controller. You can use it like any probe thermometer, but its key feature is the ability to adjust the temperature inside your smoker or grill by regulating the amount of air blowing over your coals by way of a fan.
From the manufacturer, the UltraQ comes with an ambient probe and a single food probe, both made of stainless steel. It supports up to three food probes, and these are available to purchase online.

When you purchase an UltraQ, you first select your grill or smoker from an extensive list. This allows BBQ Guru to send you the proper adaptor to connect the blower fan to your cooker. Once connected, the base unit powers up the fan as needed to keep the ambient temperature at your desired target.
You can program the UltraQ using the free proprietary app (which had a recent upgrade) and connect via your home Wi-Fi network or directly with Bluetooth. Oh, and you can control it using your Amazon smart speaker, though I admit I’d feel like a whack-job talking to my barbecue. (I mean, other than when I curse at it occasionally.)
There’s limited functionality directly on the base, too, if you want to skip connecting or have lost your signal for some reason.
One of the unique features of the UltraQ is a light-up ring formed around the front of the unit. There are two distinct sections: a four-sided rounded rectangle and a small “tail” on the bottom side. Together, they form a Q. Cute.

The ring’s purpose is to visually display what’s happening in your cooker but without words or numbers. The lights can be either red or blue, and either solid or flashing. Once you learn what the patterns mean, you can glean a lot of info with a passing glance. I’ll talk more about that later on.
BBQ Guru is based in Pennsylvania, and their products stem from a collaboration between two serious barbecue fans, “Shotgun” Fred Pirkle and Robert “BBQ Bob” Trudnak. Those are awesome nicknames, and I wish I had one.
Pros
- Automatic temperature control is hands-free, accurate, and effective. It does its job well.
- It’s well made and durable, so will withstand the rigors of working outdoors
- The display is easy to see and read in all lighting conditions and from distance
- The smartphone app is recently updated, far less buggy and connectivity is good.
- The transmitter is functional, and you don’t have to use a smartphone
- The LED light ring is innovative, and it’s nice to see something unique in a product
- The versatile stand that also has magnets, or can be screw-mounted
- Various accessories ensure it can be used with any BBQ or smoker
- Can support up to 4 probes (2 supplied.)
- Dishwasher safe probes are the first I’ve heard of!
- Water-resistant control unit
Cons
- No battery powered option, it must always be plugged in
- Although the display is easy to read, there’s not much info given
So how do we feel about the BBQ Guru UltraQ? Do we feel it’s up there with the best barbecue temperature controllers? That’s what we’re here to find out, so let’s get into our hands-on review.
What We Like
The UltraQ includes some thoughtful features missing on other comparable units.
For example, dishwasher-safe probes are a revolution in grilling! No more carefully scrubbing the probes, trying not to let the cables end up in the sink! Every other probe I own comes with a warning not to immerse it in water.
The stand is also terrific; you can mount it pretty much anywhere with its strong magnet and screw holes, and then angle it for optimal viewing. A simple but brilliant piece of kit.
I also love that the base unit isn’t just a brick with a transmitter in it. For all that Wi-Fi and Bluetooth connectivity are awesome, it’s nice to keep it simple, sometimes, and still be able to use it without a smartphone handy.
Of course, the obvious point of difference between the UltraQ and other barbecue thermometers and controllers is the LED light ring, and all the information it conveys without a screen. Once you get on to it, you’ll appreciate how effective it is at catching your attention and keeping you in the loop from a reasonable distance, with at-a-glance easy-to-read numbers, and different colored lights conveying different info.
What Could Be Improved
Honestly, I don’t have much negative to say about this unit. Here are a couple of things I’d have on my wish list for the future, though.
Technically, you can run this off a battery; a 12V adaptor is available separately for connecting directly to the terminals, or you can connect a pair of 6V batteries with the included jumper cables. But, the need to always find a power source limits how far you can be from the house and makes camping and tailgating slightly more challenging.
The LED display is big, but tells you very little. It would be nice to get more info from the base unit, and not always have to consult the app.
Finally, the alligator clip works well on most grates, but it might be challenging to attach to a grate with wide bars, like on a Napoleon grill.
Different Versions Available

BBQ Guru currently sells three barbecue controllers: DIGIQ DX3, DynaQ, and UltraQ.
The DIGIQ is a basic model, supporting just one food probe and lacking wireless capabilities. It’s not really comparable to the other two models.
The DynaQ and UltraQ are very similar, with each unit offering the light-up “Q” indicator and Wi-Fi/Bluetooth connection.
The principal difference between the two Qs is the number of probe ports — UltraQ supports up to three, whereas the DynaQ has room for just one.
Both the DynaQ and UltraQ can be used to fit a wide range of different models of smoker.
When you purchase your UltraQ, you’ll go through a selection process of component parts for your particular grill or smoker. No matter what kit you put together, however, the base unit will always be the same; the only things that change are the adaptor mounting plate for the fan, and the fan itself.
There are two fans available: the Pit Viper (10 CFM) and the Pit Bull (25 CFM).

In some cases, you’ll have a choice, while with others, it will be chosen for you based on the size of your cooker.
The smaller ‘Pit Viper’ fan is for ceramic kamados, weber smoky mountains, and other smaller, more insulate smokers. The larger and more powerful ‘Pit Bull’ fan is for very large offset and commercial smokers that need a higher airflow to function correctly.
As well as different fans, there are multiple ‘adaptor kits’ available with the UltraQ that are used to connect the blower to different smokers, depending on the model of you pit you own, how their vents are configured and so on. You will see me attach the blower to a kamado Joe Big Joe III and a Weber Smokey Mountain later in this review.
Key Features and Manufacturer Specs

Here’s your quick, almost at-a-glance data rundown for the UltraQ.
Bluetooth Range
No wireless? No worries. The BBQ Guru UltraQ is Bluetooth-ready for direct connection to your smartphone. Bluetooth range is limited, though, not so much by the device as by its surroundings. Expect 30 feet at best.
Wireless
Here’s the techy stuff: 2.4 GHz, IEEE Std. 802.11b, g, nTM, Wi-Fire certified (WFA ID: WFA61069).
In a nutshell, you can connect via your home wireless network and monitor your cook through the BBQ Guru app from anywhere you’ve got an internet connection.
Number of Probes

It comes with two from the manufacturer, 1 food probe and 1 pit probe. But it does support up to four (3 food, 1 pit) if you purchase extras separately.
Temp Range and Accuracy
BBQ Guru lists a range of 32 °F to 475 °F (0 °C to 246 °C) for the UltraQ, and it’s accurate to +/-2 °F.
Battery Life and Charge Time
Psych! There is no internal battery — the BBQ Guru Ultra Q plugs into a standard wall outlet with an adaptor. It can also be configured to run off a 12V source (sold separately) for tailgating and camping/RVing.
What’s in the Box?


That depends on which kit you order. Basically, you get:
- BBQ Guru UltraQ base unit
- 1 food probe
- 1 pit probe
- Magnetic mounting stand
- AC adaptor
- Blower fan
- Fan adaptor (for connecting to your grill)
- Safety warning sheet
- Quick start guide
Which fan adaptor you get will depend on the model of the smoker or grill you’re using. When purchasing, just select your model from a list, and BBQ Guru will send you the adaptor you need.
Design and Build Quality
Let’s take a closer look at some key features of the UltraQ.
Durability

It’s a well-made and durable bit of kit. In the past I’ve had controllers that felt too light, flimsy and that they may not last, but this seems to have a reasonable weight to it, feels strong and has a premium feel to it that should stand up to some abuse.
I’ve only owned this a couple of months and used it a handful of times, so cannot attest to its longevity yet. I’ll try to report back over time, but I’m confident it will last.
Screen

The classic red-on-black display reminds me somewhat of an old digital clock.
The LED display is large and clear, displaying the current temperature of the probe of your choice. You can also set it to scroll through each probe in sequence.
I’ve used this controller in all lighting conditions, in summer sun during the afternoon, dawn and dusk, and when dark at night. It is very easy to see and read in all lighting conditions, and due to the large numbering from quite a distance too!
Probes

Standard in appearance, but actually a cut above the rest!
I have to say, these are some of my favorite probes ever. Why? Because they can go in the dishwasher! Finally, someone made probes that will withstand a good soaking.
Both included stainless steel probes come with 6-foot cables shrouded in a metal braid and insulated with Teflon.
The food probe is curved into a 90-degree bend for easy insertion and removal. Instead of a skewer, the dedicated ambient probe ends in an alligator clip for easy connection to your grate.

There are 3 buttons on the side of the UltraQ. They’re not the easiest to get at over there — I’d have preferred them on the front — but they’re spaced far enough apart to make operation simple, and if the base is securely mounted, you can use them one-handed, which can be very convenient.
After using the smartphone app, and the web interface though, I really don’t think anybody will be using these buttons. However, it’s nice that they’ve been added, so you have the option if you don’t have your phone to hand when standing at your BBQ.
And if potentially used infrequently, perhaps it’s a good idea to hide them off at the side, instead of on the face?
Stand

The included stand is about as versatile as they come; there should be no reason you can’t find a perfect place to set it up and see the optimal viewing angle.
The base is magnetic for solid adherence to metal (like a side shelf), and it also has rubber feet to protect that surface from scratches and prevent slippage on non-magnetic surfaces.
A hinged upper section allows you to angle the base unit up and down to suit your height or to reduce glare on the screen. At the top of it all, the UltraQ unit snaps home into the mounting clip. It’s nice and snug and not going anywhere.
As a bonus, you could, if you wanted, screw the baseplate to a wood surface if you want a permanent mounting away from your grill or smoker.
Weatherproofing
It’s water-resistant but not water or weatherproof. Keep your new thermometer dry by installing it under some kind of shelter if you plan to grill in the rain. (I mean, no one plans to — it just happens.)
Blower Build Quality, Looks and Feel


The fan has a nice premium feel to it. I’ve owned controllers where the fan is pretty much just one you would see in a PC cabinet cooling a computer, with a then hastily added shell to house it and make it look different.
But the UltraQ fan comes in a nice, solid housing, with branding, and a slider to open and close the fan which you can use to completely close and shut off air to your pit when you wish to end your cook and put out the fire.
The air outlet fits very snugly into the adaptors attached to your fit, so there’s a good tight fit with no air escaping, and no worries about it ever falling out.
Plugs and Sockets


Not much to say here, other than that it’s pretty much standard fare. The UltraQ uses plugs and sockets that you would find on pretty much any BBQ thermometer or controller, so it’s on par with its competitors and is good quality.
I will say though that every plug kind of ‘snaps’ into place, and then stays tightly requiring a bit of force to push in, before a satisfying kind of ‘click’, and then needing force pull out. This is a good thing, as probe disconnections are a pain when they happen, and I just cannot see it happening here.
Setup and Connectivity
Connect your power adaptor, pit probe, food probe, and fan plug. Plug your new BBQ Guru UltraQ into a wall outlet, and it automatically powers up. An LED indicator light will come on over each correctly installed probe plug.
Download the BBQ Guru app, install it into your phone, and ensure your Bluetooth is on to complete the connection. Keep your phone close to the UltraQ, and syncing should take only a few moments. You can name your device if you like at this time.
Once connected via Bluetooth, you can go to settings on the app and set up your Wi-Fi connection.
It’s fast and easy, and you’ll be ready to grill in no time.
Or, at least you will be IF you can install the adaptor for the blower fan without any modifications. For most grills, that’s no problem (any kamados, Weber Smokey Mountain, etc.) For some, however (like Weber kettles), you’ll need to drill a hole through the metal to install the adaptor. It’s not as scary as it sounds, I promise.
More on set up and connection below in my ‘in use’ section.
Accuracy
BBQ Guru says the UltraQ is accurate to +/- 2F. But, is it? I ran my own tests to find out.
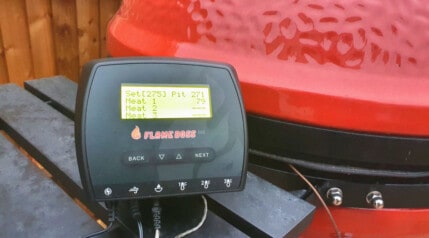
I set it up for use with my Kamado Joe Big Joe III, then compared the temps it read to my Flame Boss 500, a Thermoworks Signals, and a couple of instant-read thermometers I own.
All temperatures were very close and agreed with each other, so for me the UltraQ is accurate and dependable with its temperature readings. I am certainly happy to rely on it, and have now multiple times with success.
The BBQ Guru Ultraq in Use

The proof is in the pudding, they say. I don’t know what that means, but it’s got something to do with putting your gear to the test, I think. So, I did.
I’ve now used the BBQ Guru UltraQ a handful of times for low and slow cooks, where I set up and let it handle the cooking for me.
I’m impressed, it works very well, and I will continue to use it regularly.
Here are my findings on many aspects of its use.
Connecting to a Kamado Joe

Connecting the UltraQ to a kamado is a very simple and easy process that took just a couple of minutes with no tools necessary.
The adaptor plate seen in the image above is for kamado style cookers.
As you can see, it is taller than it is high, giving two approximate sizes to fit into many styles and sizes of kamado cooker.
Also seen is a small ‘clip’ (for want of a better word) that slips over the top edge of the adapter, that once in place in a kamado vent allows you to adjust the size until it fits perfectly, and provides a good closure of the vent.

With the adapter in place, you simply close the vent door of your kamado until it’s over the adapter as seen above, then slide the ‘clip’ up until a tight fit is achieved, and then it’s ready to receive the fan which pushes into the vent hole as seen below.
When you have the fan connected, have the open side, or back side where the air intakes, facing toward the ground. This will help to prevent any stray items such as falling leaves, bird feathers, or any other foreign bodies entering the fan and interfering with its operation.

Once you have the fan connected, simply make sure to have the fan vent in the ‘open position’, and then close down your chimney vent to a very small opening of a centimeter or less.

The reason we want the top vent closed way down is because the UltraQ works via forced air.
If the opening is too large and temperatures run away with a natural draft, then it cannot bring the temp down. The idea is to have the bottom and top vents set, so they would naturally achieve a temp way under what we wish to cook for, and then the ultraQ forces air in to achieve the desired temp.
Connecting to a Weber Smokey Mountain

Connecting to a Weber Smokey Mountain took all of about 3 minutes, and requires a crosshead screwdriver in order to fix the adapter plate to one of the vents.
So the first thing you need to do is pick one of the three lower vents to which to connect the blower van. Then completely close the two other vents.
On the chosen vent for the blower, use the supplied tape to tape over two of the holes, leaving one to which we will connect the adapter, as seen above.

Next we simply take the adapter and connect it as shown, screwing it in tightly, with the opening of the vent aimed downward.

Finally, push the blower into the adaptor, and we are ready to go.
Base Unit

The base unit feels robust and solidly built-in my hand, with reasonable heft. But, since it’ll always be attached to the stand, that’s kind of irrelevant to day-to-day operations.
Connecting the pit and food probes is simple, rather like connecting a headphone jack. They snap in tightly, so you know they’re connected. And if they’re not, the LED won’t light up, anyway.
Hooking up the fan and AC plugs is just as easy, and it’s impossible to get them mixed up, which I like.
The sizeable numeric display is clear and simple, and easy-to-read even at a distance. There’s a lot of unused real estate here, though, and I can’t help but wonder if we could have had more information displayed at once.

Like I said earlier, there are three buttons on the left side of the base unit: Up, Down, and Select. Using them, it is possible to set your target temperatures and clear alarms without the use of Wi-Fi or Bluetooth.
The default display is the pit or ambient temperature. Pressing and holding Select for 2 seconds causes the display to blink. You can now use the Up and Down buttons to set your target temperature for the pit. Once you have it where you want it, press Select again to lock it in.
Press Select again to move to the first connected food probe. Now, you can follow the same steps as above to program your target food temperature. Once it’s set, press Select to move to the next probe and repeat the process.
Pressing Select also clears any alarms currently going off.
Hold down the Down button for two seconds to engage Scan Mode. In this mode, the display cycles through all your connected probes in two-second intervals.
Smartphone App
In theory, smartphone apps for BBQ thermometers and controllers are a great idea. In practice, however, some fall flat. Based on reviews I’d read, I was concerned that would be the case here. Happily, it was not.
BBQ Guru, responding to consumer concerns, recently upgraded and overhauled its proprietary app. My understanding is it’s far less buggy than it once was, particularly concerning connectivity issues. I had no trouble connecting my unit to my phone.
The app is uncluttered and easy to navigate, allowing you to tap into the full potential of the UltraQ.
Set Up

When you first open the BBQ Guru smartphone app, it simply tells you to turn on Bluetooth on your smartphone, be close beside your UltraQ and make sure it’s powered up.
It then presents a list of all the available devices it can find. Click your device in the list, and then it starts a firmware update process, which runs for a few minutes. So go make a cup of tea, or grab a beer, and wait for it to finish.
Connected and Cooking

Once the firmware update finishes, it auto-connects to your controller, asks you to give it a name to differentiate between them if you have multiple, and then goes to a kind of ‘home screen.’
Here, a four-way display shows the current temperature and target for all probes in use. Of course, you can set all your target temperatures here and monitor them in real-time. Likewise, you can set a countdown timer through the app, though I rarely find this a useful feature.
Setting Temperatures

To set a target pit temperature, or a target internal temperature for your food, simply press the appropriate probes display, then you see the circle temp display to the left above. Then tap the ‘target temp’ message, and you get the screenshot above right where you can enter your desired temp.
This is very simple, intuitive, works well and could not be easier.
Once you’ve set your target pit temp, and desired internal food temp, it’s a simple case of attaching the pit probe to your grates, and inserting the food thermometer into your meat. Make sure the blower is attached, and off it goes monitoring and controlling your cook for you.

Recorded Temperatures Over Time Graph

Also available with the BBQ Guru controllers is the ability to see a graph of your cooks temperatures over time. In order to use this functionality, you need to sign up to a website called ‘Sharemycook.com‘. Data is then sent to their servers, where it is recorded and can be used to create and display graphs.
In the BBQ Guru app you click for the cook details, and a little iframe embedded webpage ‘pops up’ over and in front of the app.
I find this a little annoying, and it did once or twice not show, instead showing a ‘failed to load’ webpage instead. So I prefer to go straight to the ShareMyCook Website if I really want to see this graph.
Additional BBQ Guru Smartphone App Features

You can toggle on and off the Open Lid Detection feature within the app. With this feature on, the controller assumes that a sudden drop in temperature is due to an open lid, not a problem with the fire. Knowing this, the fan won’t power on unnecessarily, preventing a spike in temperature when the lid closes again.
Ramp Mode is another advanced function accessible through the app. When engaged, the controller begins to lower the pit temperature as the food approaches the target temperature — default is within 30F of your desired doneness. It’s a brilliant feature that greatly reduces the risk of overcooking your food.
Lastly, you can set your Smart Cook Adaptive Control Strategy with the app. With this feature initiated, the UltraQ begins to learn about your cooker and the conditions inside. It’s a little like Skynet in Terminator, but without the machine vs. man genocide outcome.
There are four settings available for Smart Cook Adaptive Control:
- Default for “small, medium and some large ceramic cookers, traditional Weber kettles, and small cabinet smokers.
- For highly efficient cookers that are well insulated and hold their heat like a champ.
- For uninsulated and offset pits that are less efficient than average.
- Customizable for unique situations, such as a very windy or very cold day.
It’s a robust app for a highly intelligent controller, but it’s not difficult to pick up, especially for experienced grillers.
ShareMyCook is a website that collects data sent from your temperature controller, recording all details in a graph, and providing the ability to save cooks for later referral, or to share with others who are interested.
ShareMyCook Homepage After Login

Click the ‘advanced device settings’ link, and you are taken to the screenshot you see below.
ShareMyCook Device Settings Page

On the screen you see above, you are able to configure the UltraQ, naming the cook, set target temps and so on.
ShareMyCook Historical Temperature Data

Also see on the ShareMyCook website is an historical graph of your cooks temperatures over time.
This graph is very useful, so you can see any temperature swings, and how the cook progressed. I especially like how I can see that my pit temp never strayed and was held rock solid by the UltraQ throughout the entire cook.
It is this graph that ‘pops up’ in an iFrame over the smartphone app should you request to see the graph.
Alarms and Notifications
An audible alarm will sound on the base unit any time you reach a target temperature or when a countdown timer reaches 00:00.
You’ll also receive notifications on your smartphone app. If you’re connected via Wi-Fi, you can enable email notifications for an alarm. Definitely running out of excuses for missing an alarm!
Within the app, you can adjust the number of times the alarm beeps in 10 seconds (Alarm Beeps) and how long each beep lasts (Alarm Beep Duration). These are handy adjustments if you either want a less distracting alarm, or you’re afraid you might miss an alarm and want the most beeps possible.
And, if you love data, you can save recordings via Share My Cook to the cloud service via the app. This allows you to review your past cooks to see what worked and what didn’t and learn from your mistakes and successes.
Guru Status Light Ring

Here’s the one you’ve been waiting for — the light-up Q!
Seems like everything has an LED indicator and light strip these days. It was inevitable they’d come to barbecuing someday.
Before turning on the unit, the two-section LED is white. Once powered up, the ring section should light up solid blue. This indicates the pit temperature is lower than what the controller is currently set for. Makes sense to me — blue=cold.
Once the ambient temperature gets into what BBQ Guru calls the “Smart Cook Strategy” range, the LED ring changes to solid red. I see what they did here — red=hot. The default for Smart Cook Strategy is 30F below the target, but you can adjust that from within the app.
Now it gets more complicated.
If the ambient temperature is in the range, but the fan is blowing, the sides of the ring will pulse red. The trick here is that if it pulses a lot, the fan keeps coming on to stoke up the fire. This may mean you’re low on fuel, or you’re losing heat for some other reason. Infrequent or no pulsing could indicate a fire that’s becoming too hot.
When things get too hot inside your cooker (the default is 25F above target), the entire ring pulses red. Time to close a damper!
And, if you do not have the pit probe connected, the ring will blink rapidly to let you know. This is part of a safety setting that prevents the fan from coming on if there’s no way for the UltraQ to gauge the ambient temperature.
What about that little tail section? Its color corresponds to the probe currently on display. There are four possible colors; red for ambient, yellow for food probe 1, green for 2, and blue for 3.

It can be quite the light show at first and a little distracting, and it’s easier to notice when the sun starts to go down. Once you have it figured out, though, I can see it becoming second nature, taking your cues from the Q.
Improvements Over the Previous Model — BBQ Guru CyberQ Cloud
The UltraQ replaced the CyberQ Cloud as BBQ Guru’s top-connected BBQ control. At the time, this was considered a very good BBQ controller with some great features, including cloud connectivity.
The UltraQ is a clear step-up from the CyberQ in most aspects.
For starters, the CyberQ had no stand or mounting device. This made it a pain in the butt to put it anywhere and have it stay there. One-handed operation was out of the question.
Additionally, the CyberQ, while it displayed more info at one time, had a tiny LCD fit for only the very best eyesight. Five buttons on the front allowed you to make adjustments to various settings, and while I like that they were on the front, the lack of a mount made them hard to operate without both hands.
CyberQ also lacked the preset Smart Cook Adaptive Control feature for a tailored approach to controlling your cooker.
And, of course, the UltraQ has the nifty light-up indicator ring. The CyberQ? You’d be lucky to find it in the dark.
Who is this Temperature Controller for?
Barbecue controllers are exclusively for extended cooks, usually low and slow smoking, but also roasting sessions. If you don’t do those things and do them often, you won’t get full value for your money — and it’s not an inexpensive unit.
Suppose you’re either already very good at this type of cooking or you have serious interest in becoming so. In that case, the BBQ Guru UltraQ barbecue temperature controller can help you get there.
For casual users, your money would be better spent on a leave-in digital smoker thermometer, in my mind.
But for regular smokers who tackle pork butts, brisket, and other large roasts often, I think the BBQ Guru UltraQ is a godsend. You can set up a cook, then head off to get about your day while being able to monitor and control your cook from your phone, anywhere you have an internet connection.
This automatic temperature control and monitoring solution for long, low n slow cooks makes for more consistently good food, with fewer headaches and mistakes. It’s a quality product, that works well.
Final Verdict
Is the BBQ Guru UltraQ Barbecue Temperature Controller ultimately worth paying full price for? I’m going with a qualified “yes.”
Why qualified? It’s simply not a device for everyone. It’s too advanced for many users, and I’d hate for you to drop the cash and not get your money’s worth. Butt if you often smoke and roast for hours at a time, I think it’s a very worthy investment that will allow you to BBQ without having to constantly be at your smoker, and even to sleep while it cooks low and slow for you overnight.
I admit, I thought the light-up Q was a bit gimmicky at first. But you can toggle it off if you don’t like it, and you’ll still have an exceptionally intelligent and potent weapon in your BBQ arsenal.
If you’re really into smoking and long cooking sessions, you want to master the craft and put in the time required, then the UltraQ is the ultimate sidekick.
Thanks for reading, my friends, and for letting me be your barbecue guru, at least for today.

I have owned Ultra Q for q few years now. The wifi is intermittent at best. CAN NOT rely on it for remote usability. I personally would not recommend.
Hi Joe,
Have you reached out to their support? I’ve had mine a good 18 months now, used it 15 to 20 times (I don’t use it too much as I have so much kit and always cycle products in and out) and I’ve never had a problem with connectivity at all? Might yours be faulty somehow, or a network error / something to do with your Wi-Fi setup? Maybe their support can help you.
Share my cook is OFFLINE Support gave me some things to try. No luck. I spent the money for the Wi-Fi that doesn’t work. At first, it was ok, but it has been downhill ever since.
Support: “We apologize you are experiencing an issue when using your UltraQ. Our developers are aware of this issue and are working to resolve it as soon as possible.
Until the issue is resolved, please follow these steps to manage your cooks for your UltraQ device:” This did not help. Ask them when they expect to have it resolved.
Till then, this Wi-Fi is c***.
Hi Stan. Sorry to hear you’re having issues. I just managed to log in to ‘sharemycook’, so it appears to be working? Or is it you can log in, but your device doesn’t connect? I’ve not used mine for quite some time now because I have so much other equipment. I’ll dig it out and try use it this coming week to see if I have any issues.
This thing is garbage. I had a multi-day saga with Support a few months ago trying to get it to connect to ShareMyCook, and the issue turned out to be that they screwed up their site certificates, making them invalid to their android app. I shouldn’t be testing their crappy software for them for free. Today, no connection again. Based on the troubleshooting steps they had me go through last time, I uninstalled and reinstalled the app. Upon reconnecting, it forced another firmware download, which failed at 27%, and bricked the device. Only fix is to send it in for reprogramming or replacement. The device itself works really well, but their software is garbage and actually ended up making the device unusable. I’ll sell or give away the replacement device once I get it. If I can’t rely on it, it’s worthless.