
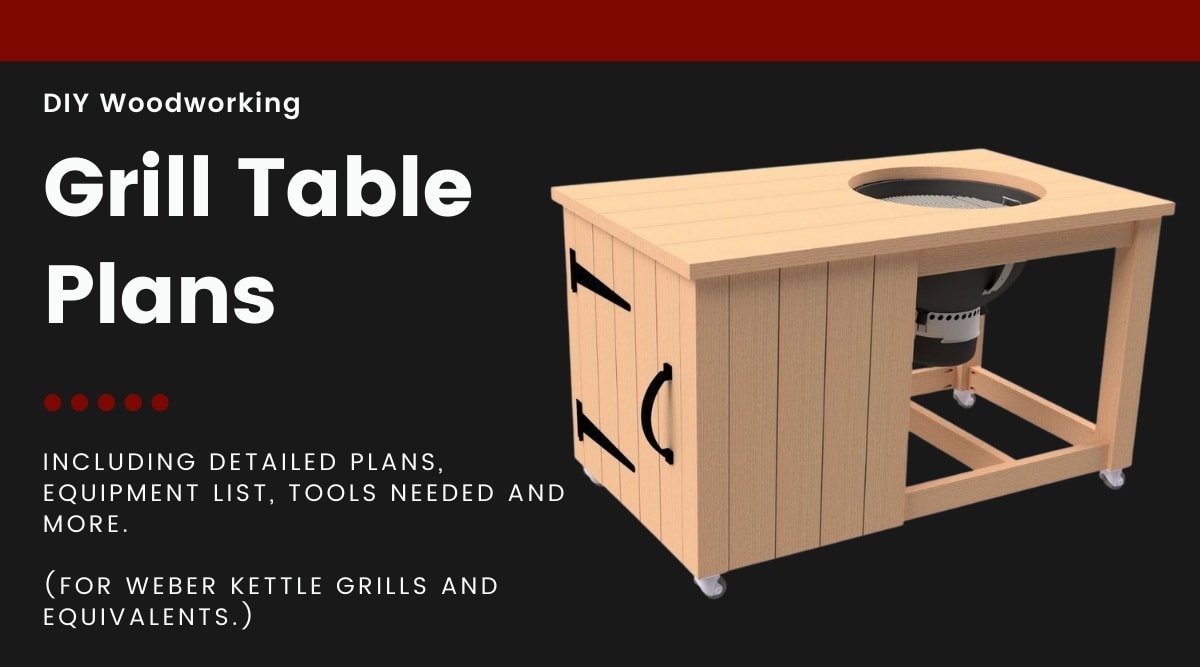
With these weber grill table plans, you’re going to learn how to build a grill cart that increases your workspace, provides a tremendous amount of storage, and that you can wheel around your yard to the optimum BBQ location.
Because let’s face it, if your budget is limited, there are compromises you have to make when you buy a grill, with cheaper models missing certain bells and whistles that can lift the whole BBQ experience. Simplicity and value for money are most important, and kettle grills lead the market in this category.
Generally speaking though, they’re usually smaller than more expensive models, lack any kind of work surface you can use for preparing food, and storage space is also in short supply.
Enter the grill cart that can solve all these problems. And if you build one yourself, they are very budget-conscious and economical too!
Key Takeaways
- Building your own grill cart can provide additional work surfaces and storage space at an economical price.
- The materials needed for the grill cart include pressure-treated wood such as cedar, teak, or redwood, as well as various lumber sizes and hardware.
- Power tools such as a power saw, jigsaw, drill, impact driver, pocket hole jig, and finish nailer are recommended for construction.
- The grill cart can be constructed in five steps, including building the frame, constructing the storage cupboard, assembling the door and shelves, fitting the worktop, and mounting the kettle grill.
- It is important to follow the measurements and instructions provided precisely, but adjustments can be made based on personal preferences and material availability.
- The finished grill cart will enhance your outdoor cooking experience and provide a durable and functional solution for limited budgets.
- The plans require drilling into your kettle, which will void the warranty. So, you might want to buy a cheaper second-hand grill to mount into the table to protect the warranty on your more expensive new grill.
Jump to:
What You’re Going to Need
Before you get started on this grill cart project, it’s best to gather together all the things you’ll need. That way, you’ll be able to keep the momentum going and finish your grill cart in double-quick time.
Having to stop midway through a project because you haven’t got the right tool or need to nip to the store to buy a bag of fasteners would be very frustrating.
Materials
The type of wood you use is down to personal preference, but bear in mind that you want your cart to last more than a couple of years.
Cedar is a good choice, as are teak or redwood. Although both of these will be a little more expensive, your cart’s increased longevity will make up for the added expense.
The wood you use should be pressure treated. While wood is an invaluable building material, it is prone to decay. There are other limits to its usefulness for many applications. Pressure-treated wood was developed to overcome some of these.
Pressure-treated wood is:
- Moisture resistant
- Fungal resistant
- Insect-resistant
- Fire resistant
- It is available in a range of different sizes.
- Compared to natural wood, it will last much longer.
- You can easily cut it using a saw, fasteners penetrate it easily, and you can make holes using a drill and use a router to shape it.
In the measurements given below, allowances have been made for any wastage. There’s nothing wrong with changing the measurements by a little either way, depending on the quality and price of the materials you’re buying.
You’ll need the following lumber for this grill cart project:
- 2 × 4 pressure treated lumber: A total of 42’ 6” or 1 × 6’, 1 × 8’, and 3 × 10’ lengths.
- 2 × 2 pressure treated lumber: A total of 3’ 10” or 1 × 6’ length.
- 4 × 4 pressure treated lumber: A total of 11’ 9” or 1 × 12’ length.
- 1 × 6 pressure treated lumber: A total of 18’ or 7 × 12” lengths.
- 2 × 8 pressure treated lumber: A total of 28’ 5” or 3 × 12’ lengths.
You’re also going to need this hardware:
- 2 × 16” shed hinges.
- Shed door handle or some other suitable handle.
- 4 × 3” caster wheels.
- Mount brackets that fit your kettle grill.
- One box of 1 ½” timber screws.
- One box of 2 ½”: timber screws.
If you’re using a finishing nailer, you’re also going to need a pack of 1 ½” long finishing nails that correspond with your tool.
Tools
You could choose to cut and assemble your grill cart using hand tools, but you’ll save time and effort if you can use a selection of power tools.
- Power saw: use a table saw, miter saw, or circular saw, depending on your preference
- Jigsaw
- Drill and drill bits
- Impact driver and driver bits
- Corner clamps
- Pocket hole jig and drill bits
- Finish nailer
Finally, you’re going to need some sandpaper to finish your project off and leave the wood’s surface with a smooth finish.
Constructing Your Grill Cart in 5 Easy Steps
With all the materials and tools gathered together, it’s time to get down to the nitty-gritty of this project.
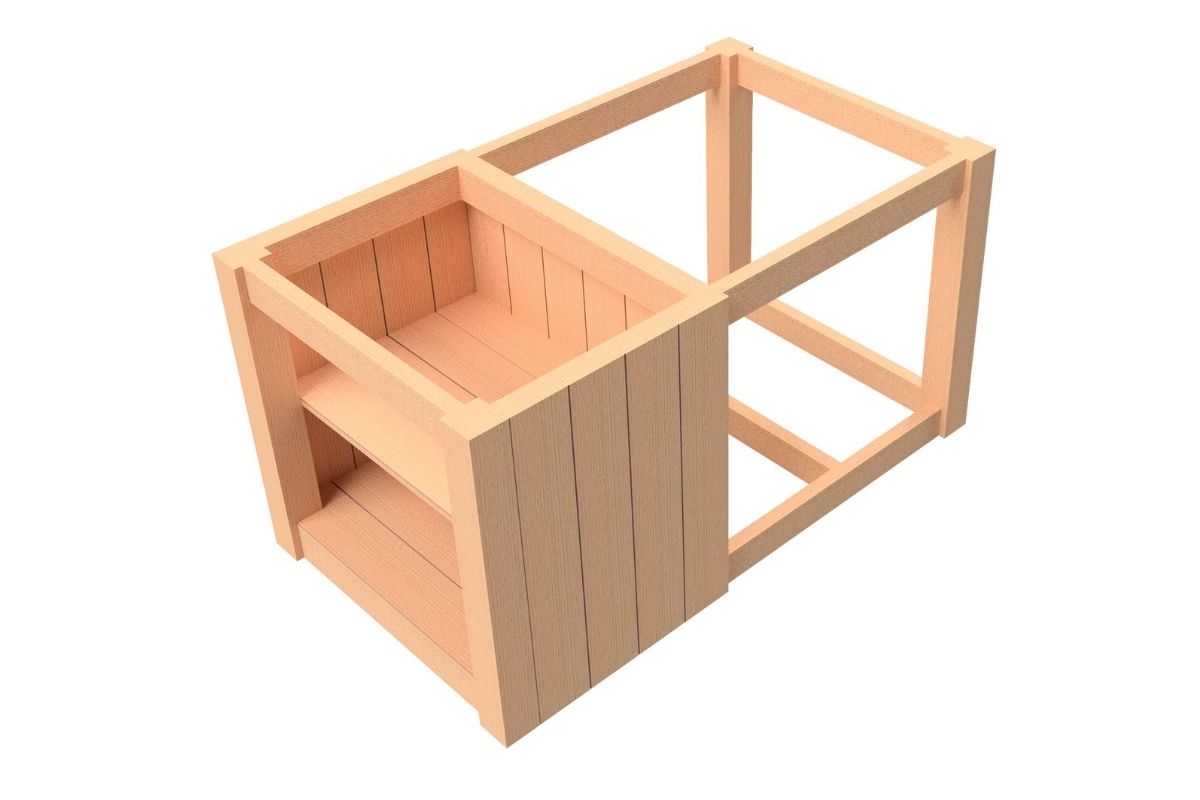
Step 1: Construct the Frame of the Cart
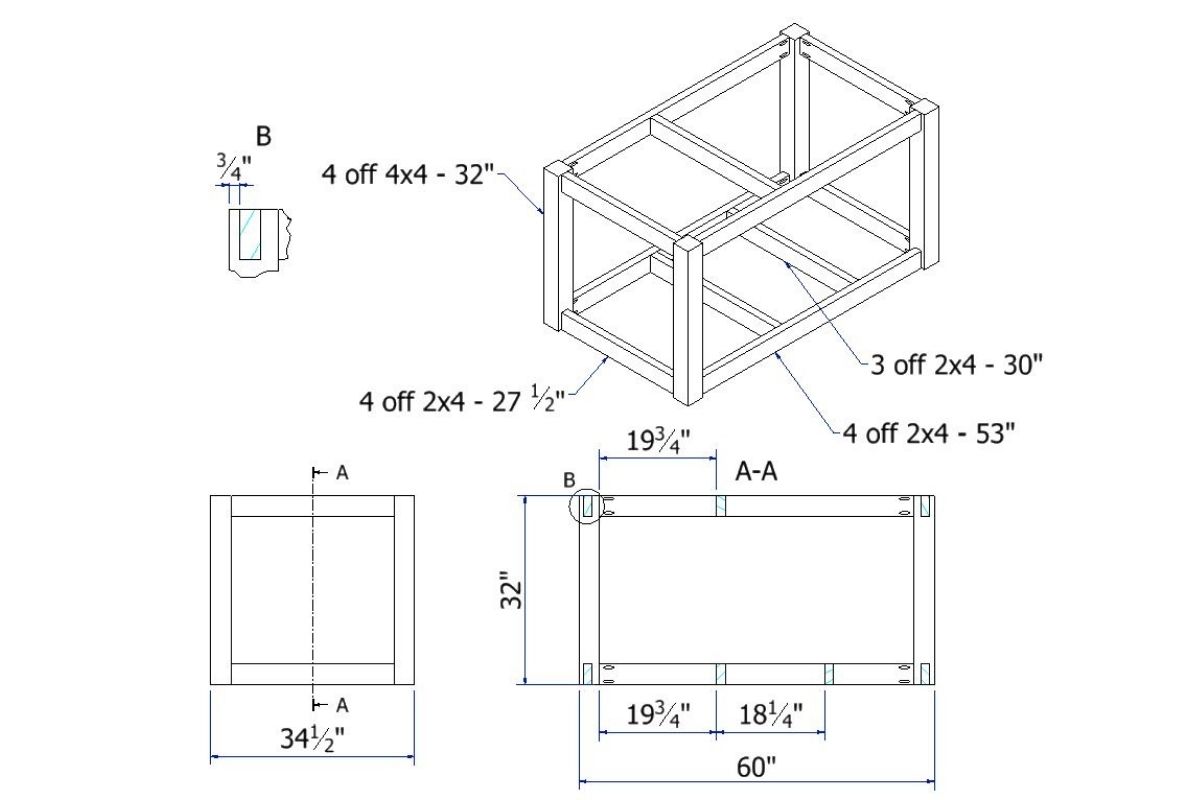
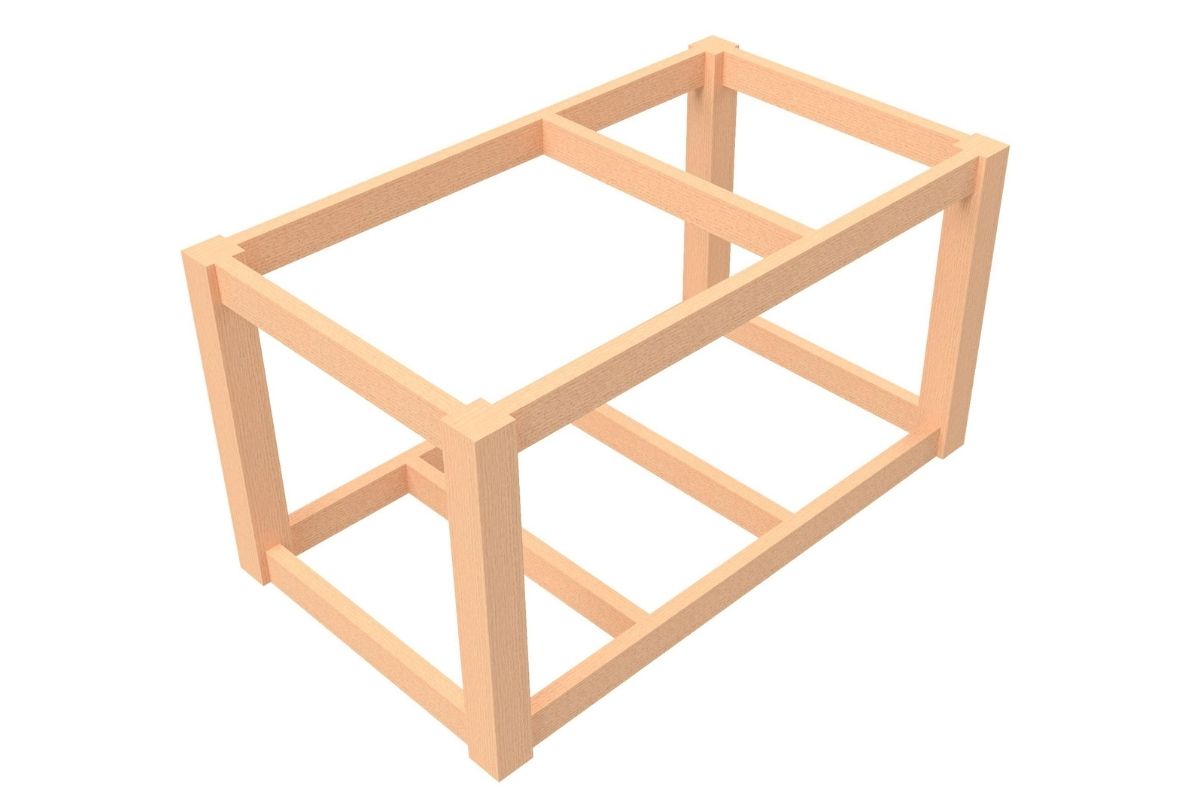

Assemble the grill cart outer frame using 4×4 uprights in all four corners. These will all be tied together using eight 2×4 cross members. One of the most straightforward, most effective, and sturdiest ways to screw the lumber together is using pocket screws.
First, you need to cut the lumber to the correct lengths for the frame. Cut the following pieces:
- 4 pieces of 2 × 4 that are 27 ½” long.
- 4 pieces of 2 × 4 that are 53” long.
- 4 pieces of 4 × 4 that are 32” long.
- 3 pieces of 2 × 4 that are 30” long.
Lay out all the lengths of lumber and assemble them using corner clamps, as this will help keep the framework square.
The frame will have 16 locations where you have to fix a length of 2 × 4 to a length of 4 × 4. Make sure these are flush with either the bottom or top of the 4 × 4. They should also be set back from the outside of the frame by ¾”.
Next, drill two pocket holes, using the pocket hole jig, in each of the joins, and use 2 ½” timber screws to fix the lumber in place.
When you’ve successfully constructed the outer frame, add the inner cross members to make the frame secure. You should also use pocket holes for the joins, but this time, secure them using 1 ½” timber screws.
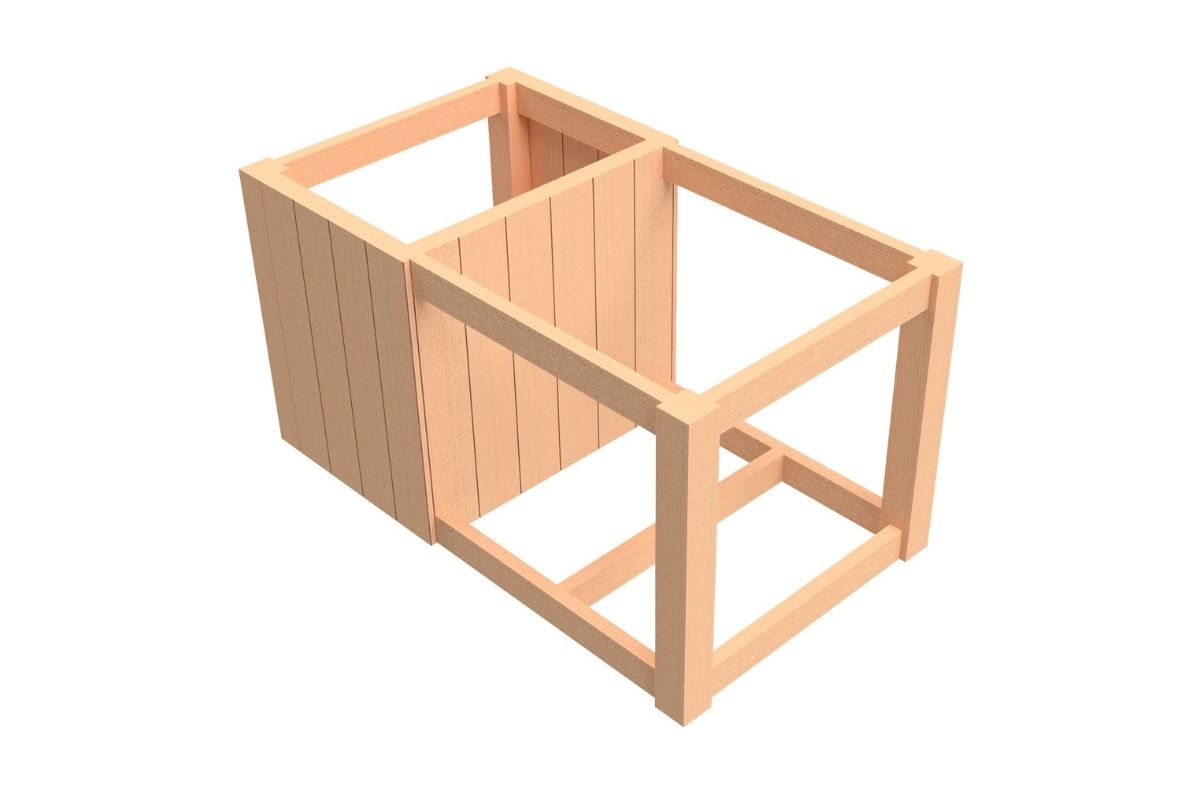
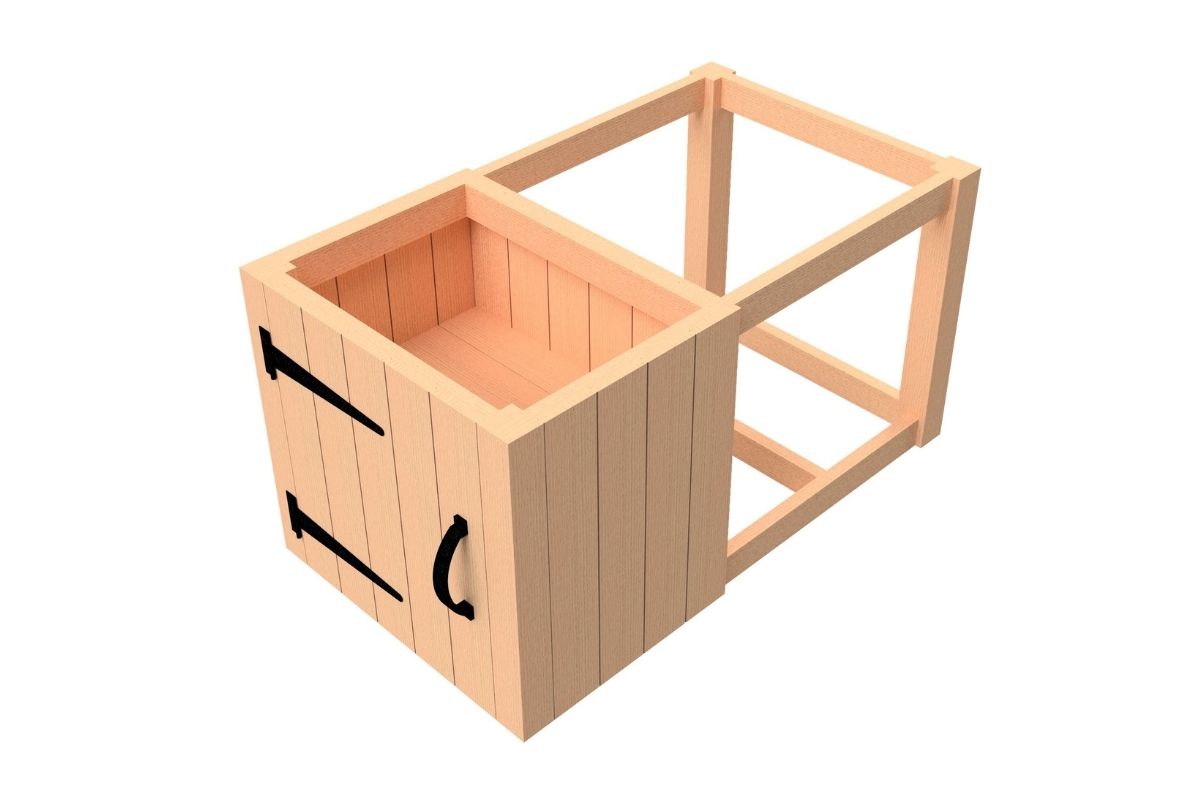
Step 2: Build the External Framework of the Storage Cupboard
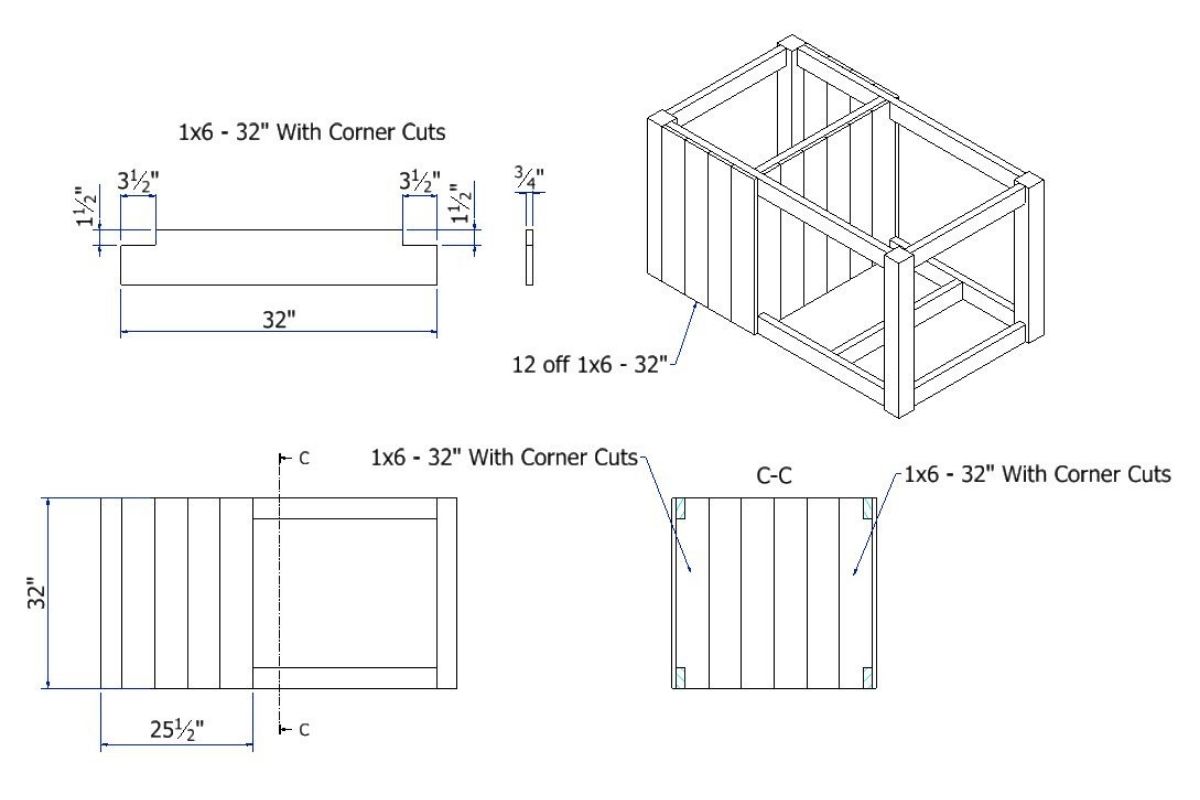
The next step is to build the storage cupboard’s body. To do this, you’ll need to use 14 pieces of 1 × 6, each cut to a length of 32”.
To make the cuts use your power saw. Whether you use a table saw, miter saw, or circular saw is down to personal preferences.
Two of the lengths you cut also need to have corners cut out of them. This is because you’ll need to fit them over the cross members that run along the frame’s length.
With all the lengths of lumber cut, you can move on to fastening them together. The quickest way to do this is with a finishing nailer. Use two finishing nails at the top and bottom of the 2 × 4 cross members.
If you’re not using a finishing nailer, the fixing will take a little longer, and you’ll have to use 1 ½” timber screws instead.
Step 3: Put Together the Door and Shelves
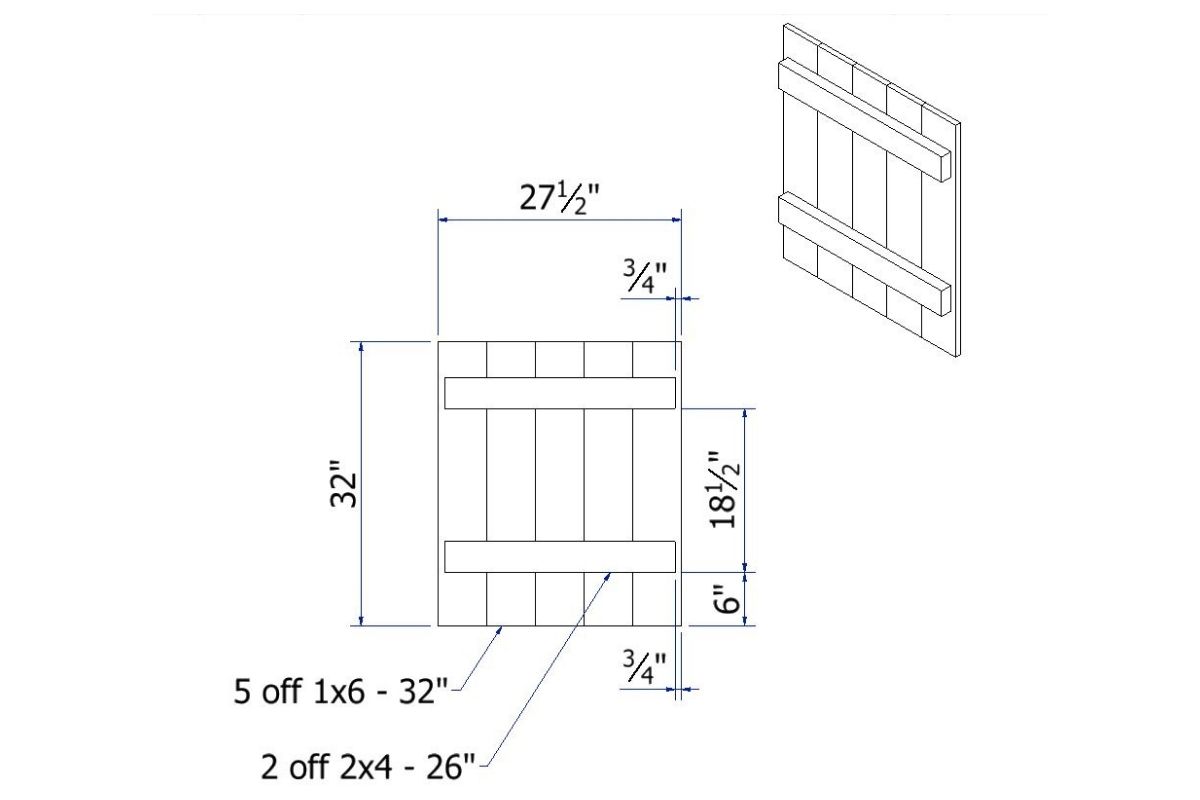

The door for your storage cupboard is straightforward to construct. You need five lengths of 1×6 lumber that you’ve cut to 32” long. Two lengths of 2×4 lumber that you’ve cut to 26” long are also required.
Using your power saw, first cut the lumber to the correct length. Then assemble the door using 1 ½” timber screws. Alternatively, you can use finishing nails. Once constructed, put the door to one side while building and fitting the cupboard shelves.
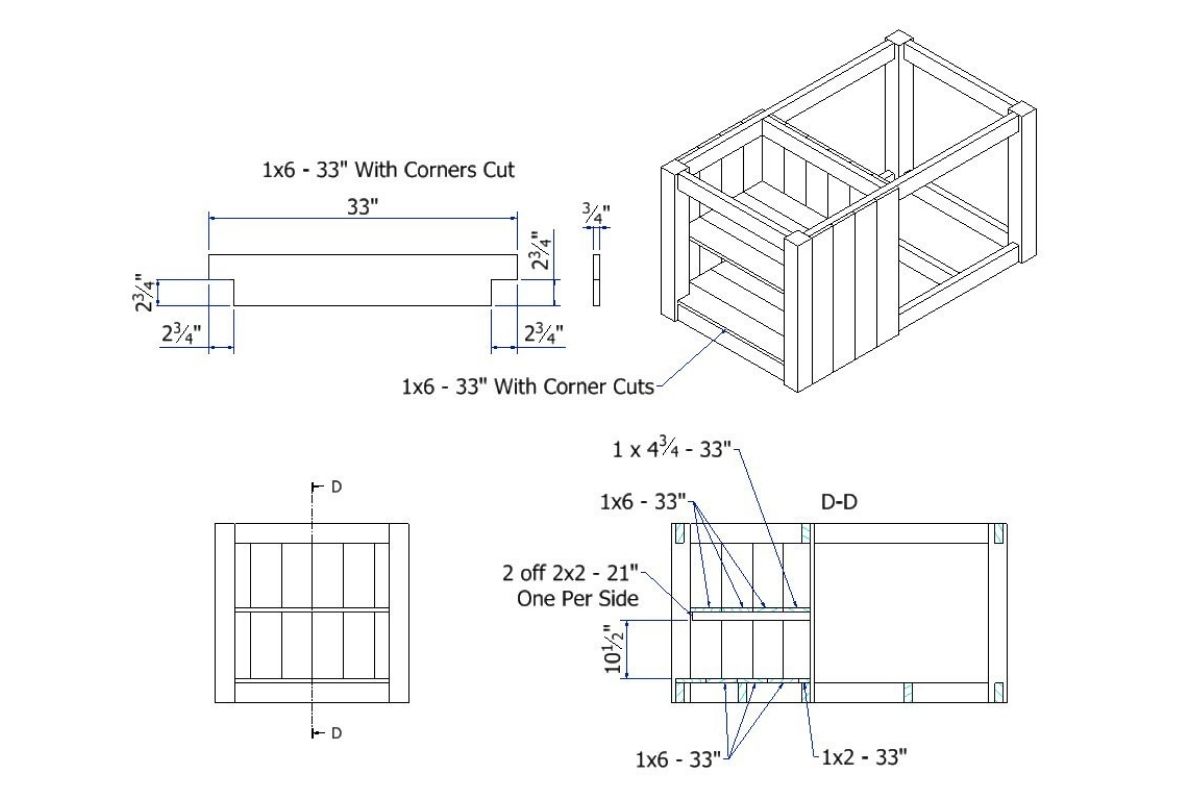
First, build the bottom shelf using five lengths of 1×6 lumber that you’ve cut into 33” lengths. One of the pieces will need to be ripped along the length so that it’s only 2” wide. You can do this using a circular or table saw. Use a guide to make sure the cut is straight. Another of the 33” lengths needs to have a corner cut out.
You then have to screw the lengths you cut into the cross members of the frame. Use finishing nails or 1 ½” timber screws if you’re not using a nailer.
For the top shelf support, cut two lengths of 2 × 2 that are 21” long. Screw these into the inside the cupboard body. Fix these pieces in place, 10 ½” above the bottom shelf.
Secure the wood using 1 ½” timber screws. Take care in how you place them because they must be level, otherwise, your shelf will have a slope, and things will roll off.
Construct the top shelf out of 4 lengths of 1 × 6 that you’ve cut into 33” lengths; one of which you’ll have to trim down so that it’s only 4 ¾” wide. Fix each board into the supports using 1 ½” timber screws.
With the shelves firmly in place, fit the door using the shed hinges. It’s also time to add the handle, whichever type you’ve chosen to use.
For maximum strength, make sure the hinges are in line with the 2 × 4 timber you’ve used to construct the rear of the door.
Be careful not to hang the door up the wrong way. If you do, the door won’t close as the 2 × 4 on the back of the door will clash with the lower cross member of the frame.
You might need to rub down some areas for the finishing touch, especially if you want a perfectly smooth finish and a door that closes tight and flush.
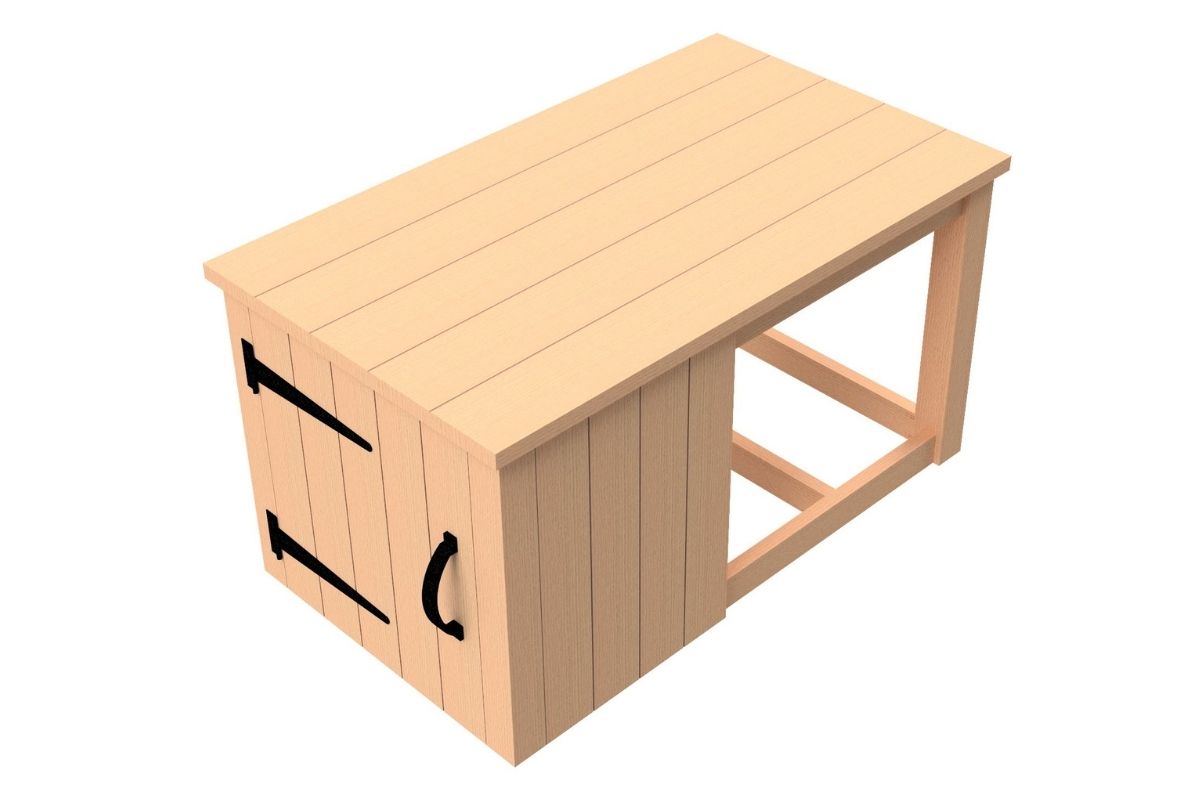
Step 4: Fit the Worktop
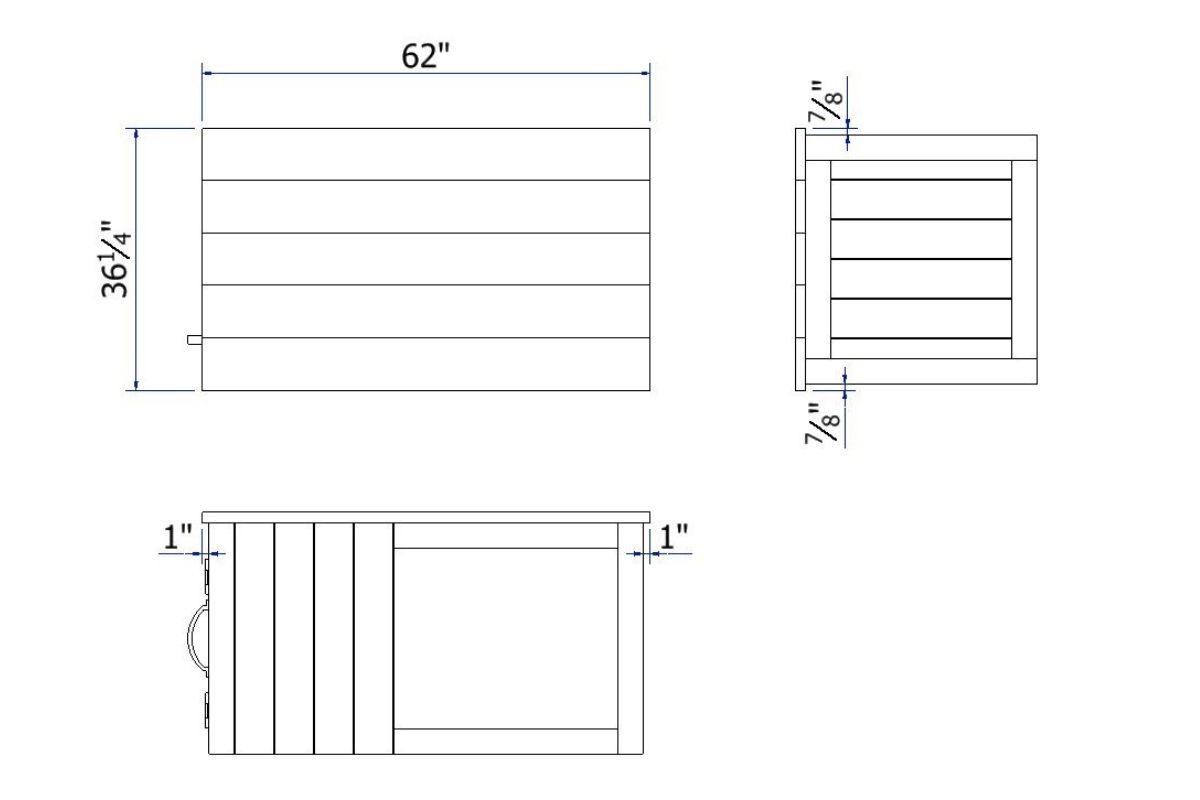
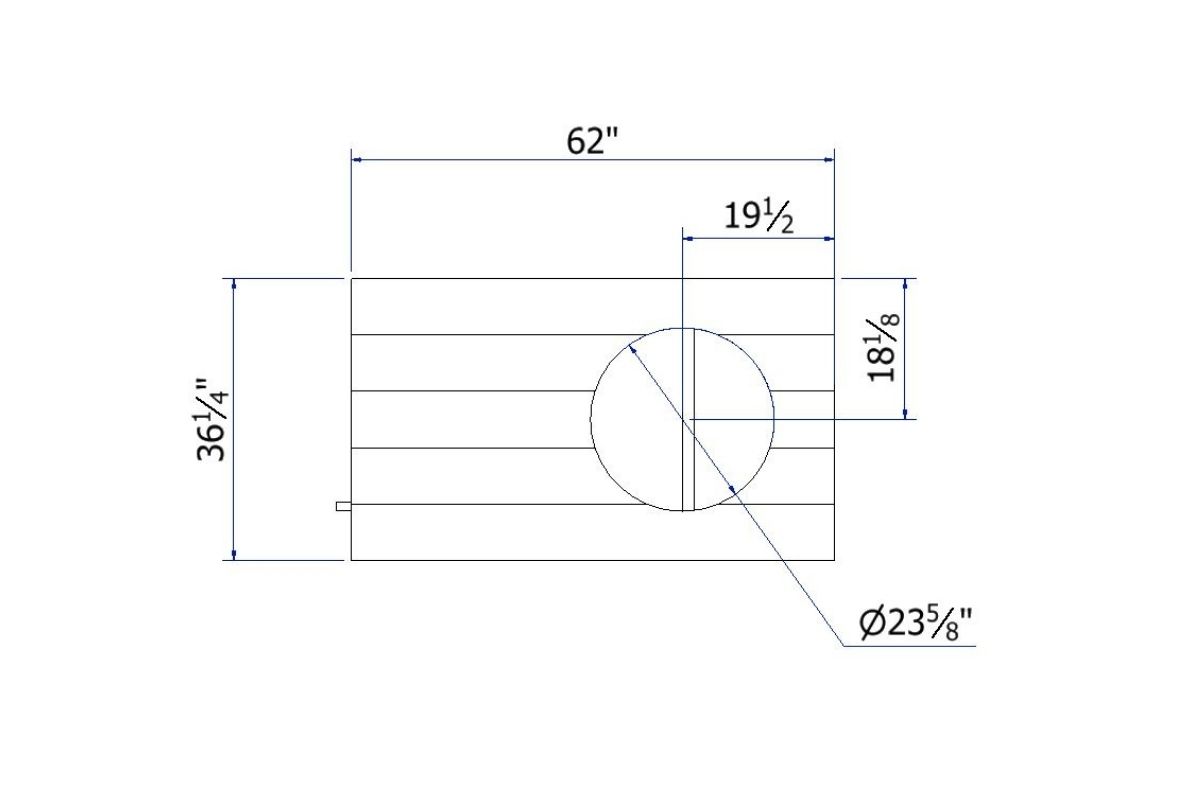
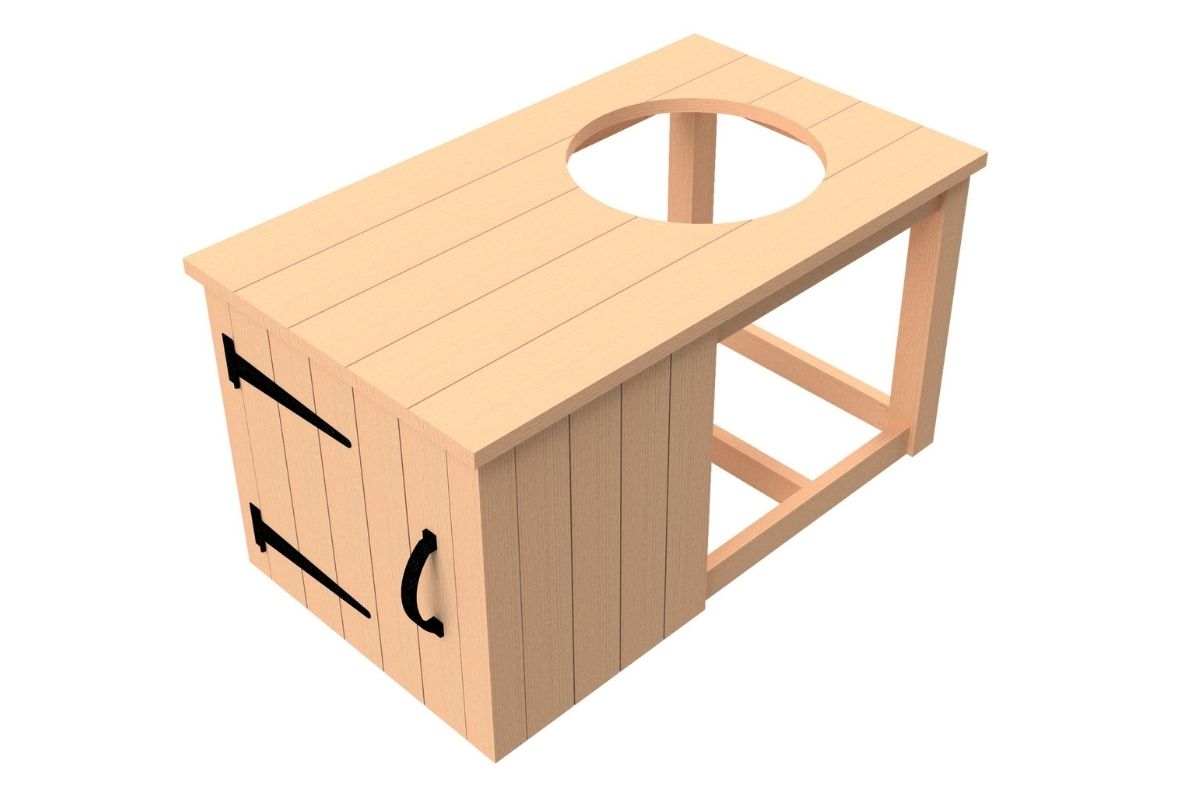
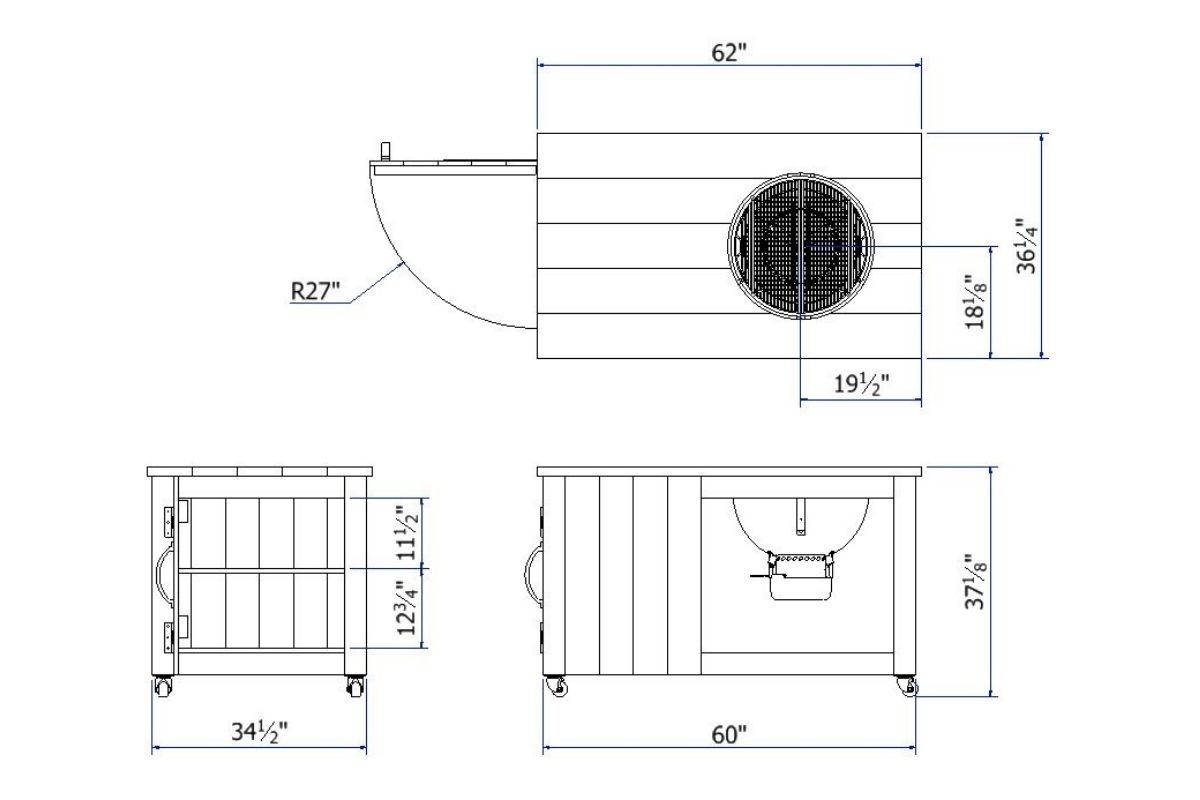
To make the worktop, use five lengths of 2×8 cut into 62” lengths. Into the worktop, you’re going to have to cut a hole to fit your kettle grill. It’s best to do this after you’ve screwed your worktop to the frame. That way, there’s less risk of the cut being slightly out and not lining up correctly.
Screw the boards of your worktop in one at a time. Start with one of the edge pieces, making sure it hangs over the frame by 1” at either end and ⅞” at the edge. If you want to make sure it doesn’t move around, clamp the board in place before securing it to the frame using 2 ½” timber screws.
Once you’ve secured the first board, move onto the next. Line it up carefully at both ends before clamping it in place. You can then screw in the board and move on to the next one until they’re all securely fixed.
If any of the boards are warped or not perfectly straight, further clamping may be necessary. This is done with a clamp across the worktop’s width. This will reduce the risk of leaving any gaps.
With the worktop firmly in place, move on to cutting the hole to mount your grill. The center position of your grill will be 19 ½” from the end opposite to your cupboard, and from the side it has to be 18 ⅛”. Mark this point and draw a circle that is 23 ⅝”.
Use a compass to draw the circle, but if you haven’t got one handy, use a piece of string and a nail.
Here’s a quick video to show you how it’s done:
Now you’ve marked out the circle, cut the hole using a jigsaw. Try to keep the blade as close to the line as possible but on the inside the line. Tidy up any rough edges using the sandpaper.
Step 5: Fit Your Kettle Grill Into the Cart
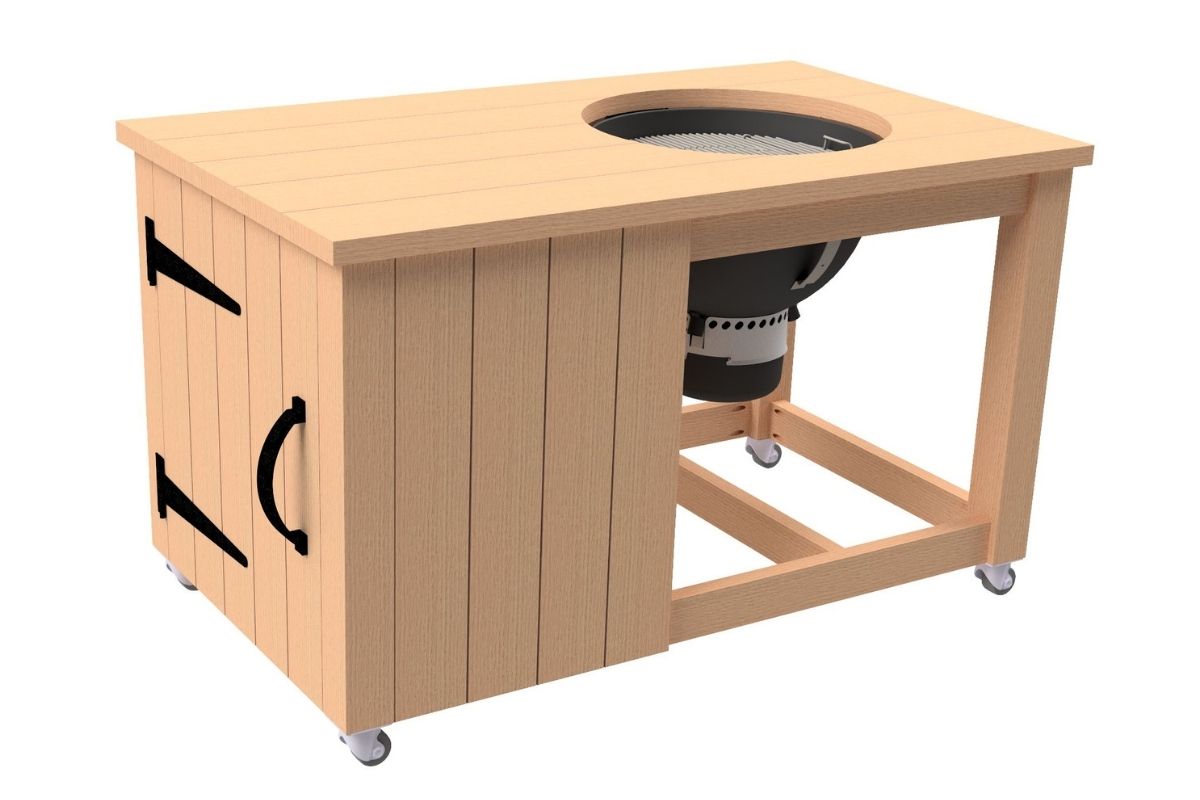
Before the final step, installing your kettle grill, there’s one more thing we need to do. Fit the caster wheels. Tip your cart on its side and screw the wheels into the middle of each 4 × 4 upright. Secure them using 2 ½” timber screws. Put the cart back in the upright position, and you’re ready to fit your kettle into the cart.
You can buy kettle table mounting brackets that are perfect for the job. All you need to worry about is making sure your kettle is sitting at the right height before screwing the brackets into the worktop.
One last point worth mentioning is that new kettles come with a warranty. If you drill holes into your brand-new kettle, it will void that warranty. It might be better to purchase a second-hand kettle and clean it up to use in your new grill cart.
A Note from the Editor, Mark: I Want this Cart — And I Will Be Building it!
Among my many grills and smokers, I have two Weber Kettle grills, one of which I frequently use for rotisserie cooking. I also have three kamado grills that only have small side tables, so overall I severely lack storage and workspace.
Therefore, I’ve always wanted to get grill carts or tables to add some work surfaces and storage for me to use. I grill multiple times per week, and this is something I genuinely need.
So I decided that this summer, I will get two tables or carts, one for the kettle grill I use for rotisserie, and one for my classic-sized Kamado Joe.
I’m a practical man, like little projects and getting my hands dirty, so I decided to find some plans and make my own.
After some searching, I came across Nathan and his website ToolToAction.com, where he has a very good-looking, easy to make set of grill plans for kettle grills that I love the look of.
I had some questions, reached out to Nathan about them, and he not only went out of his way to answer my questions, but he also offered to do a write-up on the plans that I could add to my site. And not only that, he offered to build the cart with me this summer (as soon as lockdown rules allow it!)
So I hope you enjoyed Nathans kettle grill cart plans — and we will follow up with an article on the complete build of these plans later in the year, so you can see photos of the project build, and the finished product of one of my grills happily sitting in the cart.
Final Words
I hope you enjoyed reading my grill cart plans and are all fired up ready to create your own. By following these plans, you could soon be taking your outdoor cooking experience to the next level.
Be sure to look around the site for lots more content on all things BBQ, including other tips and tricks to master the art of cooking with fire.
If you do decide to have a go, I’d love to hear how you get on, so please take a moment and leave a comment below.


Any DIY plans for a 26″ Weber kettle table? Thanks.
Hi, Marco.
I’m afraid not. This was a one off guest post by a design engineer friend of mine who is really into his woodworking and BBQ, so decided to make his own table…and I thought it was a good opportunity to steal his expertise for an article. I’m pretty sure I can’t talk him into doing it again though I’m afraid, regardless of how much meat and beer is on offer, lol.
About how much does this cost to build? Just materials
That’s impossible to say I’m afraid: Nathan lives in the UK, where materials would be a different price to the USA. And material costs change all the time. So we’re unable to say I’m afraid. Sorry.
Would I be correct in assuming that the high heat generated by the kettle will not burn or damage the wood?
There is an air gap between the grill body and the wood designed into the plans to safeguard against that.
Thanks so much for posting these detailed plans! I completed my project this past weekend, and I couldn’t be happier with how it turned out. Cheers!