
In this short guide, we’re going to show you how to use a charcoal chimney. One of the best ways, if not THE best way, to get your charcoal grills lit cheaply, and up to cooking temperatures quickly.
You may be one of the thousands (perhaps millions?) of BBQ’ers that only know one way to light your grill. You pile charcoal in the center of your grill, douse the works in lighter fluid, and light a match.
What would you say if I told you lighter fluid is not only dangerous but could also be imparting a nasty taste in your food?
Would you feel better if I taught you a much faster, safer, and better way to light your charcoal? There are a few good ways to light charcoal to be honest. But in this article, we’ll concentrate on perhaps the best. It’s called a charcoal chimney starter.
In this article, I’ll start with a quick step-by-step guide on how to use a chimney starter. After all, that’s why most of you are here!
After this, just for some of you that may not know, I’ll give a brief description of what a charcoal chimney is, followed by why you really should consider buying and using one, and then briefly detailing the model I use and recommend.
I’ll end this guide by discussing three further uses for your chimney starter other than for just initially starting your charcoal grill. One of these, the afterburner steak method, you’re going to love!
Let’s get grilling!
Jump to:
- 1 How to Use a Charcoal Chimney: A Step-by-Step Guide
- 2 What is a Charcoal Chimney Starter?
- 3 Why Would You Use a Charcoal Chimney?
- 4 Not all Charcoal Chimneys are Created Equal: I Recommend a Weber
- 5 When to Use a Charcoal Chimney
- 6 What Charcoal Should You use in Your Grill? Lump vs. Briquettes
- 7 Conclusion
How to Use a Charcoal Chimney: A Step-by-Step Guide
Step 1: Mise en place. Assemble all of your tools and instruments: What you need is:
- Your grill
- Your charcoal
- Your chimney starter
- Some newspaper or a fire starter
- Some heat-proof BBQ gloves.
Step 2: Make sure your cooking grate is in your grill, and that the bottom air vents are fully 100% open. If you light your chimney without opening your vent, you’re going to be starving your fire of oxygen.
Step 3: Load your charcoal into your chimney. How much charcoal should you use? Fill it to the top if cooking hot and fast, or less — about half full — if you’re cooking low and slow or only a small meal.
Step 4: Place 3 balls of scrunched up newspaper into the bottom of the chimney, or a natural firelighter onto the middle of your grill grates, and then light it. The firelighter manufacturers always recommend using more than one, but I find one is sufficient 99% of the time.
Note: Use your charcoal chimney starter placed on your grill grates inside your grill, or on the grates of a spare grill. If not possible, I find sitting it on some mud works well too.
DO NOT use it placed on any paving, stone wall, or any path that you care about because this thing gets hot and can cause permanent damage to some stones and concrete! I’ve seen it happen.

Step 5: Wait for about 15 minutes. After this time, you’re going to have red-hot, ashed over coals that are ready to tip into your grill and cook with right away.
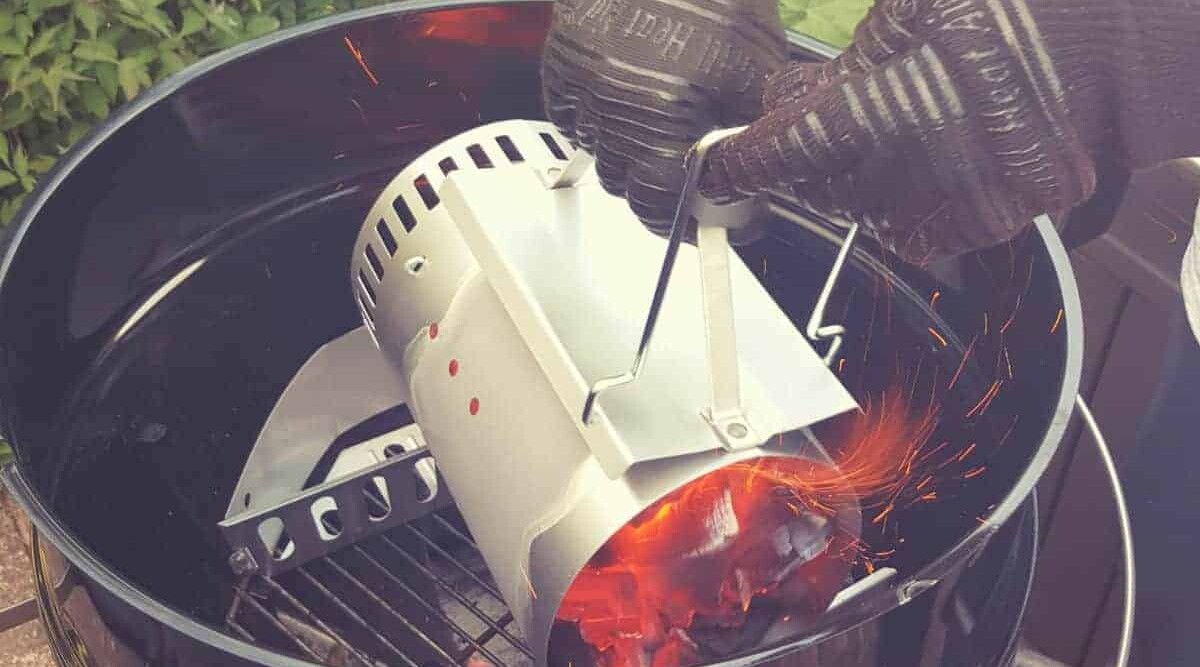
Step 6: While wearing heat-resistant BBQ gloves (or far cheaper heat-resistant welders gloves), lift the chimney, remove your grill grate, and pour the charcoal into your grill.
Step 7: Place your cooking grate back on your grill, and then place your lid on. In approx. Another 5 – 10 minutes, your BBQ will be preheated, and you are ready to cook.
This whole process takes about 20 minutes, start to finish. Lighting your charcoal inside your grill any other way will take at least 40 minutes to get all the coals burning and your grill up to temp, so you literally cut this time in half!
What is a Charcoal Chimney Starter?
In short, it is a metal cylinder with a grate at the bottom that allows you to quickly and safely light your barbecue without the use of lighter fluid.
The charcoal is held close together in the tube, and a fire is started below it with either one or two commercial lighter cubes or a few balls of scrunched up sheets of newspaper.
As the fire burns, heat rises up the chimney pulling fresh air in through the bottom, using the ‘chimney effect’ to basically self-fan the flames until they are roaring hot in quick time. Also, the fact the coals are all so close together helps the fuel become lit very quickly.
Why Would You Use a Charcoal Chimney?
In my humble opinion, it is the best, safest, and fastest way to light charcoal. If you want to get your grill on quickly, simply light a full chimney’s worth of charcoal, and you’re ready to sear burgers, steaks, and chops in 15-25 minutes.
In my guide on how to use a charcoal grill, this is the top way I advise for lighting charcoal and getting up to cooking temperatures quickly. Perhaps a Looftlighter is the only other way I know of that comes even remotely close to effectiveness and speed, but a charcoal chimney is far cheaper.
Not all Charcoal Chimneys are Created Equal: I Recommend a Weber

In my mind there is only one model to purchase: the original Weber 7416 Rapidfire® Chimney Starter.
There are many others out there, but they cannot hold a candle to this product. The Weber Rapidfire chimney can hold a lot of charcoal, has a heat deflector built-into the handle, and has a second handle that makes it easier and safer to dump the hot coals into your cooker.
When lighting, avoid the temptation of lighter fluid. You don’t need it, and you don’t want the taste that comes with using it. Just roll or ball up three sheets of newspaper. This works and is also far cheaper in the long run.
Make sure you’re using heat-resistant gloves when dumping out your charcoal because it’s going to be VERY hot. Just as important (and I learned this the hard way), you’re going to want to make sure you have closed toe shoes on, not sandals or flip-flops as occasionally, a small hot coal will fall through the bottom after lighting.
When to Use a Charcoal Chimney
You can use a charcoal chimney anytime you’re cooking on and need to light a charcoal grill, but it also comes in handy for a few further scenarios:
I Use My Chimney Like a Measuring Cup
If I’m going to be grilling at a higher temp (500 °F+), I’ll fill a chimney right to the top, get it lit, and in 15 to 20 minutes, I’ll have a full load of glowing charcoal ready to cook with.
If I’m going to be cooking low and slow (225 °F to 250 °F for 4+ hours), I’ll fill up a chimney with unlit charcoal, then dump that charcoal on one side of my barbecue, basically using it to measure out the same number of coals every time.
Next, I’ll load it up only about ¼ full of charcoal and light it.
In about 15 minutes, that coal will be gray and ashed over, and I can now pour this on top of or next to my unlit charcoal. This is the strategy behind the minion method and allows for a longer, slower burn.
Using the same amount of charcoal, as measured by my chimney, to suit the method of cooking I choose means I consistently have the same amount of either lit or unlit coals, making my temperature control far easier.
Keeping consistent temps is somewhat harder if you have different amounts of unlit and lit fuel every time.
Use the Charcoal Chimney to Add Lit Charcoal Mid-Cook
We’ve all been there. You’ve been cooking up a feast for your family and friends. Burgers, sausages, chicken wings, and more have all come off your grill over the last hour, but you still have more food to grill when you notice your temperature is heading south.
You’re going to need to add more charcoal if you want to keep this party fed.
But, if you simply add unlit briquettes to an already lit fire you are first going to smother it and starve it of oxygen for a while, the temperature will fall further, and you have to wait 30 to 40 minutes for it to come back up to temperature.
Or, if you use cheap and not quality charcoal briquettes, you run the risk of adding an off-putting taste on the food, caused by the initial burning of binders used to hold the briquettes together. When lit in a chimney, these binders burn off quickly.
Here’s where having a chimney can especially come in handy. Once you realize you need more charcoal, get it out, throw some unlit briquettes inside, and light some newspaper or lighter cubes under it. In 15 minutes, when glowing and covered in gray ash the coals are ready, add it to your grill, and you’re able to keep cooking without even slowing down.
You Can Cook on Your Chimney Starter! Afterburner
You can use your chimney for more than just lighting charcoal. A very popular tip is to give your steak a killer sear, sometimes called the afterburner method.
The venerable Jess Pryles recently made a video outlining her method for searing steaks with the afterburner method.
Essentially, if you’re cooking VERY thick steaks, you’re going to want to employ the reverse sear method, which is when you slowly bring the internal temp of your steak up to around 120–125 °F internal. Once you’re at this temp, remove your steaks to rest.
While the steaks are resting, fill your chimney half-way with charcoal and get a fire going. Once the coals are ashed over, and you have flames coming out the top, put a cooking grate on top of your chimney to cook your steaks on for approx. 30 seconds to one minute per side.
Since the heat source/flame is so close to your steaks you’re able to take full advantage of the Maillard reaction, and give your steaks a beautiful crust on the outside, while the inside is a perfect medium rare.
Just keep an eye on your steaks, as they can burn easily over the intense heat. Hey, it’s not called the afterburner method for nothing!
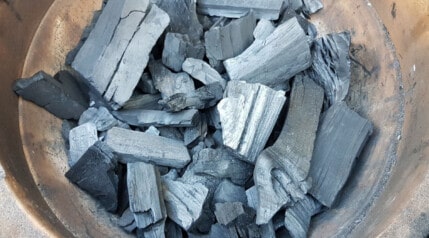
What Charcoal Should You use in Your Grill? Lump vs. Briquettes
Which type of charcoal should you use in your chimney? Either lump-wood charcoal or briquettes?
The best lump charcoal is 100% pure carbon, made solely from wood that has been previously burned in a low oxygen environment.
Briquettes are a little more complicated. Briquettes are essentially sawdust or scrapped wood that has been ground into particles, and then burned in a low oxygen environment before finally being compressed into a pillow-shape and held together with binders.
While briquettes are seemingly more popular than lump charcoal, both have their place in your grilling repertoire.
Lump tends to burn hotter and faster, making it ideal for hot and fast grilling.
Briquettes, because of their uniform size and shape, are more predictable because they burn evenly. This makes them great for low and slow smoking.
That said, you can use your chimney to light either. When lighting lump, just keep a few things in mind:
- Lump tends to light quicker than briquettes
- After loading your chimney, look to see if many smaller pieces fell through the bottom. These can usually be scooped up and placed back on top.
- If cooking hot and fast, add more charcoal than you otherwise would if you were using briquettes. I find that since lump burns faster, by the time the coals on top are lit, you’ve completely burned through some of the coal at the bottom.
Conclusion
How do you light your charcoal fire? Do you use lighter fluid, or have you been using a chimney starter for years now?
If the former, does this article make you want to put down the fluid and pick up a chimney? It really is one of our favorite grilling tools, making lighting a grill so easy, quick, and consistent time after time.
Thank you for making it to the end of my guide on how to use a charcoal chimney starter. If you have any questions or any further tips or advice on this topic, please do drop a comment below. I will reply to every question or comment.
Happy grilling!

Hey, Mark. I have a question I hope you may be able to help me with? I’ve just bought a Weber chimney, primarily for when food is cooking, but my fuel is dying out, and I need to add lit charcoal. Say on a pork shoulder which takes a long cook. I intend getting an offset smoker added to make things easier, but that’s in the future. The problem I have, is if the grill and grate are in use, what can I stand my chimney on to get the charcoal burning?
Any thoughts?
Nice website BTW. Enjoyed having a look around.
Best wishes,
Geoff.
Hi Geoff,
Sorry for the late reply, I’ve been on holiday the last week.
“What can I stand my chimney on to get the charcoal burning?” — I used to stand it on a little patch of gravel I have running alongside my BBQ area, at the very outer edge of my garden. Recently we reorganized my garden though, and I no longer have that option, so what I tend to do these days is stand it on the grates of another grill that’s not currently in use. I tend to use the Weber Smokey Joe for this purpose the most, as it’s small, portable, can easily place it right next to the grill I have in use.
What I warn against you doing is placing it on any paving you may have. I have heard of peoples paving exploding when they do this! I think it’s because water gets into the paving, and then the chimney causes the water to boil, expand, and the paving explodes.
If you don’t have a second grill to stand the chimney starter on, then loose stones or an area of soil is your best bet. Unless you have a ‘camping gas stove’? I know of some people who use this to stand the chimney on — and it fits quite well — as well as being a straightforward and even quite cost-efficient way to get the coals lit, while by its nature being able to handle the heat generated.
I hope this helps!
Hey, just used my 22″ Weber for the first time today, and by the time I was ready to put my burgers on the grill, most of my heat had depleted. Both vents were set accordingly, but I went from 450 °F to about 275 °F. What’s the best way to avoid this in the future? Just more lumps of charcoal, since as you stated they burn fast?
Hi Brandon,
You can place unlit coals in your grill, and pour lit coals beside / on top of them to get a longer burn. With good vent control they will burn through slowly and maintain a temp, not all light at once and go too high. Learning the vent control is key.
I loved reading your article. Just bought myself a charcoal grill and want to make sure I’m properly grilling to get started. I initially came to your site because I googled (duckduckgo) how to start a charcoal fire without using lighter fluid. Hopped upon thy chimney hopper and wholla learned something new. Thank you and Happy Grilling to the two of us!!!