
You’re about to learn a well-known proven method to create a long-burning charcoal fire that smokes your meat to perfection with minimum supervision.
This easy to follow, 4-step process, plus our tips will have you smoking like a pro.
Welcome to the minion method!
The Minion Method is a clever technique of setting up and lighting a fire for the long-burn cooking and smoking of barbecue meats.
Although it was first used in a Weber Smokey Mountain Cooker (WSM), it works on any smoker or larger charcoal grill.
Most people use charcoal briquettes for the heat, and chunks of dry wood for the smoke. Lump charcoal does also work well, but it requires more babysitting.
It’s the perfect technique for “set and forget,” low maintenance low and slow barbecuing and smoking. Once the fire starts, you can put on the meat and go off to watch an entire football game, worry-free.
Depending on the size of the grill or smoker, the fire will burn for many hours at an even temperature. With the Minion method, once the coals are glowing, you just monitor the temperature and adjust with the dampers, no need to add further fuel.
Jump to:
- 1 The Man Behind the Minion Method
- 2 The Minion Method Solves a Common Problem
- 3 Will the Minion Method Work With any BBQ, Grill or Smoker?
- 4 What Fuel for the Minion Method? Lump or Briquettes?
- 5 Will Using Unlit Briquettes Affect the Taste?
- 6 What Temperature Range Is Best for the Minion Method?
- 7 When Can or Should You Use the Minion Method?
- 8 Pros And Cons Compared To Other Methods Of Fire Management For Low ‘N Slow Cooks?
- 9 Four Easy Steps for the Minion Method on a Weber Smoky Mountain™
- 10 What About Other Types of Cookers?
- 11 Experiment, Document, and Enjoy
The Man Behind the Minion Method
The grill master who first wrote about this fire building technique is Jim Minion, hence the “Minion Method.”
Little yellow cartoon “minions” had nothing to do with it, although it would have made a good story. Instead, Jim was answering a question on a barbecue forum about how to control temperatures on a WSM. He explained his now famous fire building technique and somehow his name stuck to it. From that day forward it has been called the Minion method.
Click here to read Jim’s original explanation.
The Minion Method Solves a Common Problem
Every pitmaster knows that fire tending is critical to BBQ success. Continually adding fuel or rearranging the fire can be tedious and time-consuming.
Jim admits that his method was an accident born of necessity. He was setting up for a BBQ cooking competition. He had his wife buy him a new Weber Smokey Mountain Cooker™ which he had never used.
Pressed for time, it was the morning of the competition, and he was in a hurry to get the fire started. He didn’t even bother to read the directions for the grill. Instead, he dumped in a bunch of briquettes, made a well in the center and then added lit briquettes to the hole in the middle.
Jim was hoping that the hot briquettes would gradually ignite the other briquettes, burning outward slowly and evenly. Well, it worked perfectly!
Jim reported that he won first prize with his chicken and second prize for the ribs that day. Two competition wins in one day was quite an accomplishment for an untested grill and new fire control method.
Will the Minion Method Work With any BBQ, Grill or Smoker?
Jim’s technique of setting up a fire has proven itself in grill competitions across the country and tested in many types of smokers and grills. However, this method works best for grills and smokers with a deep fire box where the coals are far enough away from the meat so as not to cook it directly like a steak.
You can adapt the minion method for smaller grills by creating a 2-zone fire. Build your coals on one side of the grill and lay your meat on the other side away from the heat, to get low indirect heat grilling. Smaller grills will require replenishing the fuel more often resulting in heat loss and longer cooking times.
Another factor is how airtight your grill is. If you have an offset smoker with lots of leaks, your fuel will burn much faster, even with the Minion method. If your smoker is tight as a drum, then it will burn more efficiently, and the fuel will last hours longer.
The larger the capacity, the fewer times you will need to “reload.” You’ll spend less time fire tending and more time relaxing.
So in conclusion, it works for any grill or smoker that is either large enough to have space to sit the cooking food on an area of the grate that is not over the coals or has some set up with heat deflectors in place. So pretty much all but small grills.
What Fuel for the Minion Method? Lump or Briquettes?
You can use either lump charcoal or briquettes. It doesn’t matter. Lump charcoal will burn faster and hotter, so you will need to replenish it more often.
Because lump charcoal is a natural product, the size of the lumps can vary and are not uniform. You will need to pack them tightly to ensure good contact so that the fire spreads from one piece to the other. Too many air gaps could affect the consistency of the heat.
Of course, briquettes are processed to be uniform in size and burn evenly. But either one will work well using the Minion method for your grill or smoker.
However, briquettes produce more ash and can smother the fire if not well-placed or maintained. No matter which fuel you choose, keep an eye on your temperature with a quality thermometer.
Will Using Unlit Briquettes Affect the Taste?
Lump charcoal is simply wood burned without the presence of oxygen leaving mostly carbon. It is a natural, unprocessed product.
However, briquettes take the carbon a step further, mixing the char with ingredients such as coal, limestone, cornstarch, and borax. They are pressed into uniform shapes to help them burn evenly and consistently.
While all these extra ingredients are natural, some say that they can affect the flavor of the meat if unlit charcoal ignites while in the grill. It comes down to personal preference, but they both will work to keep a fire going using the Minion method.
| Lump Charcoal | Briquettes | |
|---|---|---|
| Pros | Lights quickly Burns hotter Less ash production Easier temperature control All natural, no additives | Burns longer Easier to maintain consistent temperature Cheaper |
| Cons | Burns faster More expensive Inconsistent size | Longer to light Chemical smell (debatable) More ash production |
However, both sides of the lump/charcoal debate agree on one thing. Never use lighter fluid or pre-soaked briquettes. The fluid will impart an awful chemical taste that will ruin your barbecued meats.
What Temperature Range Is Best for the Minion Method?
As previously discussed, it’s perfect for low and slow cooking. The slow-burning makes it easy to keep your smoker temperature around 225 °F to 275 °F (107 °C to 135 °C). It’s not the best choice for steaks and burgers when you need high heat.
This technique works best with smokers using indirect cooking where the fire is away from the meat.
When Can or Should You Use the Minion Method?
It works for long, slow style cooking and smoking when you need even heat for a long time and where the meat is not in direct contact with the heat.
On the other hand, high-heat grilling requires a large bed of red-hot coals at maximum heat to sear a steak or burgers. The heat is intense, but the coals burn out very quickly.
Pros And Cons Compared To Other Methods Of Fire Management For Low ‘N Slow Cooks?
An alternative to the Minion method is the charcoal snake where you arrange your fuel in a row, “S” shape or “C” at the bottom of the grill.
It depends on the room you have to do this. The advantage is that you only light one end, like a fuse, and it burns all the way slowly to the other end. It burns less fuel because not as many briquettes or charcoal are lighting at the same time. The disadvantage is if you don’t have a lot of room to make this arrangement.
The snake method is a two-zone fire. If you are using a circular Weber grill, you line your briquettes and wood chunks along one side of the grill in a half-moon shape. One end of the “snake” is lit and continues to burn its way around to the other end.
Unless your fire box is deep enough, the minion will create too much heat too close to the grill. Check out this quick Snake Method Video to see the difference.
The minion method is easier for smokers with larger and deeper fuel boxes that hold more fuel.
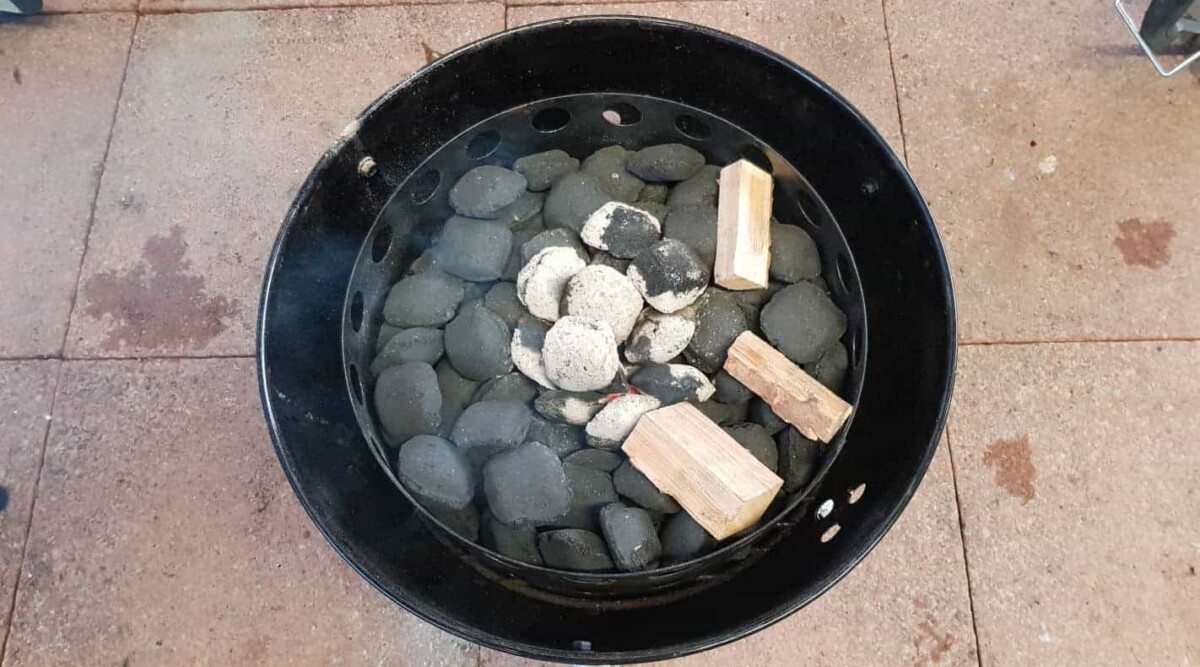
There are two basic techniques to starting your grill using the Minion method. They are the “Doughnut” or the “Top Down,” two ways of arranging your briquettes so that they stay lit and burn slowly, igniting the other contacting briquettes.
The Doughnut method is the way Jim set up his grill. You simply pour in the desired amount of briquettes, make a well in the center and add your lit charcoal briquettes in the middle.
The other way is the Top-Down method where you make an even layer of briquettes at the bottom of the grill then adding lit briquettes on top. This way they burn down slowly and cook evenly.
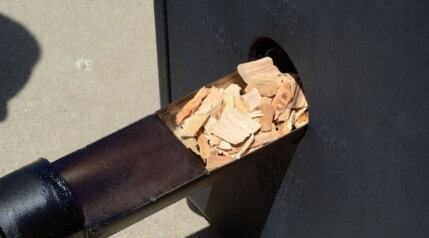
Add your split wood or chips on top of the briquettes at intervals to provide your desired wood smoke during the cooking process.
Four Easy Steps for the Minion Method on a Weber Smoky Mountain™
It takes only about 15 minutes to fire up and start smoking.
Step 1 — Fill the Chamber With Unlit Briquettes
Make a deep even layer with a well in the center where you will add the starter coals.
Place your favorite wood chunks around the top.
As the fire gradually spreads, it will ignite the wood, providing the smoke.
Step 2 — Light the Starter Briquettes
One of the quickest, cleanest methods of starting briquettes is with a charcoal chimney starter. As discussed in our guide on how to use a chimney starter, there are two popular ways to start your briquettes or charcoal in a chimney.
The fastest and most expensive way is by using a blow torch, Looftlighter, or similar.
The most economical method is by putting two sheets of newspaper or a paraffin starter cube under the chimney and setting it alight.
Once ALL the briquettes have 70% gray ash to their surface, they are ready to transfer to the grill to work their magic.
Step 3 — Place the Lit Coals in the Center
Dump the hot coals in the center where you made the well or “doughnut.” The doughnut method will allow for a slower, longer burn because the briquettes are igniting fewer of their neighbors at a time.
One way to make a perfect doughnut is using a coffee can. Make a hole by placing a coffee can with both ends removed, in the center of the fire box or grill. Load the briquettes around it. You simply dump the lit briquettes inside the can then remove it with pliers.
Step 4 — Assemble Your Cooker and Have a Beer!
The WSM has a water pan under the first of two grill shelves. It helps add moisture and to regulate the temperature.
Some cooking methods require water throughout the cooking process, others halfway or not at all. You will find what’s best for your type of meat and style of cooking.
Fill with hot or boiling water and then check the level every two to four hours, topping off with hot water.
Tip — If you are cooking dry, wrap the bowl with foil for easy cleaning. You can also fill the bowl with sand and cover with foil. Like adding water, the sand will help regulate the temperature inside the cooker.
Start with your vents wide open, top and bottom. When the temperature reaches 200 °F/93 °C, close the bottom dampers to 25% and the top to 50%. The temp will continue to rise. Now regulate the temperature using the top vents only.
When it hits 215 °F to 220 °F, close the top vent down to 25% and see where it settles. If it settles too hot, close the top vent slightly, if below 225 °F, then open it slightly. Adjust the top vent in 1/8th or fewer increments, and wait for 15 minutes after any vent setting change to allow the cooker to settle to the new temp. At first, this will take some guesswork. After some practice over time, you will soon be able to dial in to a specific temp very quickly.
To add more briquettes during cooking, use your chimney to light them. Burn them to about 25% to 50% ash before adding.
Smoking and grilling are part art and part science. It takes times and experience to learn how every grill works. Here are some helpful guidelines from the pros.
Watch a short two-minute video on how to set up your smoker using the Minion Method.
What About Other Types of Cookers?
The minion method works well with any cooker or smoker. The key is to be sure the coals are far enough away from the meat.
Because the minion allows for the continuous burning of charcoal or briquettes, you will need to try it in your cooker to see how long they burn.
Each cooker has different cooking characteristics, but the most significant factors will be how much unlit fuel you can start with in your grill, how many lit coals you dump onto them, and the air flow or leakage in your cooker.
Once you’ve tried this method, you will know how to set your dampers, how long you can maintain consistent temp, and when you need to add fuel.
Experiment, Document, and Enjoy
The Minion method just plain works. Use it to take the guesswork out of your fire building, and you’ll have one less thing to worry about during long, low ‘n’ slow cooks.
Try the four easy steps above and tell us your experience in the comments below. We would love to hear from you.
Have fun and: Happy smoking!


I just ordered my 18″ WSM and I stumbled on your site. It is amazing! So much amazing content in one place. Thanks so much!
beren
Thanks, Beren! Best of luck with your new smoker.
Excellent article! Just curious as to why you didn’t mention two pieces of equipment: the “Slow ‘N Sear and the “Smokenator”, both for the Weber Kettle. I am using the Slow’N Sear and have gotten excellent results. Granted one has some expense involved here, but both systems seem to be good alternatives.
Joe Phillips
Hi, When I come to updating to this article, I’ll give it a brief mention and link out to further info.
Thanks for the feedback.