
In this post I answer all your questions on how to dry age beef and steaks yourself at home.
Wine, cheese, steak. All good things that age beautifully, where the passage of time only makes them richer, more complex, and weak-at-the-knees delicious. But in the case of meat, we all know time can make bad stuff happen too, like mold and bacteria.
So how does dry-aging achieve that superior, deeply tender and delicious steak, without going bad? And why would you want to make it yourself?
Right off the bat, here’s one easy motivator for you: $100. Yup, that’s what you can expect to spend in a good steakhouse for a top-notch dry-aged steak. And — you guessed it — it’s way cheaper when you do it yourself at home.
So read on to find out what exactly dry-aging is, how it’s done and how easy it is to make beautifully aged steak in your own kitchen.
We’ll lay out some simple no-brainers why you’d want to do this yourself and walk you through the process, step-by-step. In fact, by the time, you’re at the end of this post, you’ll be grabbing your wallet and heading out the door to get yourself a good hunk o’ cow, so you can get started!
Jump to:
- 1 What is Dry-Aging?
- 2 Why do We Dry-Age Meat?
- 3 What Happens When We Dry-Age Meat? — The Nitty-Gritty Science
- 4 Can You Dry-Age Individual Steaks at Home?
- 5 What Cuts of Steak are Best for Dry-Aging?
- 6 The Importance of Air Temperature, Humidity and Air-Flow
- 7 Do Dry-Aging Bags Work?
- 8 Is There a Quick Way to Dry-Aging Meat?
- 9 Why It’s Important to Trim Dry-Aged Meat
- 10 How Long Does it Take to Dry-Age Meat?
- 11 What Exactly is “Funky”? And What Too Is “Foul”?!
- 12 Equipment Needed for Aging Your Meat at Home
- 13 How to Dry Age Beef At Home
- 14 How to Prepare Your Dry-Aged Steak For Cooking
- 15 How to Cook Dry-Aged Steak
- 16 The Last Morsel
What is Dry-Aging?

You may already be familiar with the superior taste of dry-aged beef and steak, that high-end menu choice in restaurants that will put a pretty dent in your wallet. But how does it get to be this way?
There are four secrets to dry aging: temperature, humidity, air-speed and time.
Stringent attention to these factors using special climate-controlled rooms for anything from a couple of weeks to several months will result in specific biological breakdown of the meat and concentration of the flavor. Mmm-hmm. Can you spell U-M-A-M-I?
Why do We Dry-Age Meat?
Think about this: did you ever throw a piece of beef in a pan or even on the grill that hadn’t been well dried with paper towels and watched it sizzle and steam? It’s not a pretty sight. Wet meat will not brown and sear (the Maillard reaction) and give that beautiful mahogany crunchy exterior we all love.
So if wet is the enemy, then the flip side is that dry is the goal. And if drying meat with paper towels makes a difference, imagine how much better for the sear and crust if it’s dried longer and more thoroughly through dry-aging!
So OK, the crust gets better. But dry-aging also means moisture loss — up to 30% of the original weight of the meat — and this helps enrich and deepen the flavor of the meat.
Note that the moisture loss is from the outer layers of fat that are exposed to the air, with limited loss of the good stuff underneath.
During aging, the meat will also undergo enzymatic breakdown, which sounds like a bad thing but is actually awesome because it results in the tenderization of tough muscle fibers and gnarly connective tissue.
Deep flavor, tender bite, seared crunchy crust. I don’t know about you, but I’m feeling hungry! But hold that thought, let’s take a minute to look at the science behind dry aging.
What Happens When We Dry-Age Meat? — The Nitty-Gritty Science

OK, I know some of us are just interested in sinking our teeth into a beautiful slab of aged steak. But I think it’s always interesting to know the science behind it.
What exactly is going on inside these drying hunks of cow that transforms the texture and flavor so radically?
How Enzymes Affect Meat
Once meat is no longer alive, it will start to break down. This can go one of two ways. Bacteria and rotting. Er, no thanks. Or precise control of humidity, temperature and air movement to ensure it ages safely.
In optimal conditions, natural enzymes present in the meat will work to break down fats and glycogen into tasty amino acids, sugars, and fatty acids, helping the meat gradually develop a new complexity of flavors.
In fact, one amino acid created through dry-aging is glutamate — as in monosodium glutamate (MSG) — which we all know is a powerful flavor. And in this case, it’s all natural.
How Bacteria Affect Meat
Don’t go all squirmy on me now. Our guts are full of good bacteria! They’re all over our skin and everything we touch. Good bacteria keep us healthy, fighting off bad bacteria, boosting our immune system and help our digestion.
With dry aging beef, bacteria are your friend, working to reduce the toughness of muscle fibers and connective tissue, and convert chewy collagen into buttery-smooth tender steak.
Bacteria also oxidize the outer layer of fat surrounding the meat to increase tenderness. The important thing is to welcome only the good bacteria, and keep away the bad (more on that below.)
For the whole hog on dry-aging beef, check out this video of the professional (as opposed to the at-home) process. The science is the same, and it’s fascinating.
Can You Dry-Age Individual Steaks at Home?
You may read that wrapping individual steaks in cheesecloth or paper towel and leaving them in the fridge for a week is a good way to dry age them. It’s not. The paper towel or cheesecloth holds moisture against the meat, much like a cotton t-shirt you’ve sweated in holds that wetness against your skin. Euwww. In both cases, this is a hygiene crisis.
No significant flavor or texture improvement happens in just one week. But if you leave individual steaks to dry in the refrigerator for longer than this, you simply dehydrate these smaller cuts into bits of old shoe leather. Your dog would probably love this, but we demand better!
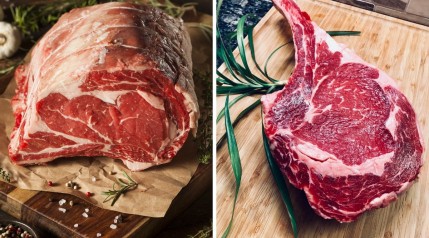
What Cuts of Steak are Best for Dry-Aging?

We are talking the beef sub-primals here, big hunks of meat.
Look for a good solid fat cap as this will take the hit on moisture loss and bacterial development which can then be trimmed off so that you lose minimal real meat content. Always leave a little fresh white fat after trimming because this is what imparts show-stopping umami flavor when allowed to oxidize over time.
Look for top-grade USDA prime quality meat. This is really important. Dry-aging will just dehydrate an inferior piece of meat. We’re talking top-drawer meat here, cuts renowned for their tenderness, flavor and marbling. Here’s more on how to select the best cuts for dry-aging.
The types of steak cuts that are best for dry-aging are as follows:
- Strip loin (New York Strip)
- Boneless ribeye (ribeye)
- Top butt (sirloin)
- Rib steak (at least 3 ribs)
- Porterhouse
- Prime rib / rib roast (bone-in)
All these big guns in the steak arena will age well and improve dramatically in texture and flavor during the dry-aging process.
The Importance of Air Temperature, Humidity and Air-Flow
Along with time, these are the keys to dry-aging.
And if you are trying this at home, it could take a little practice to find the optimal conditions for you. But, as with anything to do with meat, practice and experimentation is all part of the fun!
Let’s take a look at each factor in turn:
Temperature
Dry-aging at home must be done in a refrigerator. Unfortunately, I can’t recommend using your regular family refrigerator for several reasons:
- Sub-primal cuts of beef are big and need to have plenty of air flow around them. Your refrigerator probably has not got enough room for this.
- The temperature must be kept consistent, and with a regular refrigerator, the door is frequently opened and closed (about 20 times an hour in my house with a teenage boy!)
- A cut of beef that is dry-aging can impart odors to other foods that you wouldn’t like (much as we love dry-aged meat, you don’t want to taste it in your morning OJ…)
- Also, the meat will pick up other flavors in the refrigerator as it dries, which could result in a weird final taste or worse bacterial growth (the bad kind).
What you need: I recommend getting a small refrigerator to dedicate solely to your dry-aging. Keep this at a normal refrigerator temperature between 36-40°, and you’re good to go.
Humidity
Monitoring the humidity is important because if the level is too high, mold can grow. And if the level is too low, the beef will dry out too quickly, and the resulting steaks be less juicy.
Maintaining a humidity level around 60-80% is best.
What you need: Putting a small pan of water at the bottom of the refrigerator will ensure a moderate level of humidity so that the meat doesn’t dry too quickly.
Air Flow
Constant airflow around all sides of the meat is essential to ensure even and rapid drying and prevent harmful bacteria from taking hold. You want contact on the surface of the meat to be minimal, a light refrigerator rack at most.
What you need: A small desk fan that fits right inside the refrigerator works well. Cut a small notch out of the soft sealant around the refrigerator door for the cord of the fan to pass through.
Do Dry-Aging Bags Work?

BeefResearch.org defines dry-aging as a method of aging meat “without protective packaging”. We’ve already talked about cheesecloth and paper towels (no and no), but what about these special air-sealed bags designed to allow moisture out and not let air in?
Well, the moisture out part is all good. Dry aging (note the “dry”) is all about getting rid of moisture. But the not letting air in is a big no-no.
Circulating oxygen is a critical part of the dry-aging process allowing the oxidization of fat and other biochemical reactions to take place. Without air circulation, you are not dry-aging. And when anything is actually touching the meat — even a dry-aging bag — it is depriving that part of the meat of free-flowing air, and risking bacterial build-up.
Also, people have found no discernible difference between the taste or texture in beef aged in dry aging bags as opposed to the way we recommend here with abundant air flow. The only difference will be in your wallet which will be a little lighter after investing in unproven, unnecessary dry-aging bags. You can read more about dry-aging with bags here.
Is There a Quick Way to Dry-Aging Meat?
Well sure, there’s always a short-cut, but as you’d expect, there will be some compromises.
If you rub steak with special ground-up rice called Koji (find it online or specialty Asian supermarkets), then leave it uncovered in the refrigerator for a few days, you end up with something surprisingly close to real dry-aged steak.
We’re not the biggest fans of this method because tenderness — one of the principal aims of dry-aging — is not as good with Koji-rubbed meat as it will be with the dry-aging method described here. But in a pinch, if you only have 3 days, hey, could be worth a try.
Read more about how to shortcut the dry-aging process here with the Koji-rub method.
Why It’s Important to Trim Dry-Aged Meat

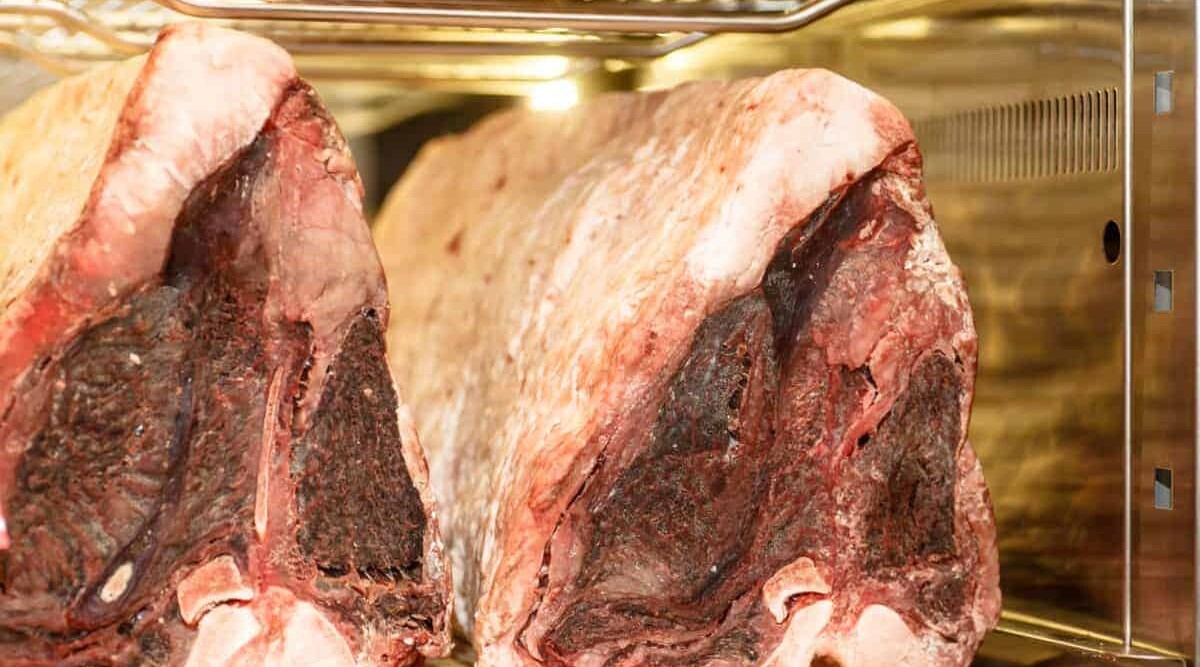
Untrimmed dry-aged meat is not a pretty thing. Desiccated, moldy, and withered, it takes some experience to understand that the good stuff is underneath!
This is why you need to make sure the sub-primal piece you start with has a good thick fat cap. It will be primarily the fat cap that loses moisture and “protects” the good meat, the fat cap that gets all dried out and cracked, and the fat cap which will be neatly trimmed away to leave you with a beautiful hunk of delicious, tender aged beef. Kind of like the ugly toad who turns into the handsome prince!
This is also why you want to choose a good-sized piece to start with. The larger the meat, and the lower the surface-area-to-volume ratio, the less dried out moldy stuff you have to throw out, and the more good stuff you keep and eat.
And word to the wise: don’t trim away all the fat, leave a little fresh white fat on for self-basting juiciness and flavor.
How Long Does it Take to Dry-Age Meat?
Ah, this is the million-dollar question.
The length of time you age beef affects the flavor enormously. Aging is, of course, a process of time. And what is perfection will differ from person to person. Again, experimenting is key here, so you can zone in on what fires up your particular palate.
That said, there are some generally accepted guidelines to timing, with 14 days being the absolute minimum for a subtle difference in texture (too early for a noticeable difference in taste). And 60 days being ripe, gamey, almost cheese-like in intensity and definitely an experience that is not for everyone.
Experts agree that 28-35 days is the sweet spot for most with beautiful bold, rich flavors developing and melt-in-the-mouth tenderness.
Here is a quick run-down on what you can expect at different points of the aging process:
Less than 14 Days
Don’t bother. All that work for a barely discernible change in texture and flavor.
14-28 Days
Things are starting to get interesting, and certainly at the end of this period, you will notice that texture is much improved, as muscle fibers break down into beautiful butter-smooth tenderness. You may, towards the end of this time, detect some deepening flavors developing. This is typically the age of steak at a good restaurant.
28-45 Days
Getting funky now! Bold nutty ripe-cheese flavors develop along with dramatically increased juiciness and tenderness. Somewhere in this range will be your perfect Goldilocks steak!
45-60 days
If you’re the kind of person who loves really strong coffee, really stinky cheese and dark chocolate, you may have a taste for really long dry-aged steak.
With extreme intense flavors, bold and gamey, this super-aged steak is beyond what you would find even in a top steak-house. A handful of people will love it, but it’s likely too much of a good thing for most.
What Exactly is “Funky”? And What Too Is “Foul”?!
Well, there’s the groovy dance thing of course, but funky is also the word used to describe the unique flavors of extremely aged beef: complex, bold, full-bodied, umami. Some even say nutty and ripe-cheese-like.
Not everyone’s beef so to speak, but you are in the driver’s seat here and get to choose precisely how funky or not your beef will be by controlling the time spent aging.
But it’s also important to recognize the difference between funky and foul. When your steak is maturing to bold and beefy goodness, or when it’s taken a turn for the worse and gone bad.
Dry-aged steak, especially when it’s aged over 35 days or so, does have a unique odor that may not be familiar to you. But you have to trust your natural inborn instinct that will tell you when something is truly rotten. Kind of gag-inducing in the case of meat. You are unlikely to mistake this putrid face-scrunching stench.
Smell it? Toss it!
Equipment Needed for Aging Your Meat at Home

OK, it’s showtime! You are now an expert on dry-aging meats, and it’s time to get to work. Here’s what you will need:
- A mini-refrigerator (set to regular fridge temperature of 36-40 °F)
- A small desk fan
- A wire rack (if the fridge doesn’t have one built-in)
- A tray to catch any meat juices
- A good hunk o’ cow! A bone-in untrimmed prime rib with fat cap and chine bone intact is my recommendation for starting out. Make sure it’s top-grade, USDA prime beef. And a prime rib, not a ribeye (learn more in our prime rib vs ribeye comparison guide.)
How to Dry Age Beef At Home
Once you have the equipment, you are pretty much there. This is a simple process, and the only challenging part is the waiting! But you know what they say, good things come to those who wait.
- Set up your wire rack above the tray in the mini-fridge, making sure if there is plenty of room around the wire rack on all sides for air to flow around the meat
- Put the fan in the fridge and, if necessary, cut a small notch out of the rubber insulating trim around the fridge door for the fan cord to pass through
- Set your meat on the rack, turn on the fan, close the door and wait! Try not to peek too often because every time you open the fridge door, you upset the just-right temperature and humidity inside the fridge, plus unwanted bacteria and aromas can get in and mess with your project.
- Wait your desired length of dry-aging time. We recommend 30 days as suitable for most people…but do experiment with longer to find your sweet spot.
- Once the desired time has passed, prepare your beef for cooking, as we discuss next!
How to Prepare Your Dry-Aged Steak For Cooking
How long you age your meat is really up to you. As I’ve said, for most people, somewhere in the 28-35 day dry-aged range is ideal. But like all fun things in the kitchen, experimenting is the name of the game!
Once you decide to take the cut of meat out of the refrigerator, you need to be prepared for some visual changes: the outside of the meat is going to look desiccated, cracked, deep red-brown or even purple-brown. But fear not…all this gets trimmed away. Also trim off most of the fat just leaving a little because, well, we all love a little fat on our steaks, right?
Finally, cut the meat neatly into individual steaks. Making each individual steak 1 ¼” to 3” thick is ideal, with 2 inches thick being the sweet spot for most. Then go fire up that grill, baby, cos it’s chow time!
How to Cook Dry-Aged Steak

This is not difficult, and you’ve probably grilled meat this way a hundred times before, but when you’ve spent a month or so carefully and meticulously aging your steak, boy, do you want to get it absolutely right!
Grilling first at a low temp and then searing high (AKA reverse searing) is probably my favorite way to cook dry-aged steaks 2 inches thick or more.
4 Easy Steps to Cooking the Perfect Dry-Aged Steak:
- Set up your grill for 2-zone grilling. On a gas grill with one sides burners blistering hot and the other side off or very low temp. On a charcoal grill, bank up all the coal on one side only. Aim for 225 °F to 250 °F ambient temp.
- Season the steaks with your favorite steak rub or better still, simple Kosher salt and fresh-cracked pepper.
- Add your steaks to the low-temperature side of the grill and leave them to cook until 15 °F below the temperature you finally want them (which is up to you). So for example, if you want your steak medium-rare (130 °F), remove them from the low-temperature side of the grill when they hit 115 °F.
- Transfer steaks to the high temperature side of the grill to sear them, and beautifully caramelize and sear the exterior. You’ll be amazed at how much better air-dried meat browns, precisely because it has less moisture.
- When the steak looks mahogany brown and crisp-seared, and the internal temp has risen to within 5 °F of the final temp you want to serve it, remove it. (use an instant-read thermometer to check internal temp.)
- Wait! I know, it’s killing you. But all meat cooked at high temperatures must rest a few minutes to allow all those delicious juices to disperse through the meat. Like I said, good things come to those who wait! So let it rest 5 to 10 minutes before serving.
The Last Morsel
Next time you’re in a fine restaurant, and you’re eyeing up that $100 aged steak on the menu amazed at the expense, be happy that you now know how to dry age beef at home and can recreate it yourself for a fraction of the cost!
Sure, it takes time and patience, but it’s also fix-it-and-forget-it. Once you’ve followed the directions above and got your meat set up for aging, just mark your calendar for when it’ll be ready and forget about it. When that day rolls around, it’s hallelujah time because I promise you that will be hands-down the tastiest bite of steak you ever put in your mouth!
Let us know how it works out for you. We love to hear about our readers’ experiences. How long did you age your steak for and why? Did you encounter and overcome any issues along the way?
And as always, if you have any questions or comments regarding the above, we’d love to hear from you, so please do use the comment section below.

Hi have you ever tried trussing say a 32 oz ribeye with fat then dry aging it or is that just stupid?
Hi Jason,
I never have, no. I think if doing something that small (relatively speaking), there’s just too much waste and too much to cut away when the aging process is finished to make it financially viable or worth the effort.
The reason people do whole primals, or at least very large cuts, is the higher the ratio of surface area to volume of meat, the less waste there is. You cut away the entire surface at the end of the process before cooking, and too much is thrown from small cuts relative to overall weight, making it not worthwhile.
I have seen people seal smaller cuts in an inch or so of butter for aging, or even ‘wet aging’, which cuts down waste, but the flavor will be different. For true dry aging, I would recommend doing only very large cuts.
Hi Mark,
Great article! Just one thing I think needs a correction. You said “Grilling first at a high temp and then low (AKA reverse sear) is probably my favorite way to cook dry-aged steaks 2 inches thick or more.” but I think you mean Grilling first at low temp and the high.
Doh! You’re absolutely right, thanks for that, Tyler. Changed it now.
I’ve actually been updating articles — slowly, as it’s so time-consuming — over the last few weeks, and I am finding a fair few ‘speeling mistacks’ too. It’s crazy what I miss sometimes 🙁
Hi Mark,
Thanks for the article, it was great. I’ve got my fridge almost set. I just have to install a fan. Assuming the fan doesn’t generate heat for this question, is it possible to have too much air from a fan that’s too strong? I’ve got a PC fan, and it’s really powerful.
Separately, what do you think of coating the meat in butter or fat? I heard you on the air circulation making it “dry” so I get that it’s not the same. But what’s your take?
Thanks,
Paul
Hi Paul,
As long as there’s a sufficient amount of cool, dry air moving about, it doesn’t matter how much. You can have too little, and this will affect the process. You can have too much in the sense of it being ‘overkill’, but it won’t alter the process.
Coating aging in butter? I’ve honestly never tried it. I’ve seen the videos doing the rounds on social sites of people completely sealing in butter, but never tried it or had the opportunity to eat some meat aged that way. I’d definitely be interested to give it a go!
All we want is the name of the best equipment for an on home dry ager. We would appreciate your help. Thank you. Chris
Hi Chris,
I’ve not looked into the vast range of equipment available for dry aging to be able to make reliable recommendations I’m afraid. Hopefully somebody else seeing your comment will chime in.
If it was me, I’d search for charcuterie forums or Facebook groups, and ask in there where people live and breathe this stuff for the best recommendations.
Is it safe to run the small fan inside the fridge for 28 days?
Hi Florinda. What do you mean by ‘safe’? What element of safety are you referring to?
Anyway, suitable fans, sure. Many people mock up their own dry aging chambers and air circulation is necessary, which means needing a fan.
Thanks for another great article. How long can you keep an aged steak in the fridge before cooking it? I may not want to use all the steaks at once so do you follow the normal rules for keeping meat in the fridge or does the dry aging change how long you would keep it?
I would follow the normal rules for steak in the fridge, because when you dry age you are doing so in a carefully controlled environment of temperature, moisture, and bacteria, that will not be true in your typical ‘used daily’ refrigerator.
Great article and well explained.
Hello,
I just built my 165 can insignia fridge. Got a humidifier in there controlled by a digiten. Added a fan. When in the fridge tapped into power from the inside fridge so when it comes on the fridge, the one I mounted on the top with spacers will circulate my air.
Should I put Himalayan salt blockss on the bottom or on the side? Thank you.
Hi David,
I’ve seen large walk in ‘dry aging salt chambers’ where the walls are lined solidly with nothing but Himalayan salt blocks. So to mimic that, I would go with the sides.
The salt blocks help pull moisture out of the air. When you put your fans blowing on it, it will also put salt particles in the air which adds a little flavor.
Hi Mark,I’ve watched videos on dry aging and some people turn the meat over about every four or five days,, good idea or not?
I’m genuinely curious. Do you know what the justification is for wanting / needing to turn it is? I guess (and it is only a guess) that the thinking is it exposes all sides of the meat to the same airflow and circulation over the whole of the dry-aging time, perhaps? I’ve no idea.
Good idea or not? I would say it’s unnecessary, though it will certainly do no harm if you do it. So it’s up to you.
I’m intrigued, though, and would like to know why it’s done, so I’ll look into it when I get a spare moment.
Great information, thank you so much. I have played with wet and dry aging for a while. This will help tremendously with the dry aging.
Mark. I looking into dry aging meat and was looking for refrigerator to use and came across cigar humidor that cools to was wandering if it would work. Thanks
Hi Dennis,
First off, I really don’t know conclusively so you will have to research it. However, from what I do know and instinct I would say it’s not suitable. Cigar humidors are made to keep humidity high and constant, to prevent cigars drying out. This is the opposite of what we want when dry aging meat.
Cigar humidor coolers do not cool to the same level as a refrigerator; as cigars are intended to be stored closer to 60-72 degrees. And because of the higher temps and minimal run times, the steak would not age; but would go bad.
Makes sense. Thanks, Juan.