
The ultimate goal for any barbecuer, from your backyard burger-flippers to professional pitmasters, is to cook delicious food.
There are all kinds of ways to bring out, enhance, or create flavor, and you could spend a lifetime exploring and perfecting them all.
Today, we’re going to look at one of the most basic, yet most effective and rewarding methods of flavoring meat for grilling and smoking: applying a dry rub.
We’re going in-depth with rubs to find out what they are, how they work, how and when to apply them, plus how much is enough and how much is too much!
We’ll also compare dry rubs to other methods of adding flavor and give you some insider tips to get the best results possible.
By the time we’re done, you’ll be ready to get out there and start discovering the amazing possibilities dry rubs can offer you and your food.
Read on to reveal a new world of flavor!
Jump to:
- 1 What is a Dry Rub?
- 2 Dry Rub Vs. Wet Rub?
- 3 Rubs Vs. Marinades
- 4 Moisten the Meat to Help the Rub Stick — or Not?
- 5 Rub it in — or Just Sprinkle it On?
- 6 When to Apply Dry Rub?
- 7 If Rubbing Hours Before, Wrap in Plastic or Not?
- 8 How to Apply Dry Rub — Two-Handed Method
- 9 How Much Rub to Use?
- 10 What Effect do Different Amounts of Rub Have?
- 11 Rub-A-Dub Done
What is a Dry Rub?
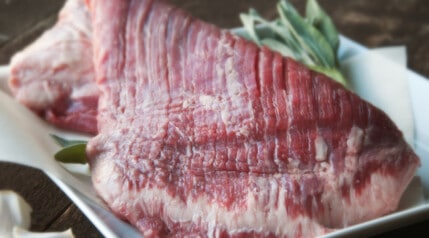
Rubs are frequently used to enhance and ramp up the flavor profiles of all types and cuts of meat, from big and bold brisket rubs, to more complex spicy and herby rubs for chicken.
As the name suggests, it is any mixture of dry ingredients that you rub onto a piece of meat before cooking.
The purpose is to both enhance the natural flavor of the meat and to introduce other, complementary flavors. You might also use it to make a low-cost cut of meat taste like a million bucks.
Ingredients you might put in a dry rub may include different types of salt, different types of sugar, various kinds of pepper, different kinds of chili peppers, paprika, garlic powder, mustard powder, celery salt, any herbs and spices, and so on.
Dry Rub Vs. Wet Rub?

It stands to reason that if there are dry rubs, there must be wet ones too, right? So, what’s the difference?
Well, one’s dry, and one’s wet!
With a dry rub, dry spices (like salt, chili flakes, oregano, etc.) are rubbed right onto the meat. While a wet rub might use the same seasonings, they are suspended in cooking oil or some other liquid.
Whether you choose dry or wet comes down to the particular flavors you want to add to your food. For example, if you like soy sauce or Tabasco, there’s no way to really duplicate either of those with dry ingredients only, so you’ll be forced to use a wet one.
Bottom line: there is no right or wrong answer here — it’s all about preferences or the mood of the day.
Rubs Vs. Marinades
Rubs add flavor to the surface of the meat, and a good one may leave a bit of a crust after cooking.
Marinades do double duty; they both flavor and tenderize meat. The tenderizing is the result of enzymes going to work on the protein strands.
(For more about marinades and other ways to tenderize meat, check out our complete guide to tenderizing steak.)
Moisten the Meat to Help the Rub Stick — or Not?

If you’re done giggling at the header, we’ll continue the lesson…
This part is really up to you. It won’t make much of a difference to the flavor because most of the liquid will cook off. If it helps you to see how evenly you’re coating your meat, then by all means, go ahead and moisten it first.
Now, if you’re thinking about heavily flavored stuff like Worcestershire sauce, fruit juice, or vinegar, you’re better off making a wet rub. In these, much of the liquid is absorbed into the dry ingredients, meaning more flavor sticks with the meat.
Our preference is to use a very light coating of oil, or even mustard before applying the dry rub. Best advice? Give both ways a try and see what you prefer.
Rub it in — or Just Sprinkle it On?
Have you ever heard of a “dry sprinkle”? No, it’s a dry ‘rub’ and is called that for a reason, amirite? So, massage it into every nook and cranny!
Take advantage of the natural grain of the meat to make your seasonings really get in there and stick. The more you rub it in, the less will fall off on the grill.
When to Apply Dry Rub?
As is the case with SO many aspects of grilling and smoking, there are many answers to this question, and everyone thinks theirs is the right one.
Some will tell you to apply the rub right before you slap the meat on the grill. Others insist on doing it hours before, and some swear by rubbing a day in advance to really let the flavor sink in. So, which is it?
Since this is dry rubbing and not dry brining, there’s no requirement to apply the seasonings hours or even a day ahead of grill time.
In fact, if any components of your dry rub have tenderizing properties, putting it on too far in advance could turn the surface of your meat to a nasty mush. No, thanks.
Adherents to the school of advance rubbing will tell you that the flavor penetrates the surface deeper the longer you leave it on. From personal experience, and having tried both, I can’t taste the difference between 12 minutes and 12 hours. (I’m sure many will disagree…let’s see how the comment thread below develops :p)
Now, for the sake of convenience, it can help to apply it in advance so that you’re not worrying about it while trying to juggle several other things around the backyard while preparing to cook and party. Most of the time, though, it’s enough just to massage it in right before it hits the grill, and it’ll taste fantastic.
Do what works for you and don’t worry about following the “rules” — in this case, there aren’t any.
If Rubbing Hours Before, Wrap in Plastic or Not?

There’s a case to be made that wrapping your rubbed meat in plastic while waiting for grill time will improve the flavor. One might assume that the tight-fitting wrap will keep the rub in place, and perhaps even encourage it to work below the surface.
Here’s the thing, though: when you remove the plastic, it ends up taking a lot of the rub off with it. So, you’ve now wasted all that time sitting in the fridge and some of your lovely rub.
For us, we never use plastic wrap on meat; just rest it in on a wire rack and put it in the fridge as is.
If you’re concerned about cross-contamination, which is a possibility with exposed, raw meat in a shared fridge with other produce, you might choose to wrap it for safety’s sake. To save your rub, however, a resealable container might be a better choice.
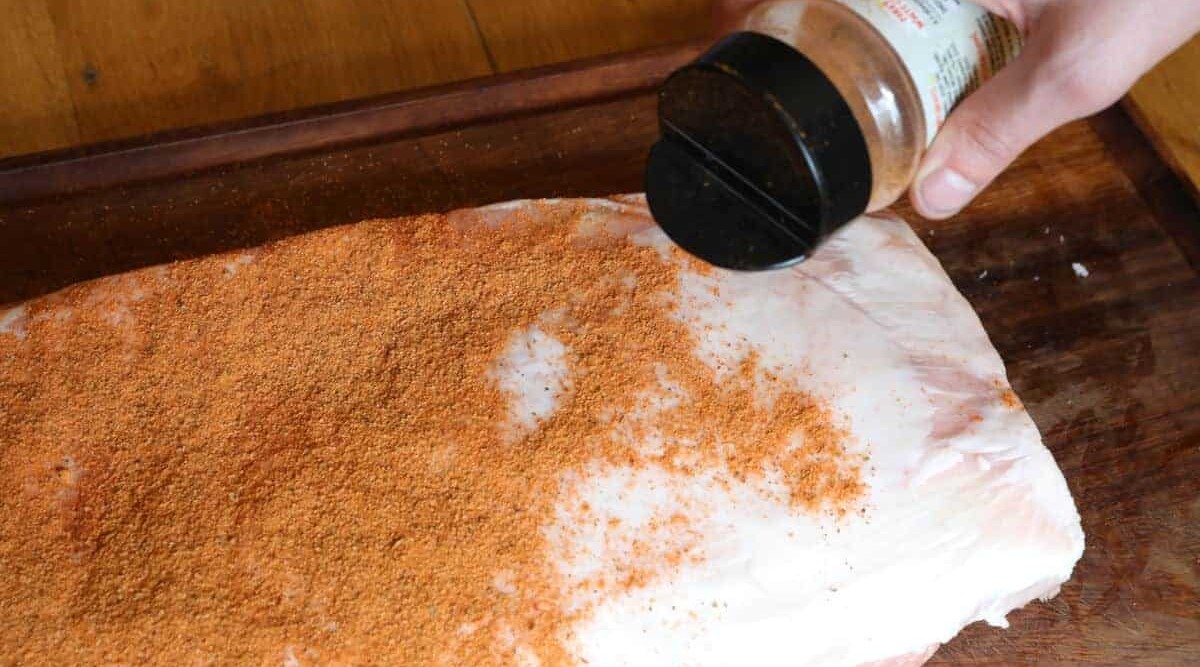
How to Apply Dry Rub — Two-Handed Method
You know that saying that goes something like, “the left hand doesn’t know what the right hand is doing”? That doesn’t apply here.
As you no doubt know, the surface of raw meat can be a playground for all kinds of nasty bacteria. Therefore, it is imperative to be mindful of spreading the little buggers around when you’re handling the meat, which you must, inevitably, do when applying a dry rub.
The best way to do this is to use the two-handed method: use one hand to scoop and sprinkle the rub, and the other to massage it into the meat. Keep your rubbing hand well clear of the bowl, bag, or other containers of rub because you’ll want to save the leftovers for future use.
Begin by sprinkling on an even layer of seasonings on all sides of the meat. You’ll note I said “all” and not “both”. Thick cuts should get some rub on what you might call the “sides,” and not just on the two main faces.
With your opposite hand, start rubbing the seasonings into the meat. Use a kneading-type motion to really get it in there.
Some sources will tell you to rub gently to avoid scratching the surface. I say, “Go for it!” The meat is already dead, so you can’t hurt it. Besides, if you do rough up the surface slightly, it then has more surface area and will grab and hold more flavor from the seasonings, and from any smoke present during cooking. Plus, you’re more likely to get a beautiful, crisp bark.
After you’ve got your rub applied, you could either move on to cooking or storage — or you could apply a second layer! This is something I often do to layer on the flavor. This can lead to some particularly tasty results if you’re working with commercially prepared rubs, and you want a custom blend. Have fun playing with flavor!
How Much Rub to Use?
Depending on whom you ask, deciding how much to put on your meat is either a science or an art.
The science people will tell you to use approximately 1 tablespoon of rub for every pound of meat. The art people, however, will tell you to go with your instincts and just eyeball everything.
Me, I fall into the latter category. I never measure, I just apply it until it looks about right. So far, no complaints have been filed with the chef!
I recommend a liberal covering for any size cut. Smaller cuts, it’s ok to leave a bit of the surface of the meat peeking through. For large cuts, you barely want to see the meat at all by the time you’re done.
The key for any rub is to apply it evenly and don’t leave any dry spots. Dry spots? Isn’t this supposed to be a dry rub?
Yes, but the meat is moist, and that moisture should wick into the rub. Any areas of dry seasoning left behind have a chance to feel gritty and awful in your mouth after they’re cooked. Not the results you’re looking for!
As with everything to do with flavor, how much rub to use comes down to personal preference. Once again, have fun experimenting — or creating if you’re also an “art” person!
What Effect do Different Amounts of Rub Have?

More rub equals more flavor, right? Well, yes, that is in fact the case. The more you apply, the more strongly you’ll taste the rub. If you’re really in love with your particular seasoning mix, and meat to you is just a delivery vehicle for other flavors, then go ahead and load it on!
There are times, however, when less is more. If you have a particularly fine cut of meat, like a really high-quality steak, using a lot of rub will mask the flavor of the meat itself. Therefore, you may want to use a lighter hand on premium steaks, chops, and perhaps even chicken.
With big cuts, though, like briskets, roasts, butts, shoulders, and so on, there is a LOT of meat under the surface. That means that any given bite will have some surface meat and a lot of interior meat. This allows plenty of opportunities to taste the true flavor of the meat no matter how much rub you apply. Definitely use a hefty portion for monster cuts like these.
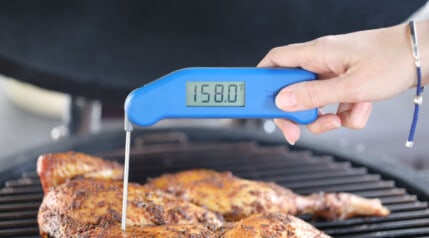
In our experience, using lots of rub on large pieces of meat seems to leave us with a thicker, deeper, chewier bark. Not only is this really tasty, but it also seems the meat inside is more moist and tender. Perhaps the bark prevents moisture loss during cooking? We’re no scientists (we covered that earlier), but we know what we see and taste.
Aesthetically speaking, liberal application of dry rub can give you a “burned” look on your finished product after hours of cooking.
How important is that? Well, and we hate to sound like a broken record here, that’s up to you.
If it looks burnt, it may not be something you want to serve to your guests or family. On the other hand, it’s probably going to taste awesome (I like a deep, dark bark), so does it really matter how it looks?
The truth is we probably all want a balance: drool-worthy bark, but a perfect visual appearance. You’ll have to find your own personal sweet spot on this.
Rub-A-Dub Done
Anyone else salivating just a little?
A good dry rub can really turn your grilled, roasted, or smoked meat into something special. We hope you now have a better understanding of how to use and how to apply dry rubs. Delicious things are coming your way.
Thanks for choosing FoodFireFriends for your BBQ knowledge center, and be sure to tell your friends and family about us. We have no desire to be the best-kept secret on the Internet!
If you have any questions, tips or feedback to give on the use on dry rubs, please do drop us a comment below, we’ll answer every one.
Catch you next time — happy grilling!


I’m glad to hear that dry rub doesn’t have to be applied hours in advance. I’m throwing a barbecue this weekend for my husband’s birthday, and I want to be sure to cook the meat to perfection. Thanks, for explaining how to apply rub before putting it on the grill, this will be incredibly helpful for the barbecue!
Hi, Lyla,
Bets of luck…let us know how you get on?
You’re absolutely right about the art on the amount of rub. I started with the 1 TBSP per-pound on a pair of spare ribs per science. That covered one of the ribs to my liking. I have smoked ribs and pork shoulder for years and just wanted to get an idea of how much I use. Thanks, much for the info.
Thanks, John, Glad it was useful. How much to use can certainly vary person and our individual tastes.
Do you think celery seed in your rub helps with more bark? I surely enjoyed your article. Thank you
Hi Charles,
It will a bit, yes. The bark is partially formed from undissolved components of rubs that you use, and celery seeds certainly will not dissolve, so they will add to the bark some, yes.
After searching for quite a while I found your help! It was just what I was looking for so thank you!
Thanks, Judy. Glad it helped!
When making a dry rub rib should I apply some of that dry rub at the end of my cook as well???
Hi William. I would say not to. You want the rub on at the start, because during the cook the heat causing reactions with the herbs, spices, sugars, and the rub combining with moisture from the meat, smoke, and so on, is what creates your ‘bark’, the crust you get from all low n slow BBQ. Adding rub at the end would result in…well, raw and dry rub. If you’ve put sufficient on at the beginning, there’s no need to top it up.
Having said that, it’s up to you. I do know some add a little extra rub before wrapping ribs if following the 3-2-1. And the thing with all cooking, is not everybody likes the same thing. So try it, experiment. Maybe add rub at the end to half a rack of ribs, and not the other half. Eat a piece of each and see what you prefer.
Thanks so much for posting these helpful tips! I’m making three beer can chickens this weekend each with a different marinade/rub/seasoning. I’m trying a new Tuscan rub recipe, taking your advice that it doesn’t have to sit in the fridge overnight. I have plenty of time to apply the rub before grilling and before my guest arrive. I appreciate your advice!
Thank you so much for the rub lesson! I have been cooking most of my 60 years, but never tried a dry rub, so thought it was about time ! You gave me wonderful information to work with, so off to the kitchen. Thank you again!
I always put my rub on a day before for Butts then vacuum seal. My butts have never been soggy or mushy, but really flavorful. Once i pull them from the bags I do sprinkle some fresh rub on them. Smoke at 225 for almost 16 hours for two 8.25 pounders. I like to get the internal to 300 and allow it to sit in a cooler for about 2-3 hours.
Question on Boston butt if I’m putting a dry rub with other seasonings do u mix all together or put it on one at a time
Hi, Blaine.
You can do either. I often ‘layer rubs’ by applying one, then another over the top. But it wouldn’t make a difference if I was to mix them before applying.
I am about to do a 15LB brisket smoked with a jerk paste. My concern with placing it in the fridge to marinate unwrapped in plastic and open to conditions while marinating would be that fridges these days tend to draw moisture out of items. Do I really want to lose moisture from my meat or am I wrong about this moisture loss?
Hi, John.
I would either vacuum seal if you have the option, or seal in shrink wrap, to keep the moisture in. Many jerk pastes have salt in them, and this will draw out moisture that will run down the brisket and pool underneath it. If you shrink wrap it, the salt will draw out moisture, that will be kept close to the surface, and then re-absorbed back in.
This info was good but said nothing for the original question. Do you want to salt and pepper if using a dry rub
Hi, Mary. It depends, and there is no right or wrong or wrong answer I’m afraid.
If you do not want salt and pepper on the particular cut you are using, then no. If you do, and if the dry rub already contains those things, then also no because then you will have too much. If the dry rub you are using does not contain salt and pepper, then it’s your choice. And of course, after use you can add more seasoning to your own preferred taste, as everybody is different.
For the record, Meathead famously advises not adding any salt to your dry rub, and instead ‘dry brining’ your meat with carefully measured amounts of salt way beforehand, then adding your dry rub just before cooking.
Very informative advice that helped guide this novice through her first smoke pork butt.
Well I must tell you a big Thank You for helping me decide on how to apply a dry rub to my very first making brisket experience! Besides all the laughs from reading and Imagining I am as ready as I can ever be to do this brisket 🥳🥳
Merry Christmas to you!