
With its thick ceramic walls and egg-like shape, the kamado grill is not just another barbecue. It’s a unique, versatile, and precise instrument for outdoor cooking. But getting to grips with how to use a kamado can be tricky without the right guidance.
I’ve been where you are now, but after studying, experimenting, and cooking on them for many years now, I’ve honed the skills necessary to handle these grills and produce excellent results with everything from perfectly seared steaks to the most amazing Texas-style briskets, and entire roast dinners (all meat and veg), to delicate fish dishes.
Now, I’m excited to pass on the lessons I’ve learned over the years to help you skip the common beginner pitfalls and head straight for kamado grilling glory.
Here’s what you will learn in this guide:
Article Topic Key Takeaways
- How a kamado grill works.
- Tools, techniques, and the pre-cook preparation you need to ensure a successful cook.
- How to set up your grill for smoking, grilling, roasting, searing, or baking.
- The correct charcoal to use, how much to use, and how to configure it for different cooks.
- How to light your kamado.
- How to hit a target cooking temperature and hold it there rock solid for hours.
- Kamado grill safety and the ‘burp’ (Nobody likes singed eyebrows!)
- Using smoking wood to ramp up the flavor.
- How to close down / turn off your kamado and clean up when you’re finished.
Are you excited to get started? Then take your first step into an amazing new world of outdoor cooking!
Jump to:
- 1 Article Topic Key Takeaways
- 2 How do Kamado Grills Work?
- 3 What Ways Can You Cook on a Kamado?
- 4 Plan Your Cook, and Ready Your Kamado Before You Start
- 5 Always Start With a Clean Kamado
- 6 Have the Correct Tools Ready
- 7 What Charcoal Should You Use in a Kamado?
- 8 How Much Charcoal Should You Use in a Kamado?
- 9 How to Configure Your Coals
- 10 How do You Light a Kamado?
- 11 A Note on Hitting Target Temps — do Not Go Over!
- 12 How do You Set up a Kamado for the Different Ways to Cook?
- 13 Adding Smoking Wood — And, Erm, Burping?
- 14 It’s Finally Time to Add Your Food
- 15 How do You Monitor Temperature in a Kamado?
- 16 Cook to Temperature and ‘Feel,’ Not Time
- 17 Be Mindful of Carryover Cooking
- 18 How do You Close Down a Kamado When You’ve Finished Cooking?
- 19 Kamado Cooking Safety Tips
- 20 Now You Know Kamado
How do Kamado Grills Work?
Kamado grills work by building a charcoal fire in the firebox towards the base, which draws in air from an adjustable vent near the bottom to provide a controlled amount of oxygen to the fire. Heat and smoke are then drawn up through the cooking chamber towards a vent at the top, passing over and around the food on the cooking grates as it goes.
Manufacturers make Kamados from various materials, including stainless steel and cast aluminum, but the best kamados are made of ceramics. This material makes them very heavy and a bit fragile, but it also retains and radiates heat with amazing efficiency, and that’s what makes a Kamado so unique and extraordinary.
The ceramic material absorbs and radiates heat for incredibly even, all-over cooking. You can cook food on the grates incredibly quickly or slowly, from temperatures between 200 °F to 750 °F plus, with direct or indirect heat, depending on the style of cooking chosen.
Their versatility and fuel efficiency are unmatched by any other style of cooker.

Still looking for a Kamado grill? You can see the best available examples in our collection of kamado grill reviews, and also our two favorite models in our Kamado Joe Big Joe III review, and this Kamado Joe classic review.
— Mark Jenner
What Ways Can You Cook on a Kamado?
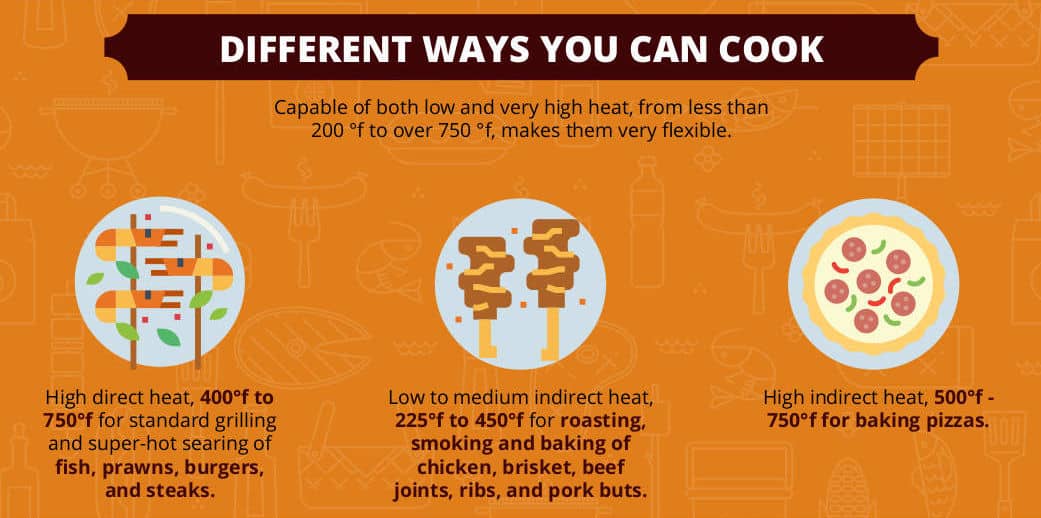
A kamado can cook food in many different ways, including searing, roasting, grilling, low and slow smoking, and baking.
A Kamado is capable of very high heat, allowing for both searing and standard grilling, able to generate and apply high direct heats to cook foods quickly and create fantastic flavor and browning.
They are also highly controllable and fuel efficient, so you can also use it as a smoker for cooking low ‘n’ slow briskets, ribs, and more.
Roasting and even baking are also possible with a good quality kamado. Using a heat deflector to sit between the firebox and cooking grates to shield the food from the flames, you can generate indirect heat at roasting and baking temperatures, mimicking your kitchen oven.
You can also purchase pizza stone accessories and crank a kamado up to over 700 °F for cooking authentic pizzas.
They really are the Swiss army knife of outdoor cookers, a true all-in-one, highly versatile outdoor cooking station.
Plan Your Cook, and Ready Your Kamado Before You Start
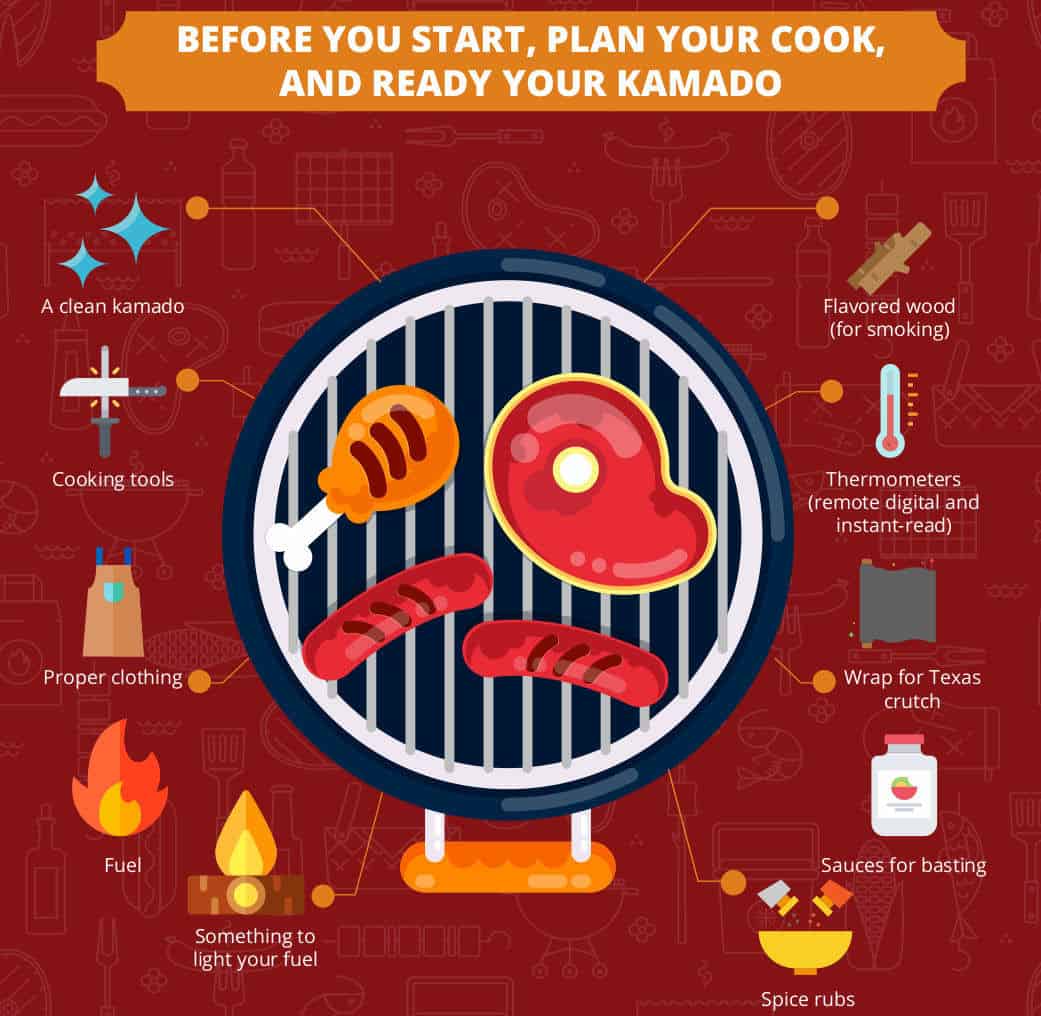
They say prior planning prevents poor performance. In other words, have an idea of what you want to accomplish before you even make the first spark. As we’ll discuss further soon, the many ways to cook on a kamado each require a different setup and tools.
Will you smoke a brisket low ‘n’ slow for half a day? Perhaps you’ll stoke up the flames and sear some steaks over a backyard volcano? Or maybe it will be something else entirely?
Regardless of what’s on the menu, you’ll need to set up accordingly with the right tools and fuels.
Here’s a quick list of everything you might want and need:
- A clean kamado
- Cooking tools
- Proper clothing
- Fuel
- Something to light your fuel
- Flavored wood (for smoking)
- Thermometers (a smoker thermometer and an instant-read)
- Aluminum or pink butcher paper to wrap for a Texas crutch
- Dry rubs
- Sauces
We’ll discuss some of these points in detail in the following sections. The important thing is to be ready for anything before you start to cook. Using a kamado should be fun, not stressful!
Always Start With a Clean Kamado
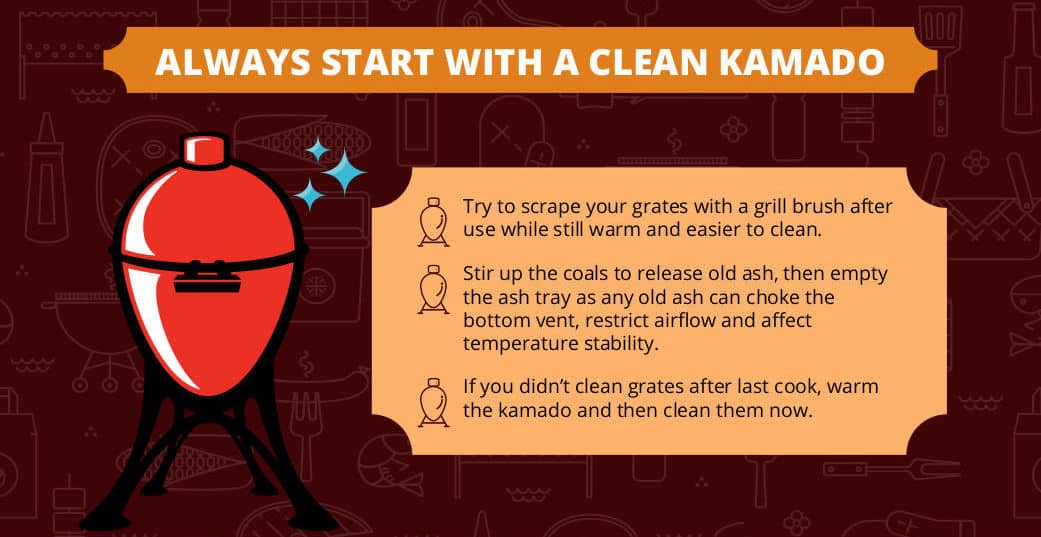
Let’s start at the beginning. Actually, let’s start before the beginning — back at the end of your last cook session. While the grates were still warm, you should have scraped off most of the leftover food debris. Pull them out and give them another look. Some stubborn stuff that you couldn’t shake last time might be ready to come off now.
While you’re at it, empty the ash left behind by the last load of charcoal. Ash can block and choke vents and diminish vital airflow, severely hampering the temperature stability and hence the performance of your Kamado.
Stir up the coals so that all the trapped ash falls into the bottom of the Kamado where it can be collected. Be sure to dump the ash into an appropriate receptacle like a steel garbage can.
If you cover your Kamado between uses, you shouldn’t have to do any other cleaning. On the off chance some trapped moisture causes mold or mildew to form on the inside, do not panic and do NOT attack it with chemical cleaners. Kamados are self-cleaning.
Instead, build up a nice hot fire and let the internal temperature slowly come up to 600 °F (316 °C). Hold that for 15 minutes before putting it out and letting it cool down. Once sufficiently cooled down, just brush away any residue, and you will be good to go.
Have the Correct Tools Ready
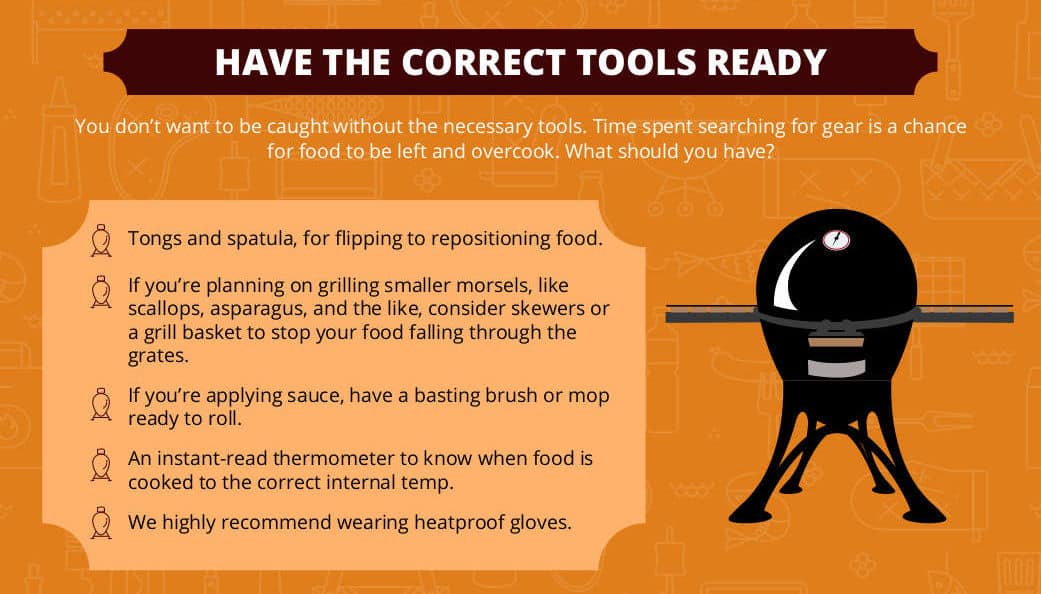
What tools should you have? Tongs should be a given; from flipping to repositioning, this is THE essential piece of barbecue equipment. Choose a nice pair that provides a solid grip, and maybe non-slip handles. Don’t forget a spatula, too, for easy flipping of burgers and items that need a little more support.
If you’re planning on grilling smaller morsels, like scallops, asparagus, and the like, consider buying skewers or a grill basket. These handy devices can save your food from a fiery demise below the grate.
And, if you’re applying sauce, have a basting brush ready to roll.
No matter what you’re cooking, you’ll likely want to have a digital probe thermometer at hand. We’ll touch on that again later, but we consider a good thermometer to be an essential part of your grilling ensemble.
What you don’t want to happen when you’re trying for the perfect, hassle-free grilling or smoking session is to be caught without the necessary tools. Time spent searching for your gear is time spent away from your Kamado, and that can lead to overcooked or burned food. So have all this ready BEFORE you start cooking.
Wear Protective Clothing
Now, let’s talk about PPE, or Personal Protective Equipment. We highly (and we mean HIGHLY) recommend wearing heatproof gloves. This is no time to get all macho and ignore basic common sense. Kamados can get very hot, and a severe burn will ruin your day faster than you can say, “Let me just check on those coals…”
Strapping on an apron isn’t a bad idea either, to keep your clothes clean. Also, close-toed shoes are always best when there’s hot charcoal, hot food, and hot grease around. Make your fashion statement after you’re finished cooking.
Once all your gear is cleaned and ready, you’re almost ready to start cooking.
What Charcoal Should You Use in a Kamado?
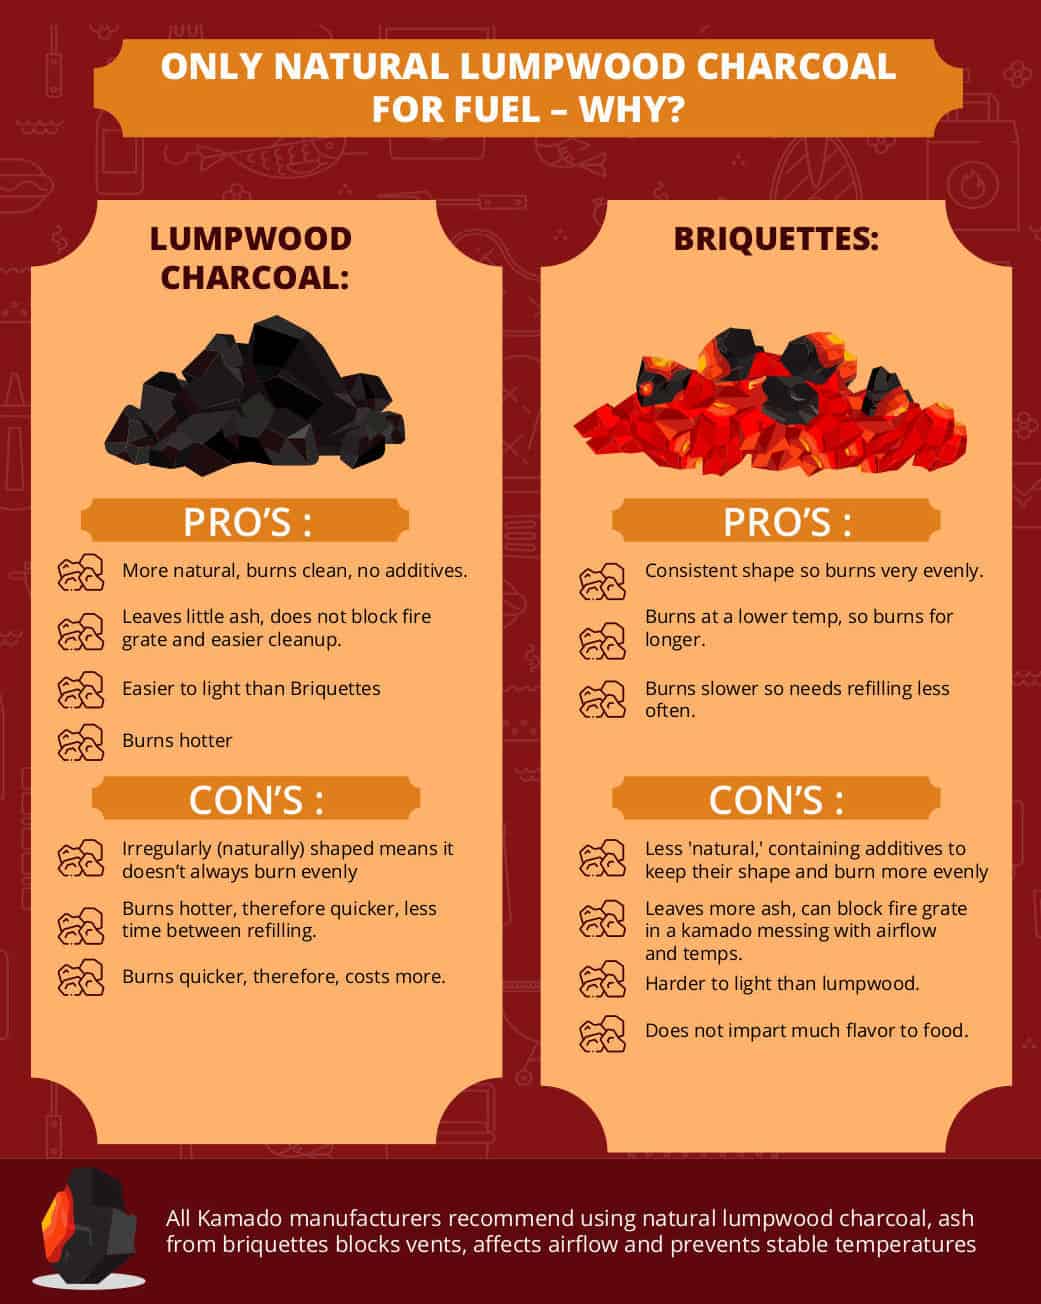
You should lumpwood charcoal in your kamado grill, not briquettes. Rather like a high-end sedan or sports car runs best when you fill up with premium gas, your Kamado is designed for optimal performance when you load it with lumpwood charcoal.
In fact, nearly all manufacturers of kamado grills recommend the use of natural lumpwood, sometimes referred to as just lump charcoal right in the user manual.
Lumpwood burns very hot and clean, making it perfect for a ceramic-lined kamado. Plus, once burned it leaves very little ash behind. On the other hand, briquettes leave a lot of ash behind, much more than lumpwood. All that ash can lead to blockages at the fire grate and vents, thereby restricting airflow and messing with your ability to hold a steady cooking temperature.
Since holding a steady temperature is the key to great smoking, you can see why the right fuel is so important.
So, if you’ve got a bag of briquettes already kicking around, or you see they’re on sale somewhere, resist. Save those for your regular charcoal grill or smoker. Perhaps donate them to a friend who isn’t quite as lucky as you are, owning a kamado.
How Much Charcoal Should You Use in a Kamado?
We find that in most situations in life, it’s best to err on the side of caution. For this situation, that means using a full load of coals every time you light up your Kamado.
You really don’t want to run out of charcoal part way through a smoke session because re-filling is, quite frankly, a pain in the you-know-what. To reload with charcoal you have to remove the grates with all your food on, possibly the heat deflectors if used, and this is just a pain.
And don’t be afraid of wasting your good lumpwood, though. You can always snuff them out when you’re done cooking just by closing the vents, then save anything that wasn’t used for another time.
Having said that, you do need to pick your spots.
Let’s say you’re setting up for some low ‘n’ slow smoking. Maybe you’ve got a nice pork butt? If that’s the case, you’ll probably be looking at a target temperature of 225 °F to 250 °F. For low temperatures, you should use only fresh fuel.
The same goes for searing over high heat. If you’re cranking your Kamado up to 500 °F (260 °C) or more, again, you want nothing but fresh lumpwood charcoal.
Why? Partially used fuel doesn’t burn as consistently or as well as new stuff. That means you’re in danger of it going out completely if you’re trying to keep the temperature down. On the flip side of that coin, it also won’t allow you to hit the rocket-launch temperatures required for a perfect sear.
For all points in between — the roasting to grilling zone of 250 °F to 500 °F — you’re OK to reuse your leftover charcoal.
The fresh charcoal you add to top up the load will balance the inconsistency of the old charcoal, and this will be perfectly fine for medium temperatures.
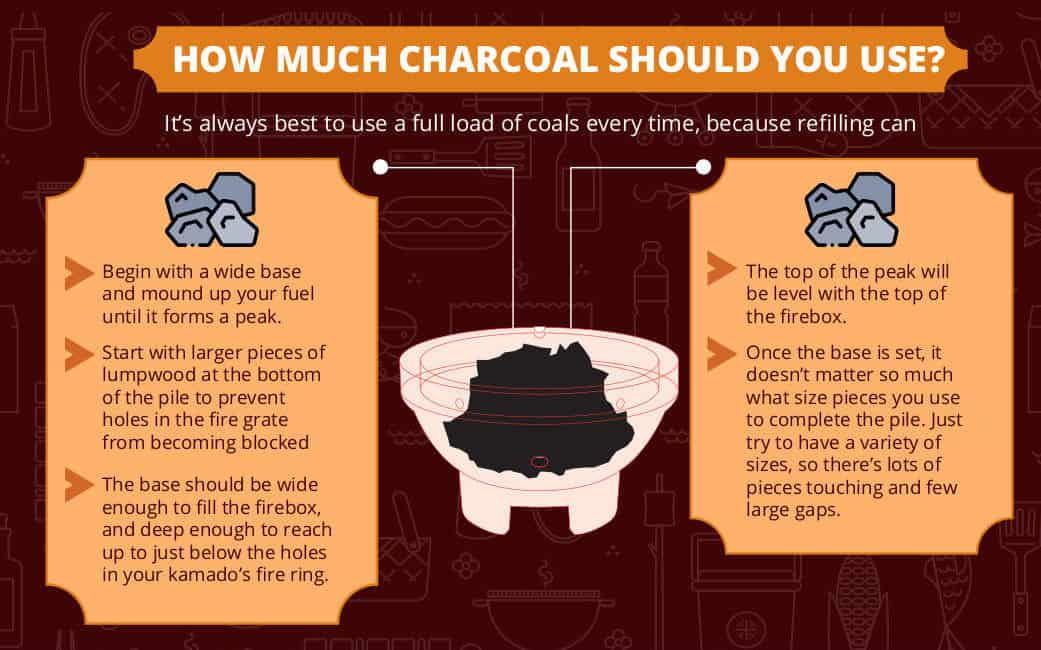
How to Configure Your Coals
It’s essential to get a good steady fire burning down at the bottom of your Kamado, and tThis starts with properly configuring your coals.
While ‘make a pile’ may not sound like ancient wisdom passed down through the ages, this is the best way to set up your charcoal.
Begin with a wide base and mound up your fuel until it forms a peak. The base should be wide, and the peak deep enough to reach up to just below the holes in your Kamado’s fire ring. The top of the peak will be level with the top of the firebox.
Start with larger pieces of lumpwood at the bottom of the pile. Why? Because this will leave gaps for airflow between the pieces and prevent the holes in the fire grate from becoming blocked. Remember, airflow providing oxygen is absolutely necessary for charcoal to burn.
Once the base is established, it doesn’t matter so much what size pieces you use to complete the pile. Just try to have a variety of sizes in your mix.
Many people think using all large pieces is the way to go, but you’ll get a more even, stable burn with smaller pieces filling in gaps here and there. Besides, the bag won’t be filled with only large pieces, so the small ones have to go somewhere.
Now that the charcoal is ready, it’s time to summon your inner Tom Hanks and make fire!
How do You Light a Kamado?
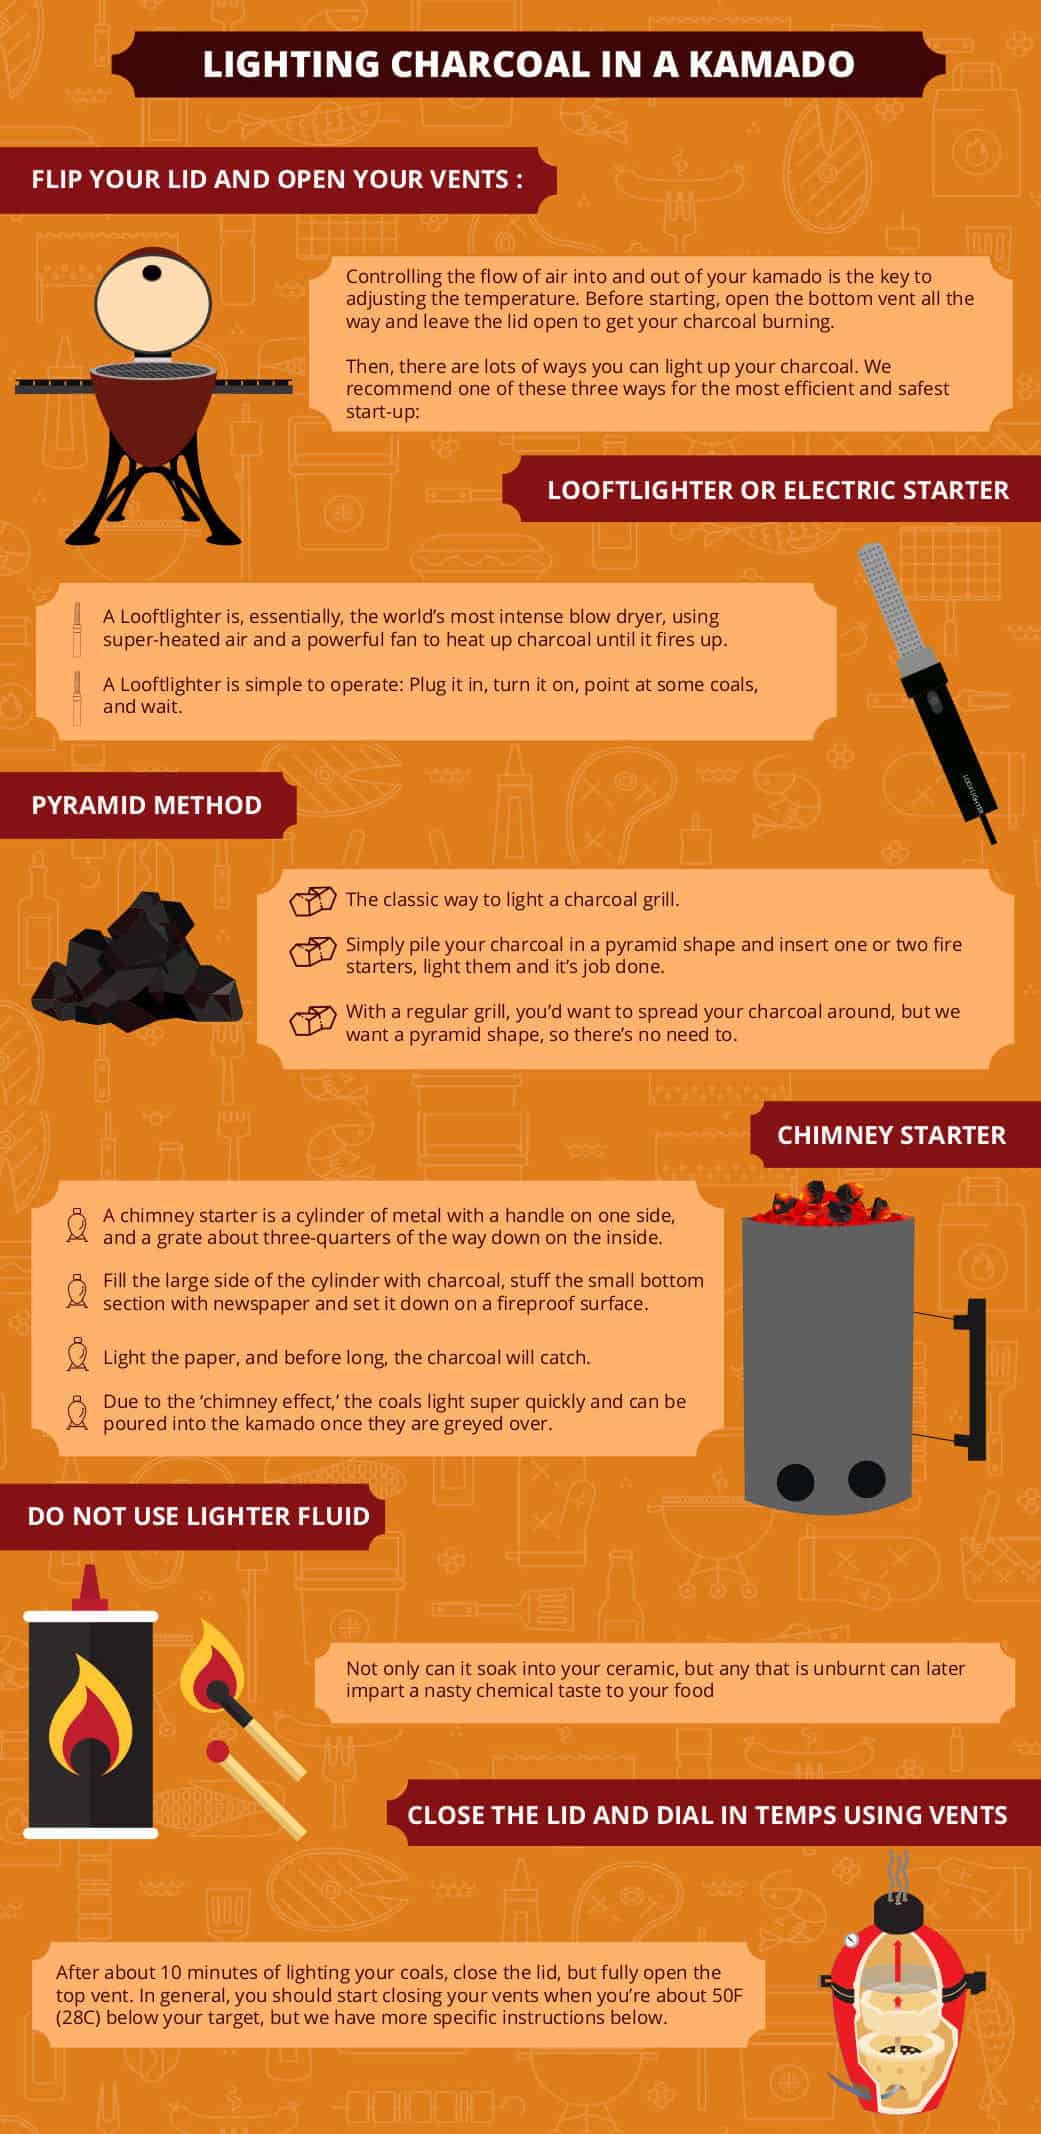
There are a few different ways you can light your kamado grill. However, we recommend only using either the standard ‘pyramid of fuel and firelighter’ method, an electric starter or Looftlighter, or a chimney starter. These three methods are the most efficient and safest way to start-up.
Pyramid Method — The Way I use Most Often Myself
This is a classic strategy used in standard charcoal grills. All you have to do is pile your charcoal in a pyramid shape and insert one or two fire starters. Just light the fire starters, and soon they will fire up the charcoal.
With a regular grill, you’d want to spread your charcoal around, but since we want a pyramid shape anyway, there’s no need to touch anything after lighting.
Looftlighter or Electric Starter — I Occasionally Do This
Perhaps the easiest way to light your charcoal is with a powered heat source such as a Looftlighter or electric starter.
Electric starters have been around for decades, and they’re simple to operate. Using an electric heating element not unlike what you’ll find on a stovetop to ignite the coals, you just plug it in, turn it on, and wait.
A Looftlighter is, essentially, the world’s most intense blow-dryer. It employs super-heated air and a powerful fan to heat charcoal until it fires up. Not going to lie — they’re pretty cool.

Chimney Starter
If you have a traditional charcoal grill, there’s a pretty good chance you already own a chimney starter. If you don’t here’s a quick synopsis of how they work:
A chimney starter is a cylinder of metal with a handle on one side, and a grate about three-quarters of the way down on the inside. You fill the large side of the cylinder with charcoal and stuff the small, bottom section with newspaper and set the whole thing down on a fireproof surface.
Light up the paper, and before long, the charcoal will catch. Once it’s nicely smoldering, carefully pour the coals into your firebox and arrange.
Of the three methods, we most recommend using a Looftlighter or fire starters. While chimneys are great, it can be awkward to pour the lit coals into your Kamado and then arrange them properly.
A Word on Lighting Fluids
If you and charcoal grilling go way back, there’s a good chance you’ve used lighting fluids. Time was, it was pretty much standard practice for cookouts. Simply squirt a flammable liquid on your briquettes, and light it up. As the fluid burned off, it set the briquettes to smoldering.
Yes, it works like a charm. It’s also a bit dangerous if you’re not careful. The biggest problem, however, is it can add a nasty chemical taste to your food. You didn’t just shell out big bucks for a kamado to eat brisket with an aftertaste of kerosene, now, did you?
In a standard grill, you can get away with using an accelerant, then letting the coals rip until every single one is burning and ashed over. At this point, you can be sure all accelerant has burned away.
With many cooking techniques in a kamado, however, you only have a small portion of charcoal lit, and close down the vents to keep a lower temperature. The fire then spreads coal to coal over many hours, allowing a very long, low n slow cook. This means that any accelerant used will not have burned off and will be present to taint the flavor of your food.
So our recommendation: NEVER use lighting fluids in a Kamado cooker. EVER.
Flip Your Lid and Open Your Vents
As we’ve said, you need oxygen for the fire to burn. Controlling the flow of air into and out of your Kamado is the key to adjusting the temperature.
For now, though, open the bottom vent all the way and leave the lid open to get your charcoal burning.
After about 10 minutes, close the lid, but fully open the top vent. In general, you should start closing your vents when you’re about 50 °F (28 °C) below your target cooking temperature, but we’ll have more specific instructions on this later.
A Note on Hitting Target Temps — do Not Go Over!
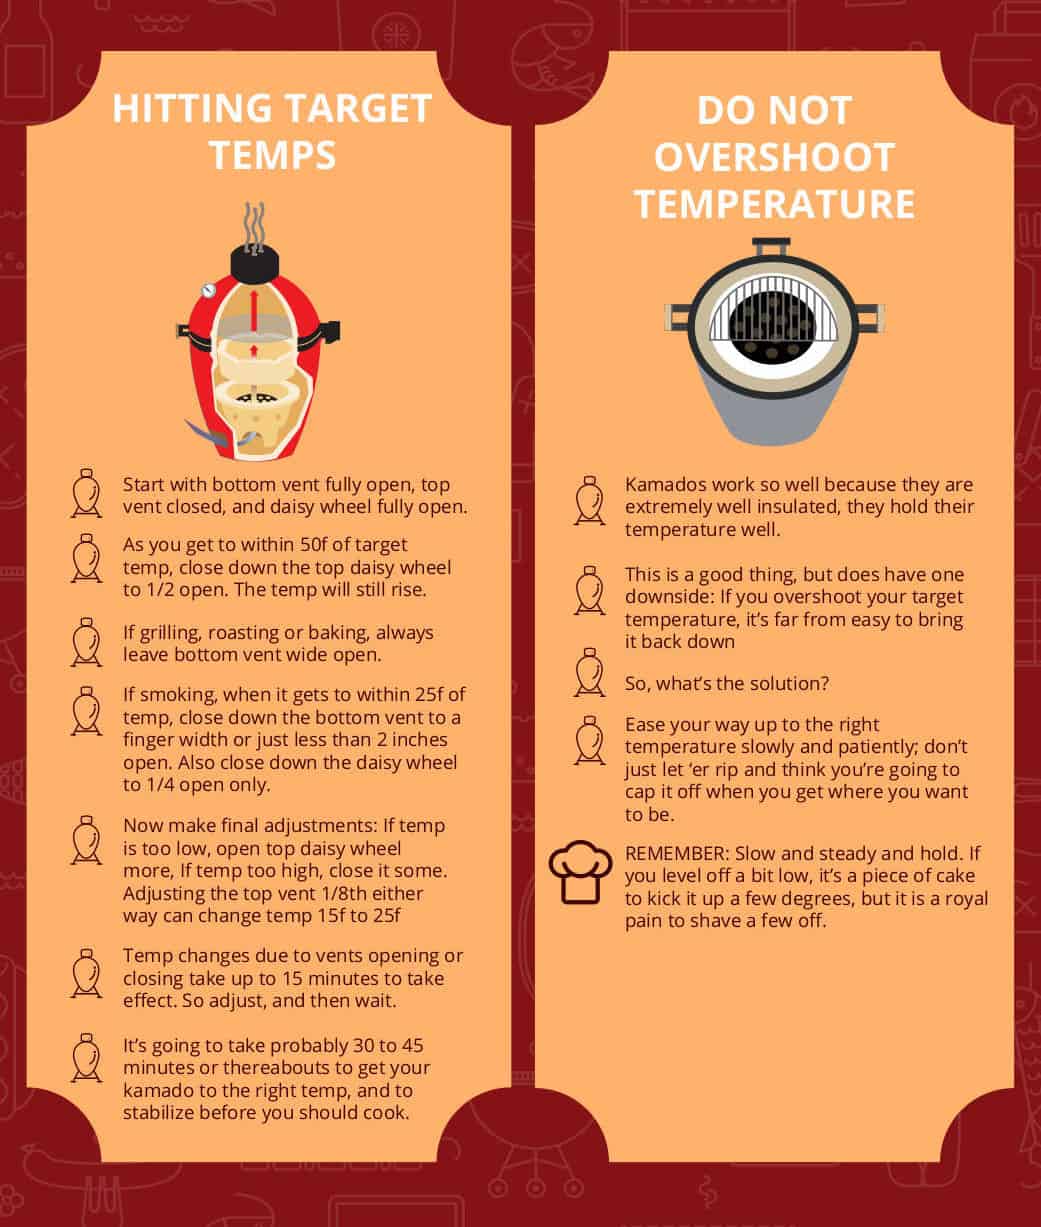
As we discussed earlier, kamados work so well because they are exceptionally well insulated. That means they hold their temperature — the key to great smoking and grilling — and once you’ve hit your target temperature, they hold on to it like a kid with an ice cream cone.
For as much as this is a good thing, it can also become a problem: if you overshoot your target temperature, it’s far from easy to bring it back down to where you need it. Damn you, Kamado, and your brilliant construction!
So, what’s the solution?
Ease your way up to the right temperature slowly and patiently; don’t just let ‘er rip and think you’re going to cap it off when you get where you want to be.
Start with both vents fully open, and as you get to within 50 °F of your target, close down the top vent to slow down the climb.
Then, as you get to within 25 °f, either close down the bottom vent by half, or the top vent further, depending on what style of cooking you are cooking (and explained more below.)
Then, tweak by opening and closing the top vent to hit your desired cooking temperature. Opening it slightly increases temp, closing it slightly decreases temp. Just be sure to wait for a good 10 to 15 minutes after a vent tweak to see the effects.
Be Patient!
It’s going to take probably 30 to 45 minutes to get your Kamado settled at the right temperature and to have allowed the walls to absorb enough heat for perfect convection cooking action.
Remember: slow and steady and hold. If you level off a bit low, it’s a piece of cake to kick it up a few degrees, but it’s a royal pain to shave a few degrees off if you go over.
How do You Set up a Kamado for the Different Ways to Cook?
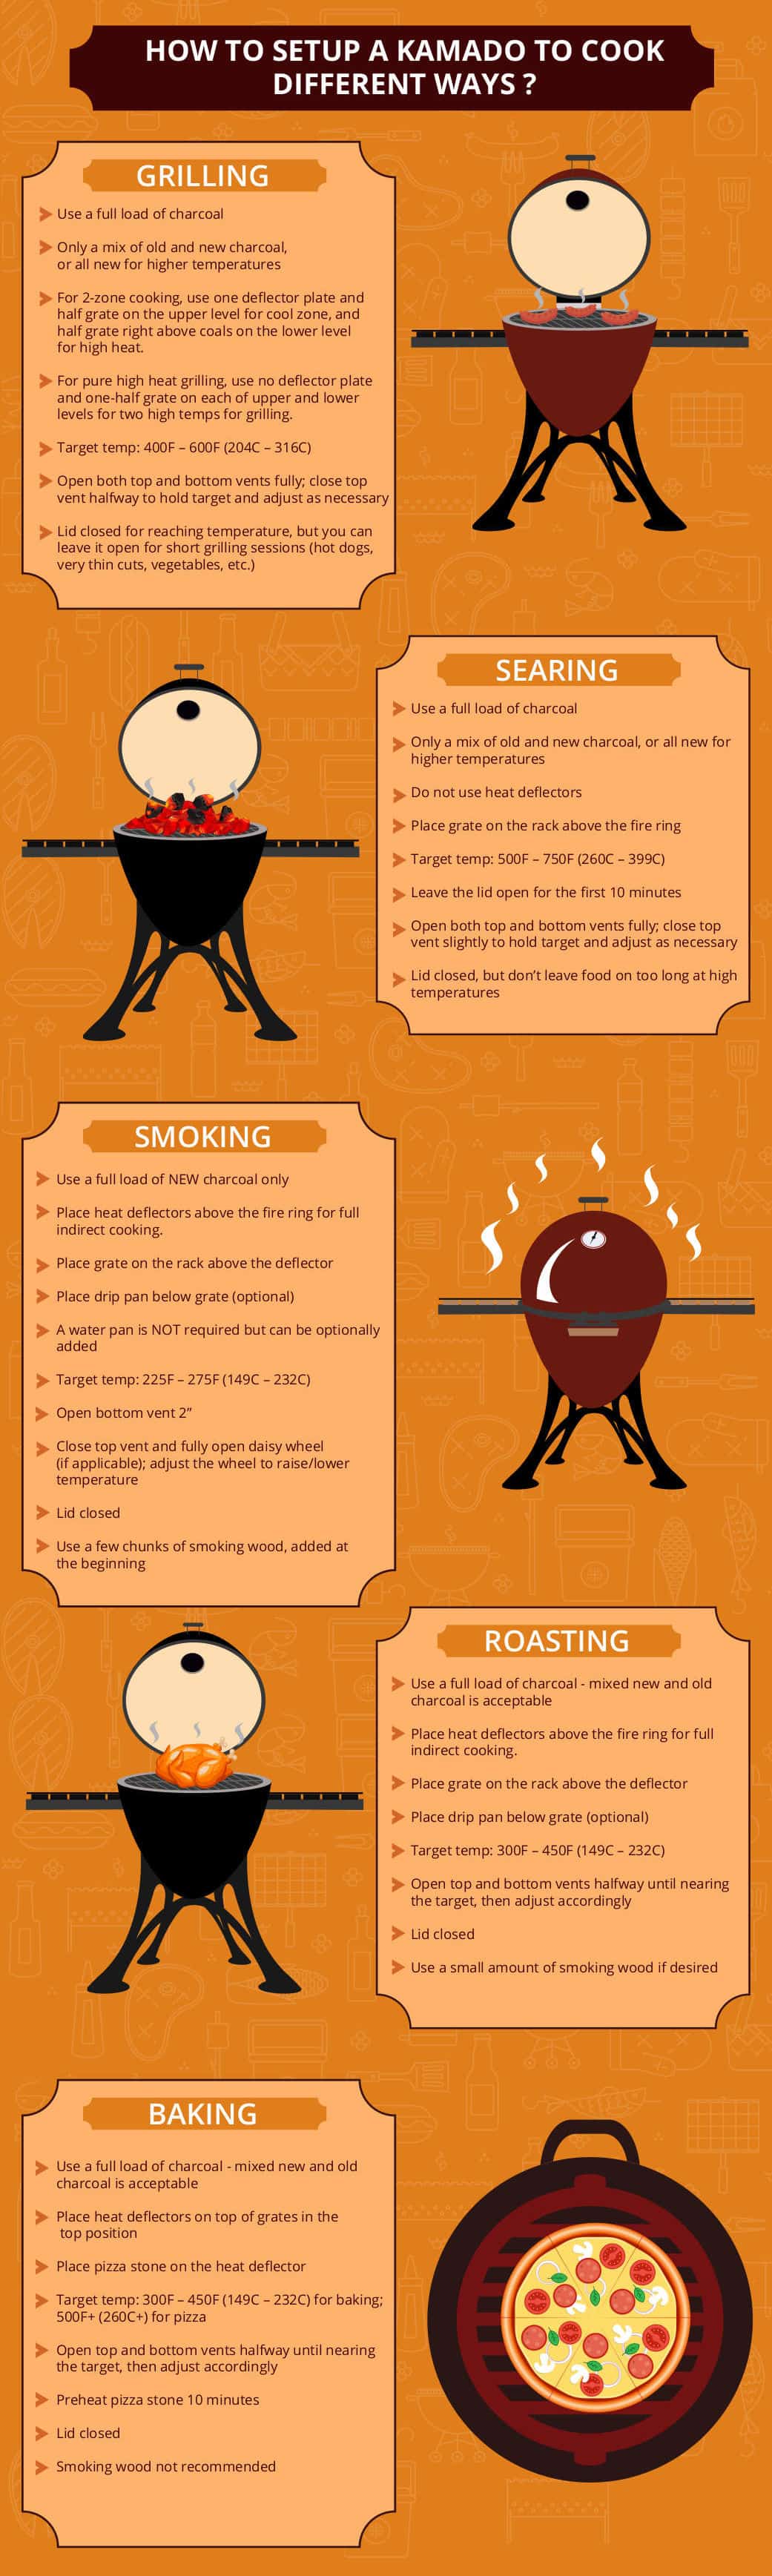
We mentioned at the beginning that there are many ways to cook with your Kamado. So how do you set it up to cook all the many different ways?
Here, we’re going to give you what you need to know to set yourself up for the best possible results for each kind of cooking.
How do you Set up a Kamado for Smoking?
To set up a kamado for low and slow smoking:
- Use a full load of charcoal
- Only use new charcoal
- Place heat deflector above fire ring
- Place grate on rack above deflector
- Place drip pan below grate (optional)
- A water pan is NOT required
- Target temp: 225 °F – 275 °F (107 °C – 135 °C)
- Open bottom vent 2”
- Close top vent and fully open daisy wheel (if applicable); adjust wheel to raise/lower temperature and wait 15 minutes
- Lid closed
- Use a few chunks of smoking wood, added at the beginning.
How do you Set up a Kamado for Grilling?
To set up a kamado for grilling:
- Use a full load of charcoal
- Only a mix of old and new charcoal, or all new for higher temperatures
- Do not use heat deflector
- Place grate on rack above fire ring
- Where possible/desired, use half the grate on upper level and half on lower for 2-zone grilling
- Target temp: 400 °F – 600 °F (204 °C – 316 °C)
- Open both top and bottom vents fully; close top vent halfway to hold target and adjust as necessary
- Lid closed for reaching temperature, but you can leave it open for short grilling sessions (hot dogs, very thin cuts, vegetables, etc.)
How do you Set up a Kamado for Searing?
To set up a kamado for searing:
- Use a full load of charcoal
- Only a mix of old and new charcoal, or all new for higher temperatures
- Do not use heat deflector
- Place grate on rack above fire ring
- Where possible/desired, use half the grate on upper level and half on lower for 2-zone grilling
- Target temp: 500 °F – 750 °F (260 °C – 399 °C)
- Leave lid open for first 10 minutes
- Open both top and bottom vents fully; close top vent slightly to hold target and adjust as necessary
- Lid closed, but don’t leave food on too long at high temperatures
How do you Set up a Kamado for Roasting?
To set up a kamado for roasting:
- Use a full load of charcoal
- Mixed new and old charcoal is acceptable
- Place heat deflector above fire ring
- Place grate on rack above deflector
- Place drip pan below grate (optional)
- Target temp: 300 °F – 450 °F (149 °C – 232 °C)
- Open top and bottom vents halfway until nearing target temp, then adjust accordingly
- Lid closed
- Use a small amount of smoking wood if desired
How do you Set up a Kamado for Baking?
To set up a kamado for baking:
- Use a full load of charcoal
- Mixed new and old charcoal is acceptable
- Place heat deflector above fire ring
- Place pizza stone on the heat deflector
- Target temp: 300 °F – 450 °F (149 °C – 232 °C) for baking; 500 °F+ (260 °C+) for pizza
- Open top and bottom vents halfway until nearing target temp, then adjust accordingly
- Preheat pizza stone 10 minutes
- Lid closed
- Smoking wood not recommended
Adding Smoking Wood — And, Erm, Burping?
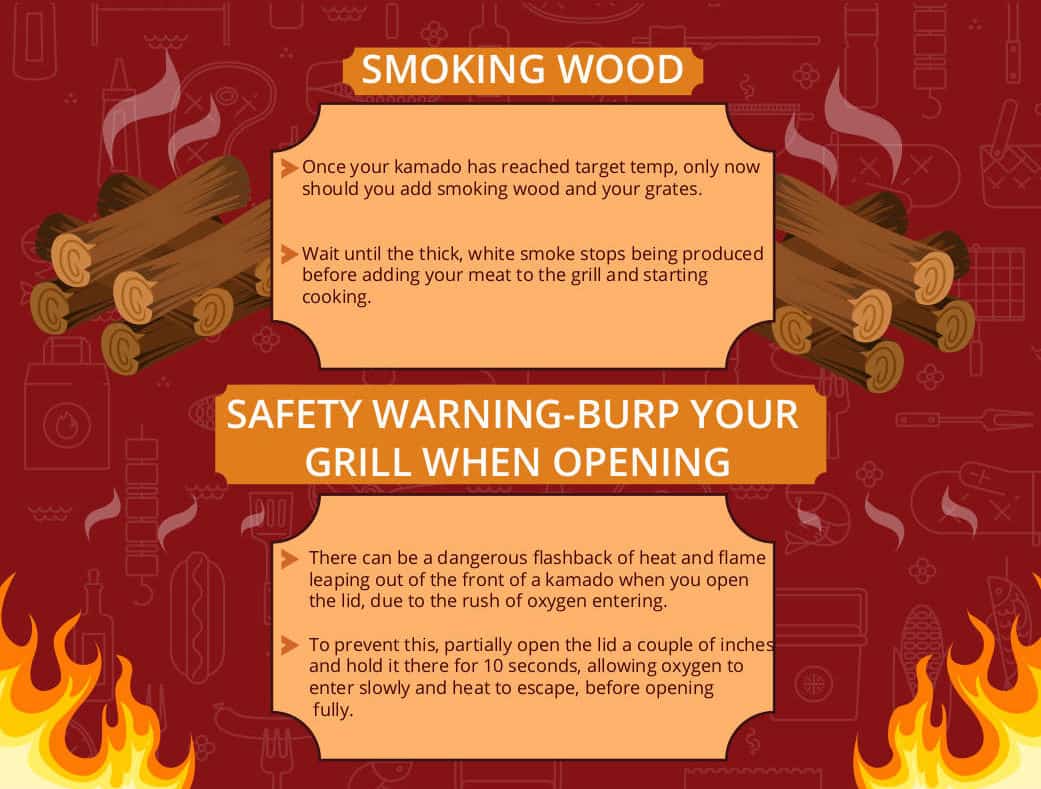
One of the great things about a kamado grill is…it’s not just a grill. It’s an accomplished smoker too! Here’s how to add smoking wood to your kamado.
Whatever you’re cooking, adding a lick of smoke can seriously ramp up the flavor and take your food to new heights. To do so, you need to add smoking wood.
Not all smoke is good smoke, though. When we’re smoking foods, we certainly want to avoid creosote depositing black smoke. We also want to avoid thick clouds of white smoke when possible. Too much of this can taste bitter and acrid, a bit like eating an ashtray (though I’ve never eaten an ashtray, honest!)
What we ideally want is a thin blue smoke. This is a barely perceptible smoke. But trust me, if there is unburned wood in your Kamado on or within the hot coals, smoke is being generated and adding flavor, you can just barely see it.
To achieve this, what you want to do is bring your Kamado up to a stable cooking temperature. Only then add your smoking wood and grill grates. At first, the smoke will be thick and white. Wait for this thick white smoke to die down, and then add your food.
Some white smoke is OK, but thick billowing plumes is not. Wait for it to pass, you will still get a smoky flavor, trust me.
When It’s Acceptable to Burp
For shorter cooking sessions, it is sometimes necessary to lift the lid and see how things are going. What you don’t want to do is flip the lid all the way open, then stick your face right in.
Massive amounts of heat build up under the dome, and suddenly opening the lid may unleash a wall of searing heat or a ball of flame as oxygen from the air rushes in and fuels the flames. Either one of those in your face could have devastating consequences for your eyebrows!
If you need to open the lid, first raise it just a couple of inches to ‘burp’ your Kamado, to let more oxygen in, and let some heat escape safely.
After 5 seconds or so, go ahead and open it the rest of the way, though it’s still a good idea to keep your face clear, just in case.
To see how serious this issue can be, check out this slow motion video of a manufactured fireball after completely closing all vents and then opening the lid:
It’s Finally Time to Add Your Food
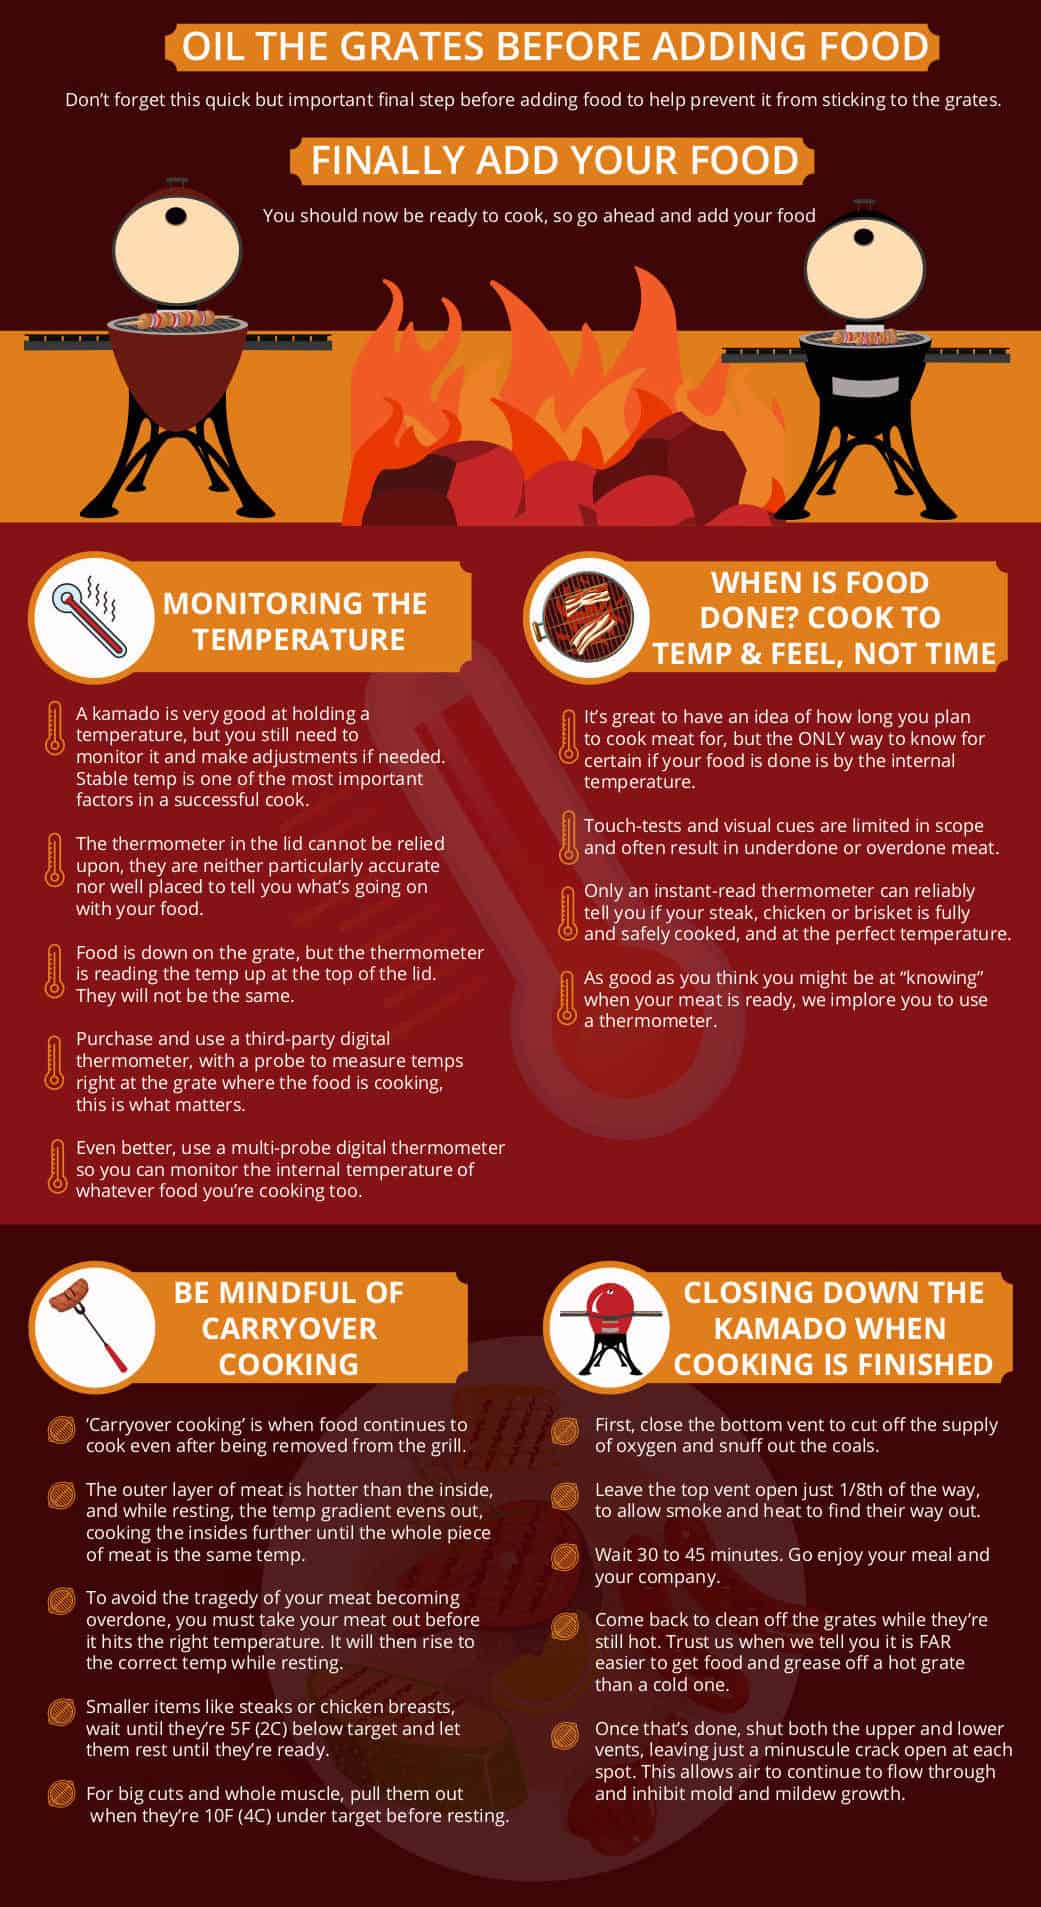
Now you’re all set up correctly, the fire’s lit, your Kamado has come up to and settled on the correct cooking temperature, you’ve added wood (maybe), and the smoke has stopped billowing — it’s now time to add your food.
But wait! Before you do, you should oil your grates. This will help prevent the food from sticking while cooking.
So soak a paper towel in cooking oil, and then use your BBQ tongs to rub them all over the grates where you will place your food. Then go ahead and do so.
We’re finally cooking!
How do You Monitor Temperature in a Kamado?
You may be thinking, based on what we said earlier, that with such perfect insulation, once you’ve hit your target temperature, your job is done? Your Kamado will now hold that temperature forever and ever. Well, yes and no.
While a kamado is very, very good at holding a temperature, you’ll still need to keep at least one eye on things. Remember, a consistent temperature is the number one most important factor in a successful kamado session, success being measured by how delicious the food turns out.
Well, there’s a thermometer in the lid, isn’t there? Isn’t it enough to check on that from time to time? That would be a no.
It’s great to have a lid thermometer for a vague reading on whether it is or is not hot inside your Kamado. Unfortunately, they are neither particularly accurate nor well-placed to tell you what’s going on with your food.
Think about it: Your food is down on the grate, but thermometer is reading the temperature up at the top of the lid. No good.
The best way to monitor the temperature in your Kamado is with a third-party digital thermometer. By mounting a probe inside the Kamado right at the grate, you can read the temperature where the food is cooking, and that’s what matters.
Even better, you can use a multi-probe digital thermometer. With one of these, you can monitor not only the grate temperature but also the internal temperature of whatever you’re cooking. By doing so, you’ll know exactly when your food is ready, taking all the guesswork out of your job. This is especially useful for low ‘n’ slow smoking and roasting, processes that can go on for hours.
Alternatively, you can use an instant-read thermometer that you just stick in your meat whenever you want to check on it. They’re fast and efficient and don’t require any apps or remote monitors. An instant-read is especially useful for “lid up” grilling like steaks and burgers.
Cook to Temperature and ‘Feel,’ Not Time
Every recipe in every book and every internet site tells you how long to cook for. (Honestly, we haven’t verified that by checking every recipe, but it’s close enough, surely.) This can only ever be an approximation, though, not a precise measurement.
It’s great to have an idea of how long you plan to smoke, roast, broil, or whatever, so you can plan your day. But, the ONLY way to know for sure if your food is perfectly done (and this only applies to meat) is by the internal temperature.
Only a thermometer can reliably tell you if your brisket, picnic shoulder, turkey, or chicken is thoroughly and safely cooked, while also avoiding it becoming overcooked.
As good as you think you might be at “knowing” when your meat is ready, we ask you — no, we implore you — to use a thermometer to protect yourself from nasty overcooked food, and, most importantly, dangerously undercooked food.
So use an instant read thermometer to check the internal temperature of your food to see when it’s done. And if you don’t have one, check out our guide to the best instant reads on the market.
Be Mindful of Carryover Cooking
Ready for a monkey wrench? Picture this…
You’ve been smoking a stupidly expensive cut of meat for hours, the anticipation building all day long. Finally, your digital thermometer readout informs you that you’ve hit the safe eating temperature — the time has come!
You remove the meat from your Kamado and set it on a platter while you gather the clan and get ready to chow down. When you finally cut into your masterpiece… it’s overcooked! What happened?
You’ve fallen victim to ‘carryover cooking’, that’s what happened.
So much heat accumulates on the outside of a piece of meat while cooking (it’s in contact with very hot air) that the inside the meat, where you are taking measurements, continues to cook for a bit. This happens even after it’s been removed from the Kamado. In fact, this applies to all forms of cooking, on any equipment.
To avoid this tragedy, all you have to do is take your meat out before it hits the right temperature. How soon? Well, we measure that in degrees, not time.
For example, for smaller items like steaks or chicken breasts, wait until they’re 5 °F (2 °C) below target and let them rest until they’re ready. For big cuts and whole large muscles, pull them out when they’re 10 °F (4 °C) under target before resting.
During the rest, the meat will carryover cook and settle perfectly at your target temperature. Pretty cool when you know how, huh?
How do You Close Down a Kamado When You’ve Finished Cooking?
Once you’re all done cooking, and the food is resting, this is how to to shut down your Kamado, kill the fire and close it down.
First, close the bottom vent to cut off the supply of oxygen and snuff out the coals. Leave the top vent open just a little, maybe 1/8th of the way, to allow smoke and heat to find their way out.
On average, it will take anywhere from 30-45 minutes for the fire to go completely out, depending on how intense it was to begin with. So leave it for an hour minimum. Go enjoy your meal and your company, and then come back to clean off the grates while they’re still hot. Trust us when we tell you it is FAR easier to get food and grease off a hot grate than a cold one. Just remember to wear your gloves to prevent burns.
Once that’s done, shut both the upper and lower vents, leaving just a minuscule crack open at each spot. This allows air to continue to flow through and inhibit mold and mildew growth.
When you’re sure it is fully, completely, 100%, totally cooled down, go ahead and put your cover on and/or move it into storage. Placing a cover on a still-warm grill may damage your cover, so do make sure the Kamado is entirely cooled.
Kamado Cooking Safety Tips
We’ve mentioned a few important safety guidelines for using your Kamado, but we’re going to list them, and others, here, just in case you missed them. Safe operation of your Kamado is good both for you and for your grill.
- Avoid dangerous ‘flashbacks’ (also called “backdraft”) of built-up heat; before fully opening lid, open 2-3 inches for 5 seconds to allow heat to escape before opening the rest of the way
- Never use your Kamado indoors or in a garage
- Do not attempt to remove or discard hot ashes
- Never use on any surface that isn’t heat-resistant
- Keep kids and pets away while in use
- Never move a kamado while in use
- Use on a level surface
- Don’t look into the top vent while in use
Now You Know Kamado
By now, you’re either ready to get out there and start making masterpieces on your Kamado, or you’re itching to buy one of your own.
Owning and using a kamado can be an incredibly rewarding experience for those who genuinely love smoking and grilling. So best of luck on your grill-outs, and if you need any further advice or help, please do hit me up in the comments below, I’m always happy to help.
If you know someone who’s thinking about going Kamado (not going commando; that’s a whole other issue, and we’re not touching it), make sure to hook him or her up with this guide on how to use a kamado grill.
Many thanks for being with us today, and enjoy your grilling adventures!


Thanks for this article geezer. Just bought a monolith today and found it by chance. Very informative and I will be referring to it regularly for a while. Good man.
Cheers, Ben. Welcome to the Kamado club…it’s addictive!
Hello Mark
We have purchased a kamado 3 and had a practice smoke of a pork butt. It worked well, but I guessed poorly on how much charcoal to use. My wife finished it of for 35 mins indoors. Hope I can get lots of help and will fill my firebox next cook. G
For long cooks like pork butt, brisket etc. I just fill it right up. When you’re finished cooking, fully close the bottom vent, leave the top one open just a tiny, tiny amount (allowing it to vent a bit) and the coals will be starved of oxygen and go out, to be used on the next cook. You can simply rake them over with the ash tool, empty out the ash drawer, add fresh coal to the old stuff, cook again. No wasted coals, but also no fear of running out mid-cook.
Really enjoyed your article. Thanks for taking the time to put it together. Just purchased a Kamado Big Joe a few months back, and I’m loving the journey. Lots to learn, especially smoking a brisket. On my 3rd one.
Hi Mike,
You went ‘Big’? Good choice. Nobody ever said: ‘I wish I had a smaller grill!’ lol.
I use my Big Joe way more than any other grill or smoker I own these days. When I fire up to cook, I tend to load it up, portion it off, vac pac it, and reheat during the week(s) for meals (family of 4 here.) I absolutely love the thing, the food it creates, and it’s capacity (I have extra grates and grill expander.)
Best of luck with your journey, I know you’re going to love it!
Thank you for this very informative article. I have finished restoring an Imperial Kamado and excited about learning how to create the right fire temperature for all the different cooking methods.
My question; How do I regulate the starting of a fire and fire during cooking when the top vent of the Imperial Kamado is a simple cap. There are no vents or dials.
Thank you.
Hi, Haveen,
I’m yet to come across an imperial kamado myself, so am not entirely sure on their components, but surely the top vent is adjustable, no? I’ve had a quick skim through the manual for one, and it suggests that they are adjustable, both the ‘damper top’ and ‘slide’ version.
Check out the manual here, read through and see if it helps: Imperial Kamado manual.
At last! Some straightforward info on using our new kamado. 5 attempts, one success and nearly a divorce so far. Most sites spend more time suggesting recipes. I can already cook. Just needed concise instructions on the lighting and running of my new toy. Thanks very much and off to set up for my spatchcock chicken.
Thanks, Yvonne. I’m sure you’ll nail it very soon. It’s like most things, there’s a n initial learning curve, a few mistakes to make and learn from, and then you’ll master it. Best of luck, and welcome to the world of kamado cooking!
Great guide best so far in the internet!! Thanks it will help a lot to starters like me!
Thanks, Fernando. Best of luck!
Hi Mark thanks for a great comprehensive guide. I hope you don’t mind but I have a question I’ve not been able to get an answer to. I love the smokiness the Big Joe 3 gives but I also like the crispy finish (not blackened – just like say a good roast chicken). I have a joetisserie and have tried unsuccessfully to part cook say a Guinea Fowl or Chicken with the lid shut (Smokey flavour) and then open to get a crispy finish and not too Smokey. I try and avoid cooking directly over the coals as you then get the fat dripping on them causing those not so healthy flames and smoke. So I push the coals to one side so it’s indirect but I can never control the temperature sufficiently to finish off to a good crispy cook without burning. If I leave the lid on throughout the taste is great but the skin is soft. Any ideas ?💡 Thanks so much Anthony
Hi Anthony.
I have an article on crispy chicken skin, which may give you some tips.
Anyway, try the following: Smoke indirect low and slow with either the Slo-roller or deflector plates in place, with wood chunks placed on top of the charcoal, not mixed in, until you get your desired smoke level. Then remove remove the chicken, remove your Slo-roller / deflector plates to gain access to the coals. Now use tongs to remove all the wood chunks, to stop any further smoking. Then set up to use the deflector plates only in an upper position, open up your vents to get a high heat indirect cook to finish the chicken and crisp up the skin. Do not use the Slo-roller for high heat though, it will melt! This way you can still perfectly control the high heat with vent control.
Thanks for the very informative article. I purchased the Big Joe ll. Looking forward to firing it up!!
This is great, except nowhere do you distinguish between a top vent and daisy wheel. A daisy wheel is a top vent isn’t it?
The statements then are contradictory: “Close top vent and fully open daisy wheel (if applicable); adjust wheel to raise/lower temperature and wait 15 minutes”
Hi Tom. On the Kamados with a daisy wheel style chimney, there are two parts:
1. The small wheel that turns with the holes in it, is the daisy wheel.
2. The whole thing can ‘slide open’ which is what is meant by the ‘top vent.’ Please see the image here for an example: Kamado top vent open.
I’ll try to go over the article again soon to update it and make it clearer.
Thanks for the in-depth and informative article. I did notice that your Celcius conversions for the Smoking recommendations are incorrect (as they are the same as the Roasting ones).
Thanks for helping this smoking newbie
Hi Michael,
Thanks for pointing out the conversion errors. I have quickly changed that in the text, and will need to get an edit made for the graphics.